
I am a member of a papercutting forum on
facebook and someone recently asked how to produce a template.
As I mentioned before, this is my first BIG tutorial using screenshots so it is truly a learning curve for me.
After it goes live and I have a bit more time, I think I shall break it down, one post per method, save the confusion. I'll also resize the screen so there is less clutter for you. Any other suggestion that you can give on how I can improve my tutorials is GREATLY welcomed, be kind I am a Mummy on the edge :) but it will really help me to improve how I produce future tutorials.
Coming soon, video tutorials for those who prefer video.
Thank you for visiting. I am on Instagram, facebook, twitter, Etsy and soon Youtube. Links at the side if you would like to like, follow, say hello or give feed back there or in the comments below.
Thanks again xxxx
Now I don’t use a template per se, well in
theory I do, as I cut around the lines that I draw and if I wish to neaten something
or duplicate some work I scan in the image to make multiple prints and amendments. But I don't use the ones that grey out all areas to be cut away.
However, my degree was in Multimedia Technology
and I use a variety of design software, so I can explain what I’d do, were I to
produce a template.
So, I thought I’d explain how you can use
design programmes to create a template.
I won’t make any assumptions about your
knowledge of Photoshop so I will address this to a novice, with step by step
images.
This is my first big tutorial using screenshots and although I tested the steps, I write it so am not the best test subject. If it is broken somewhere along the way, PLEASE do let me know so I can fix it, I'm supposed to be helping, not confusing!
This is my first big tutorial using screenshots and although I tested the steps, I write it so am not the best test subject. If it is broken somewhere along the way, PLEASE do let me know so I can fix it, I'm supposed to be helping, not confusing!
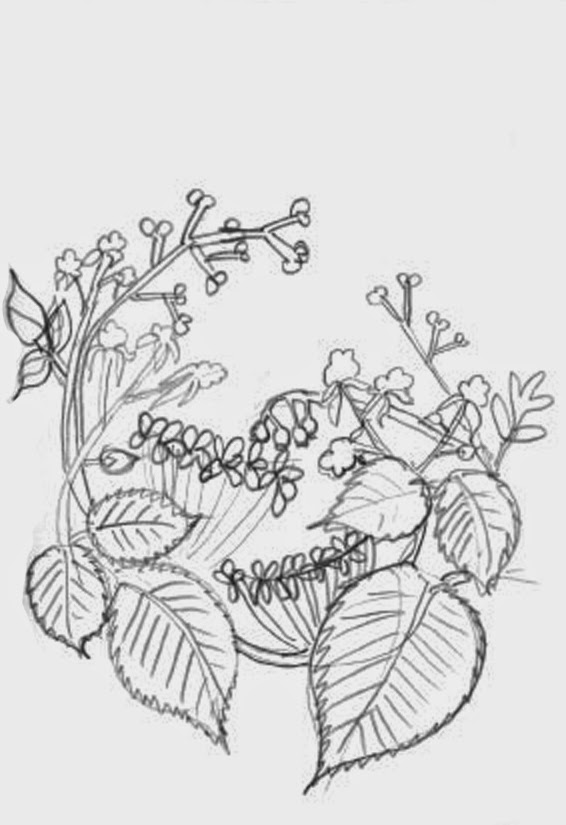 |
| Start by scanning a sketch into your computer, I am using Brambles. |
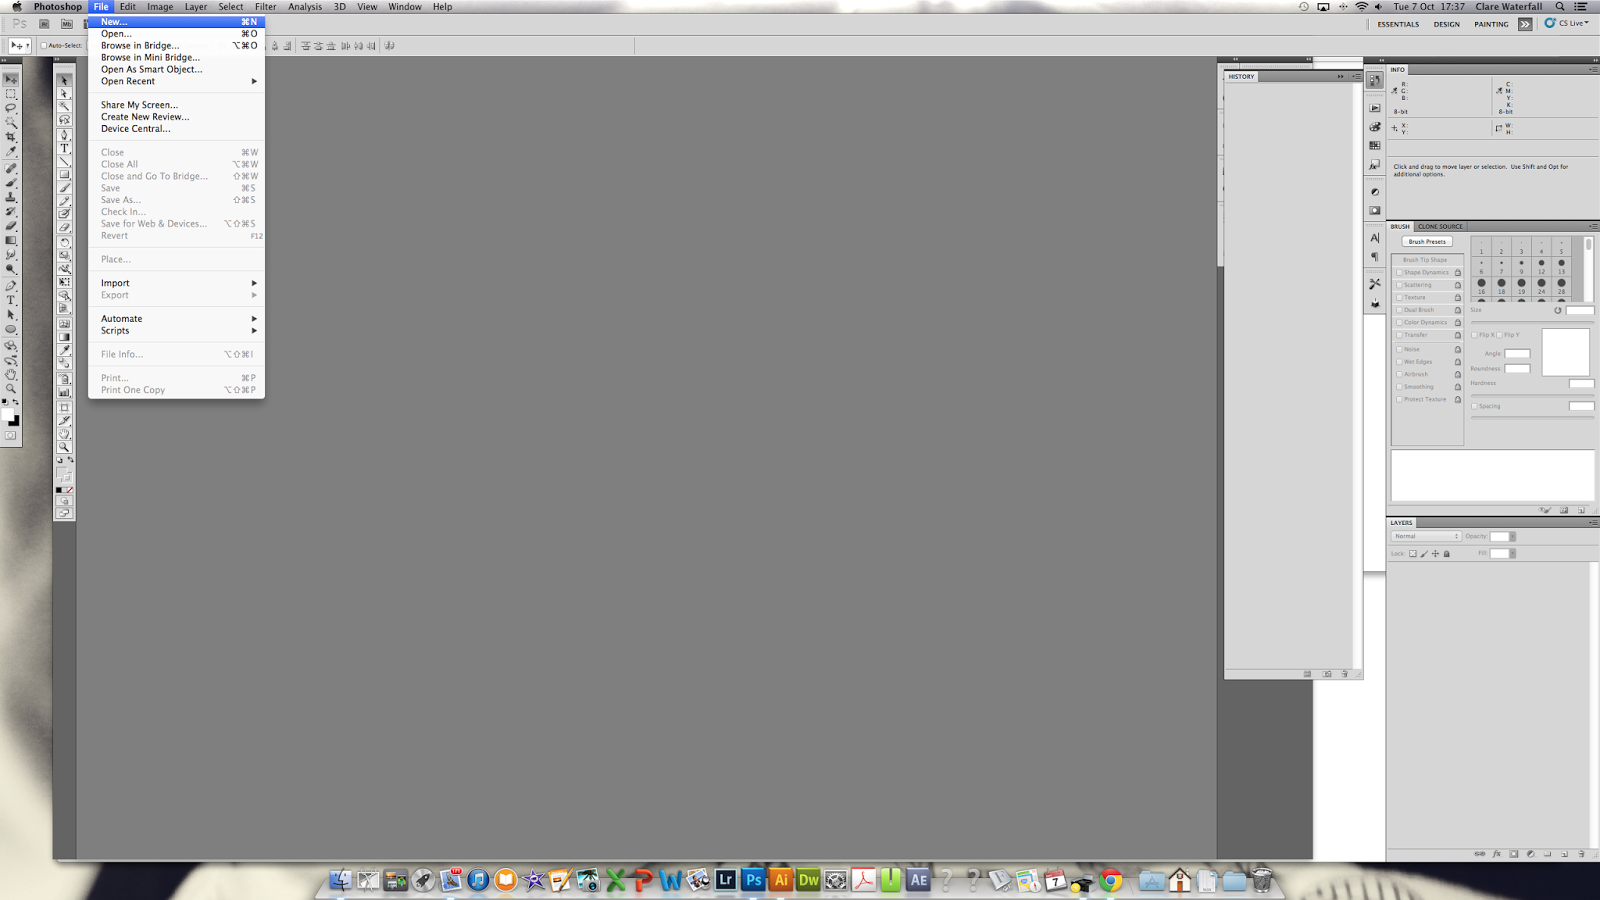 |
| Open Photoshop and select 'New' to create a new picture. The are in which you work is called a canvas. |
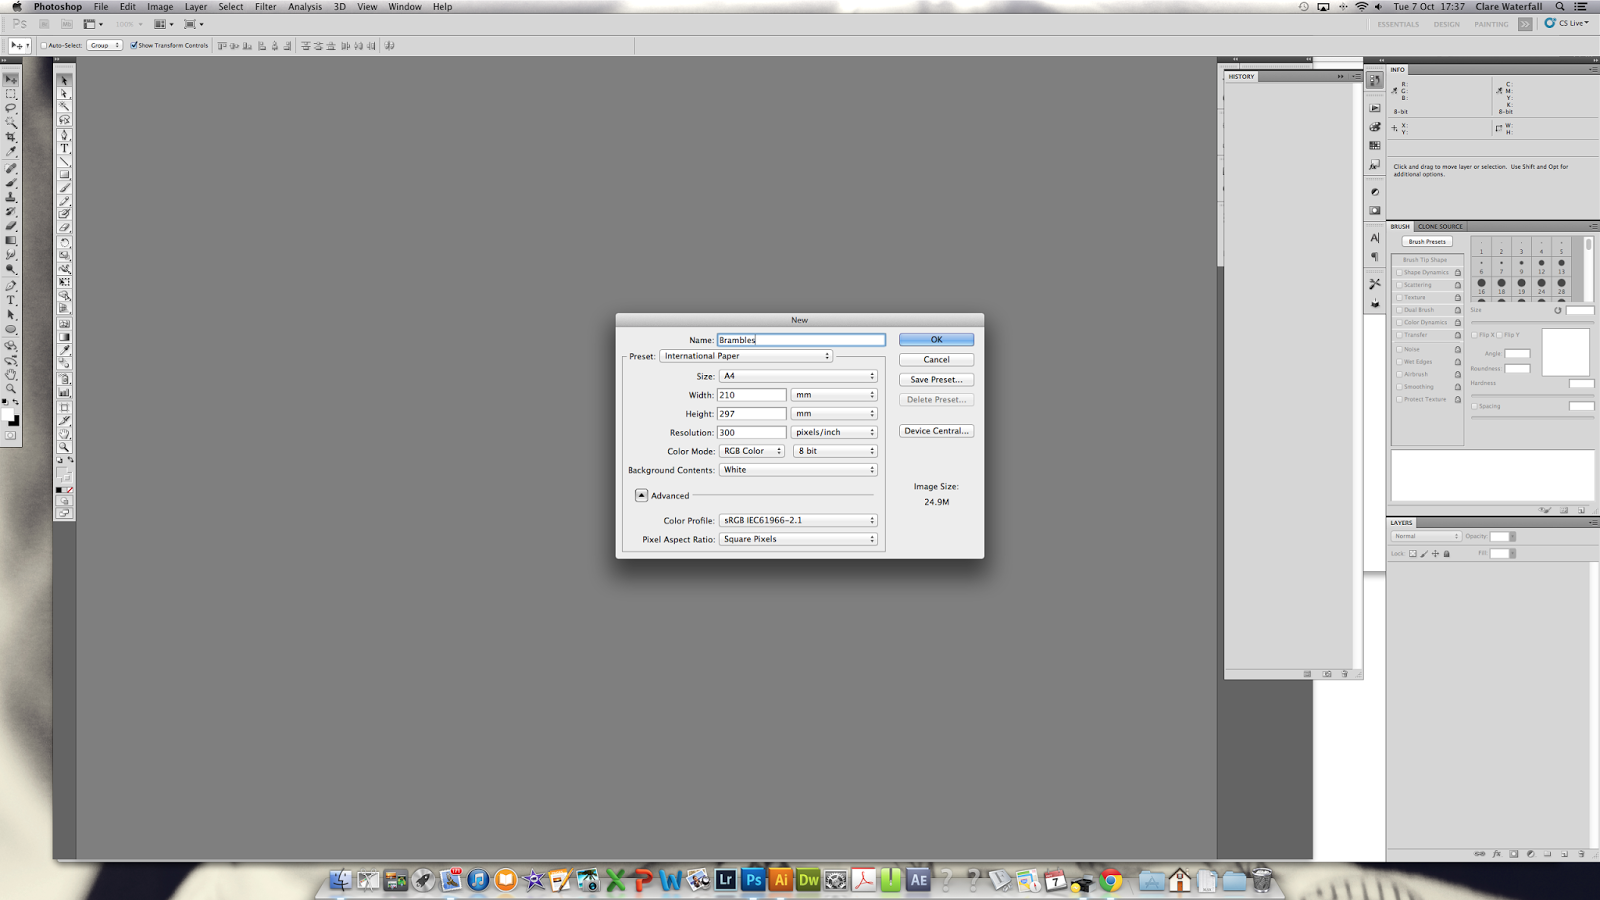 |
| Select the size canvas you want, there are presets for International paper (e.g. A4 etc.) If your size isn't in a dropdown simply add your own figures. You can use mm, cm, pixels etc. to customize the size and scale. I would at this stage reccommend that you also name your document (picture/canvas) for saving purposes. Give it a save. |
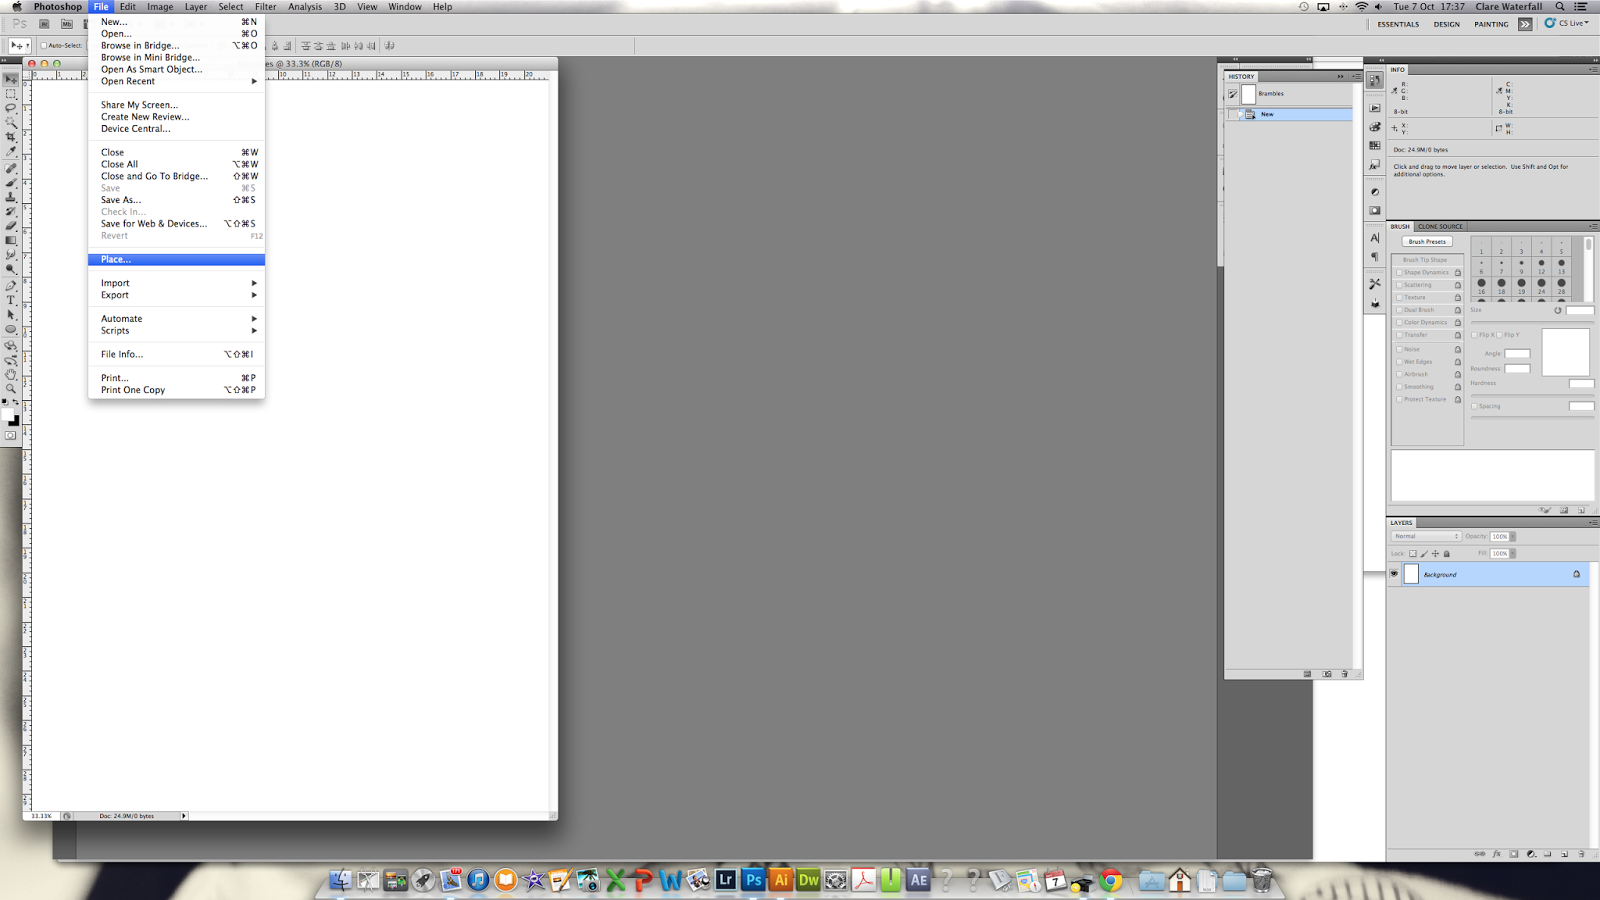 |
| You now want to 'Place' your scanned drawing. |
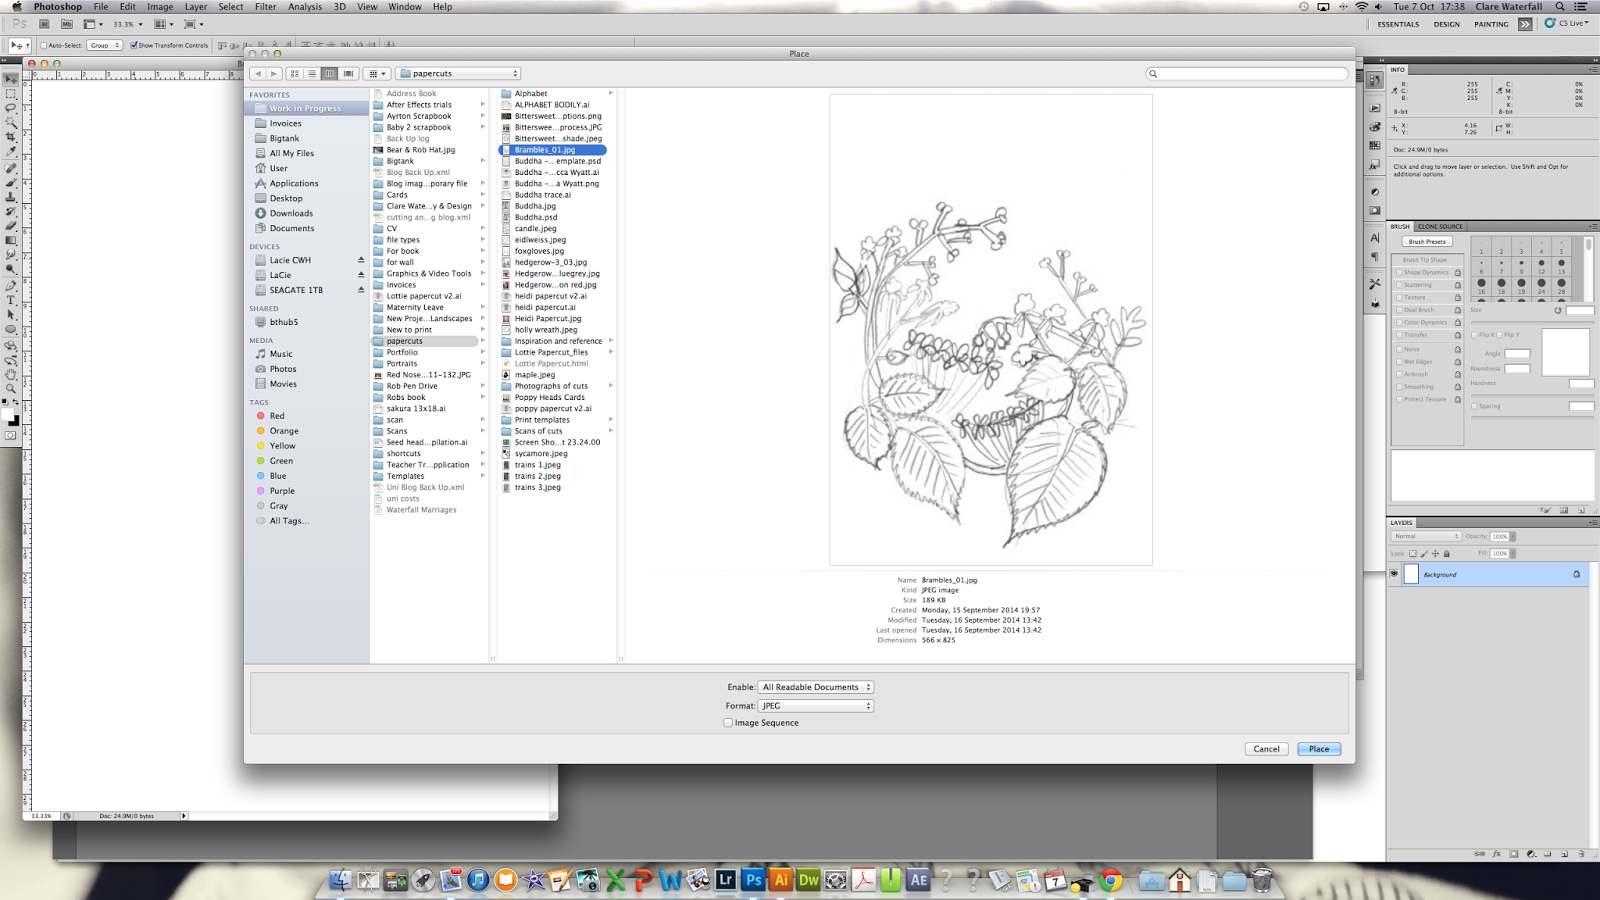 |
| Select the file of your sketch and hit place (highlighted in blue) |
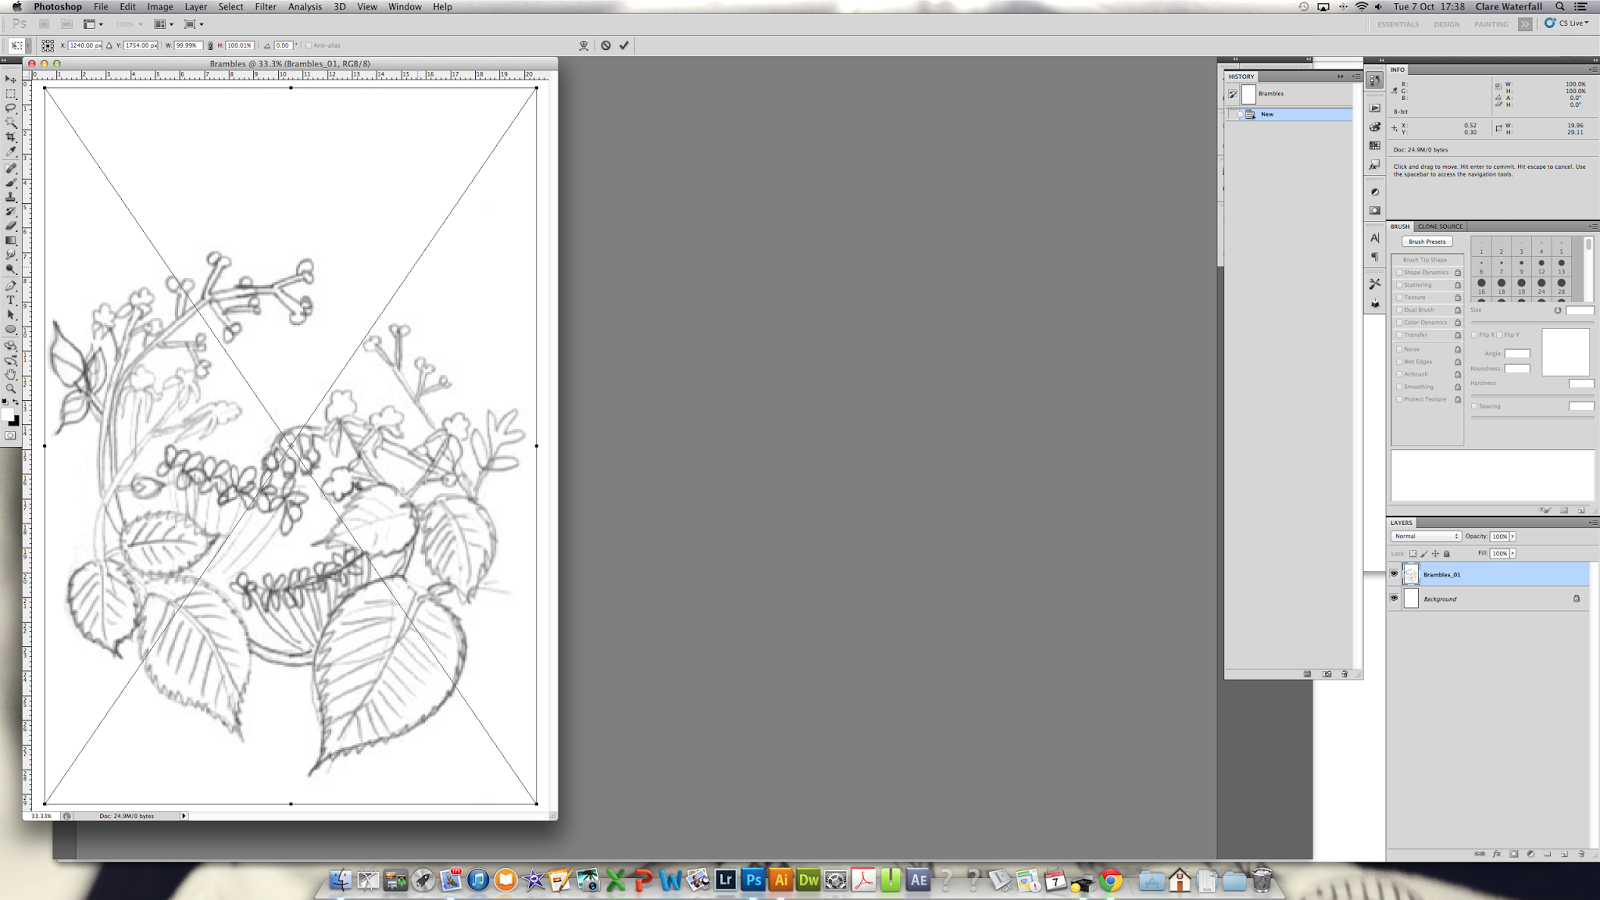 |
| You can hit the return key to place the image if you are happy with the placement |
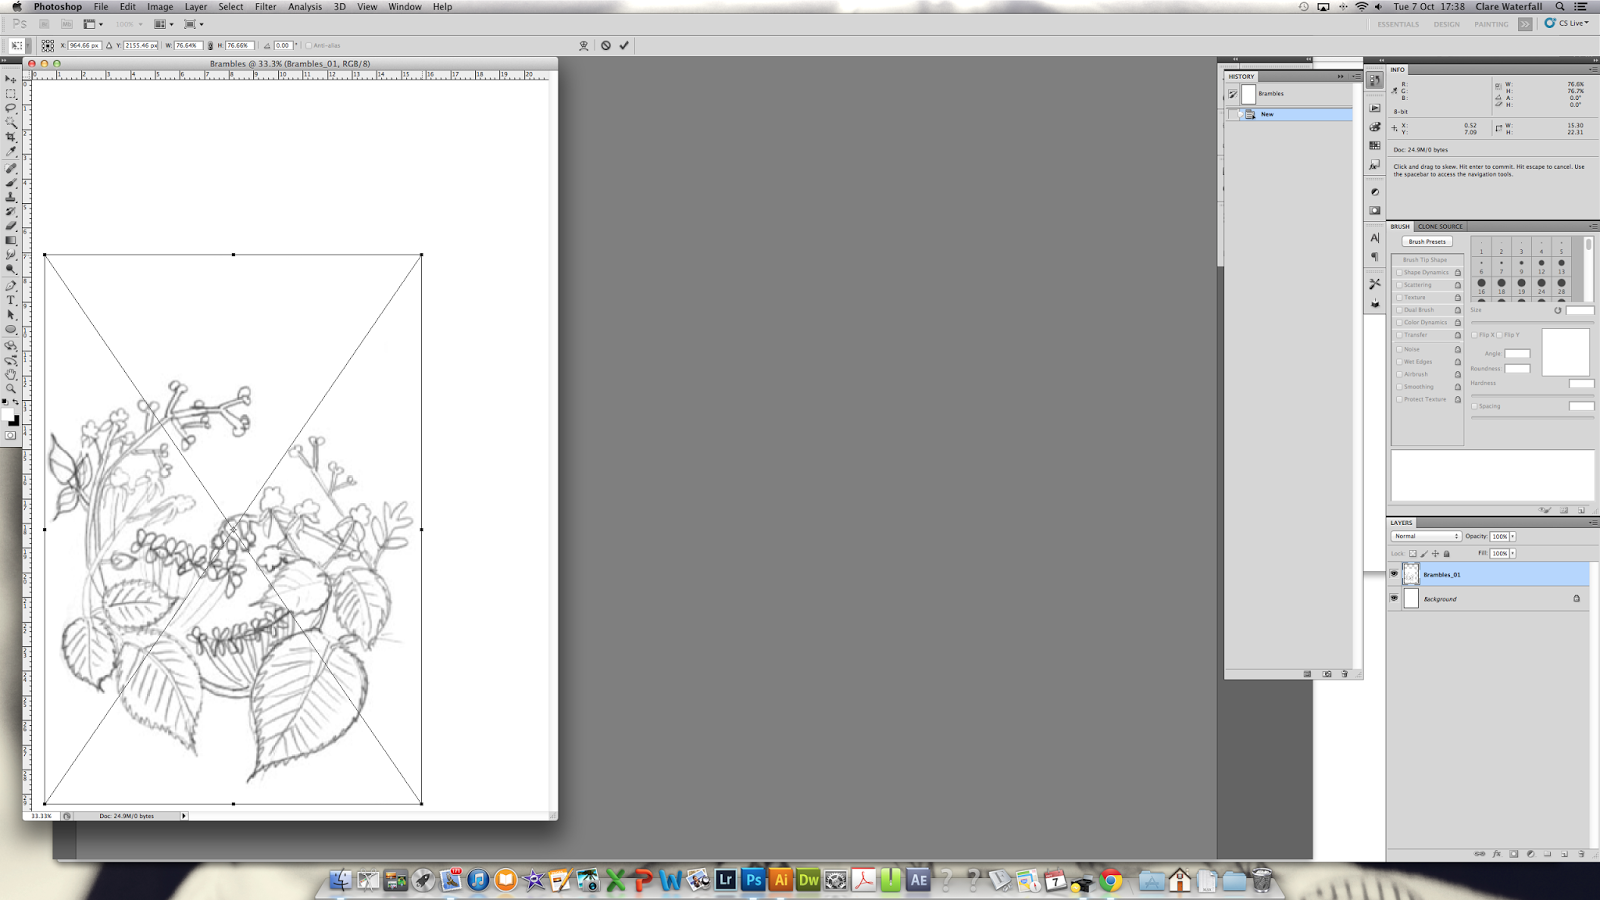 |
| You can drag the image around the page manually. You can Transform/adjust the size and scale by dragging the corners. Note: holding the Shift key will constrain the proportions for you. |
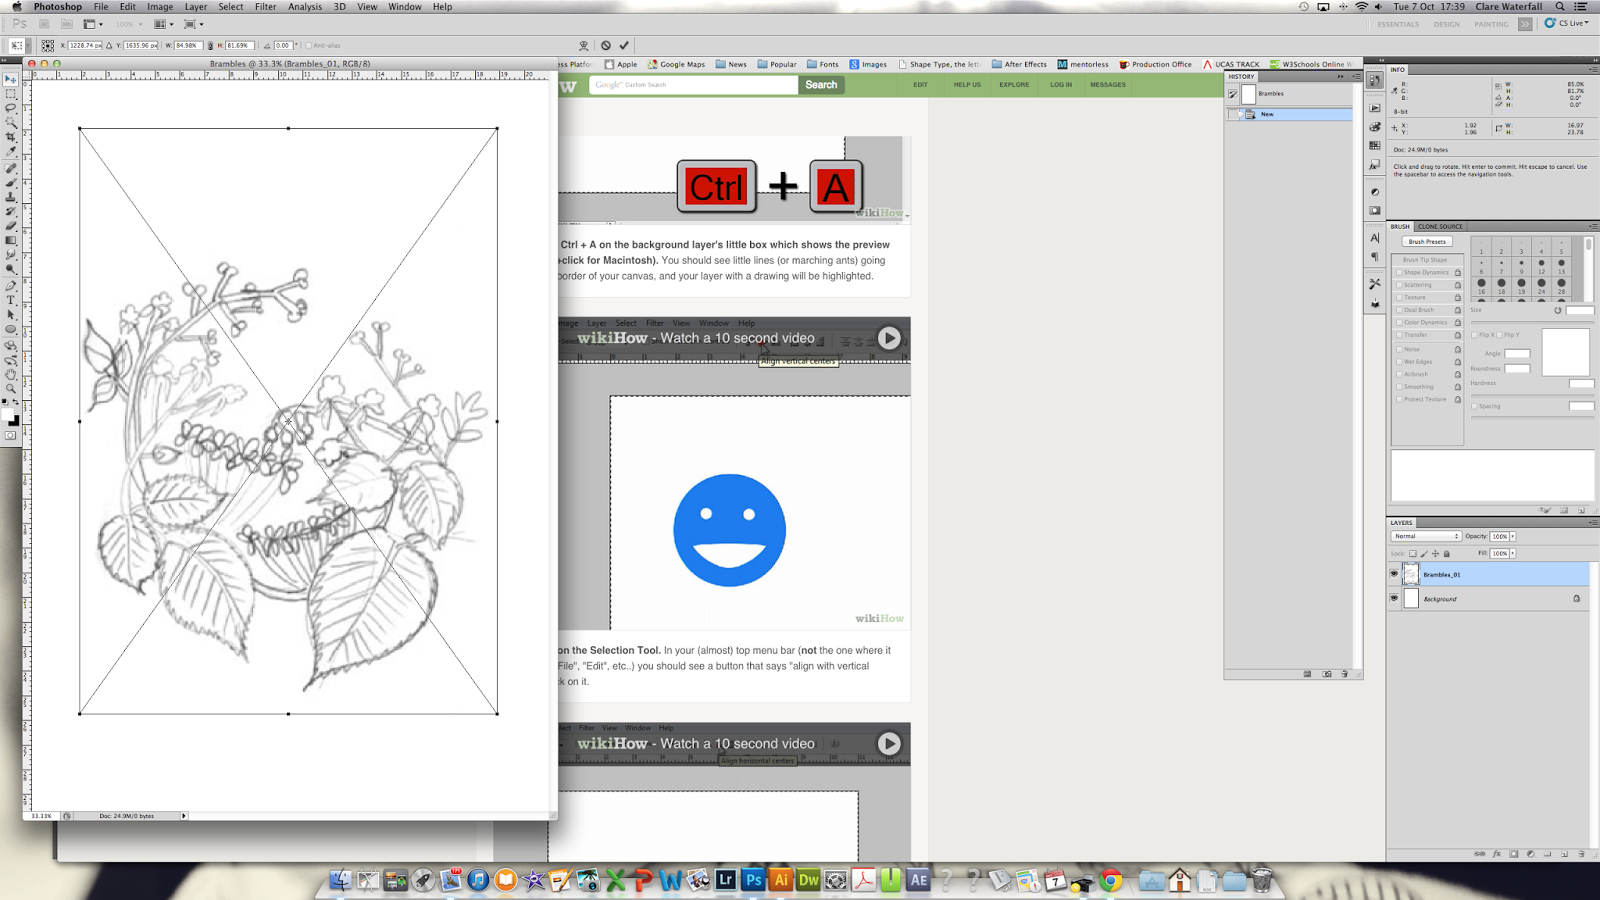 |
| Hit apply to place on the layer. |
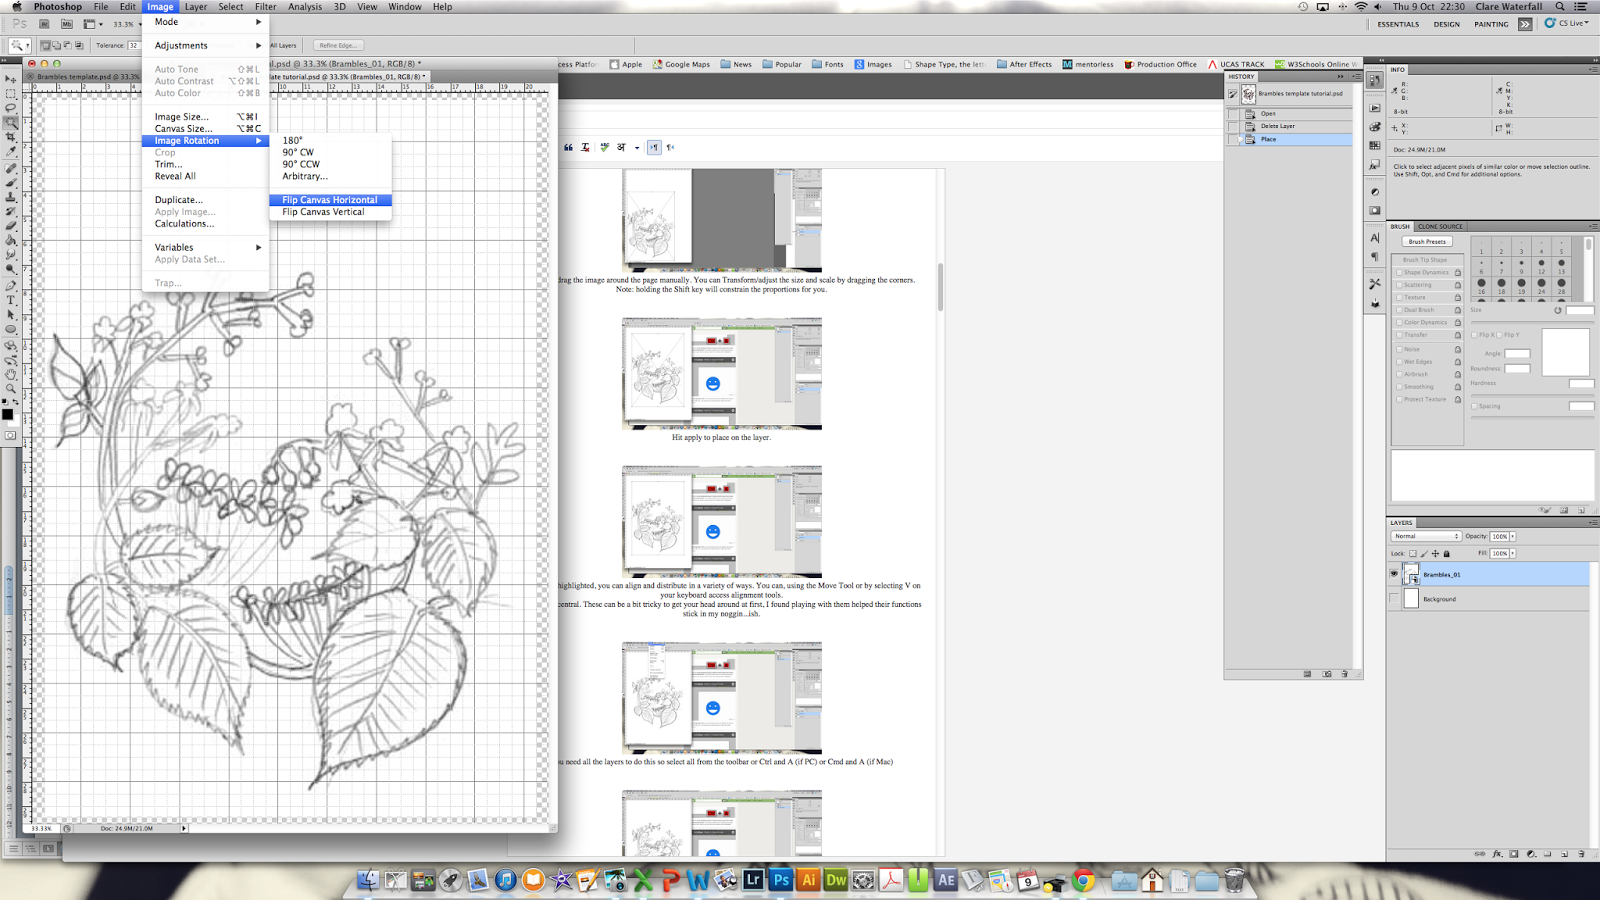 |
| Most cutters I know like to cut from behind, so if you want your finished cut to look as it does in the sketch, not a mirror image, you need to flip the image. You will cut into this mirror image. So, using the toolbar at the top, Image > Image Rotation > Flip Canvas Horizontal |
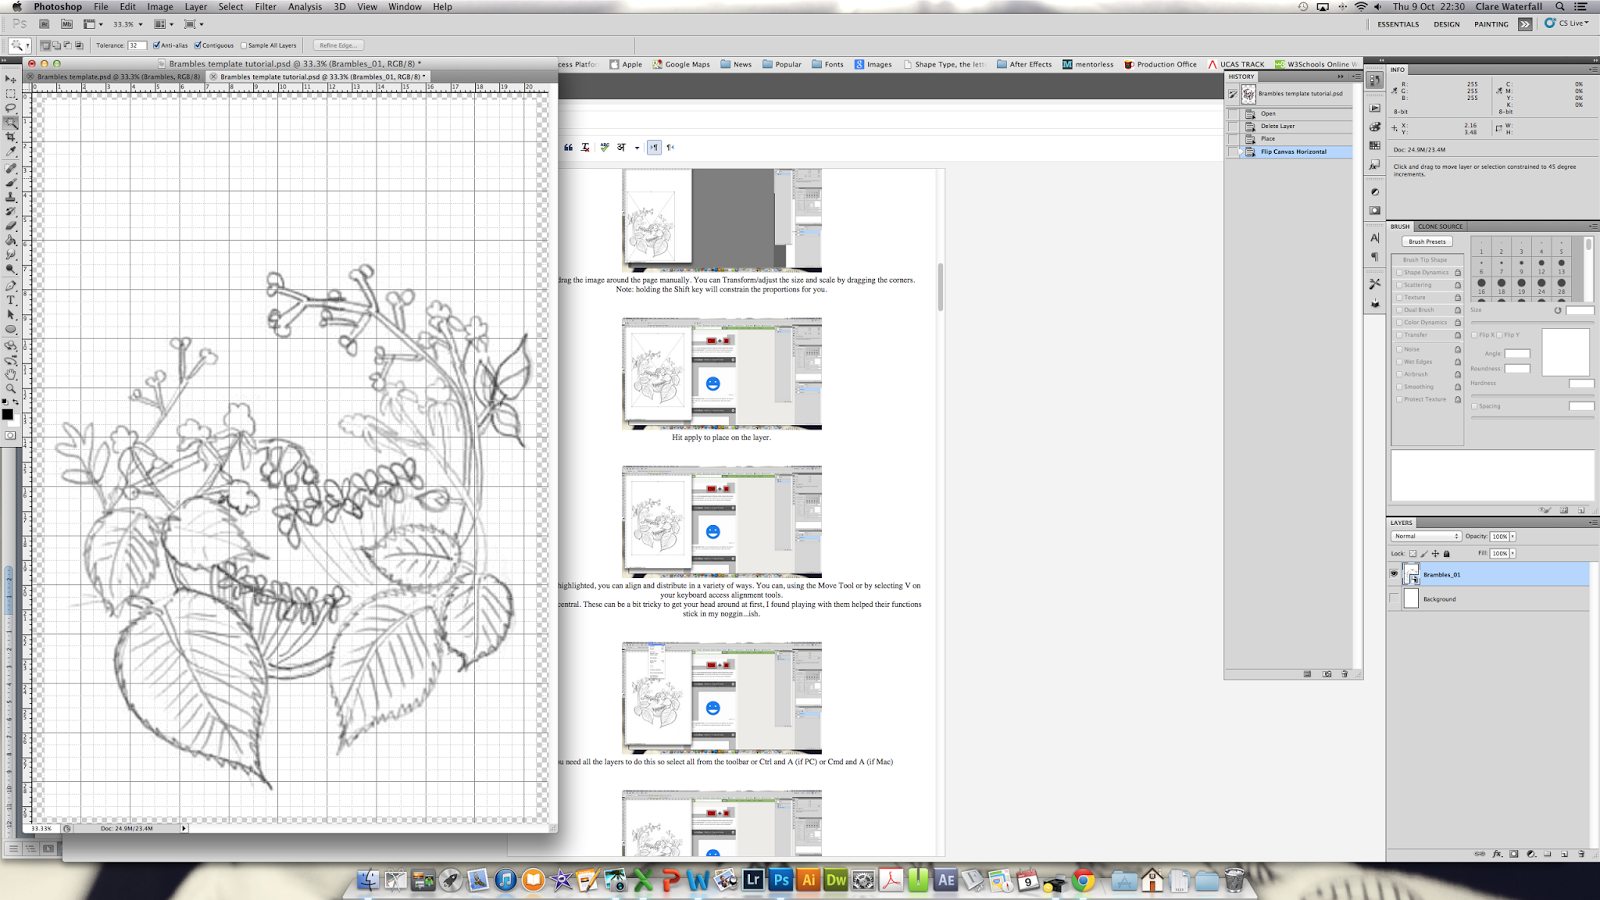 |
| This gives you a mirror image. For the purpose of this tutorial I didn't bother with this but I will for the version that I will be presenting in my gallery and Etsy shop. |
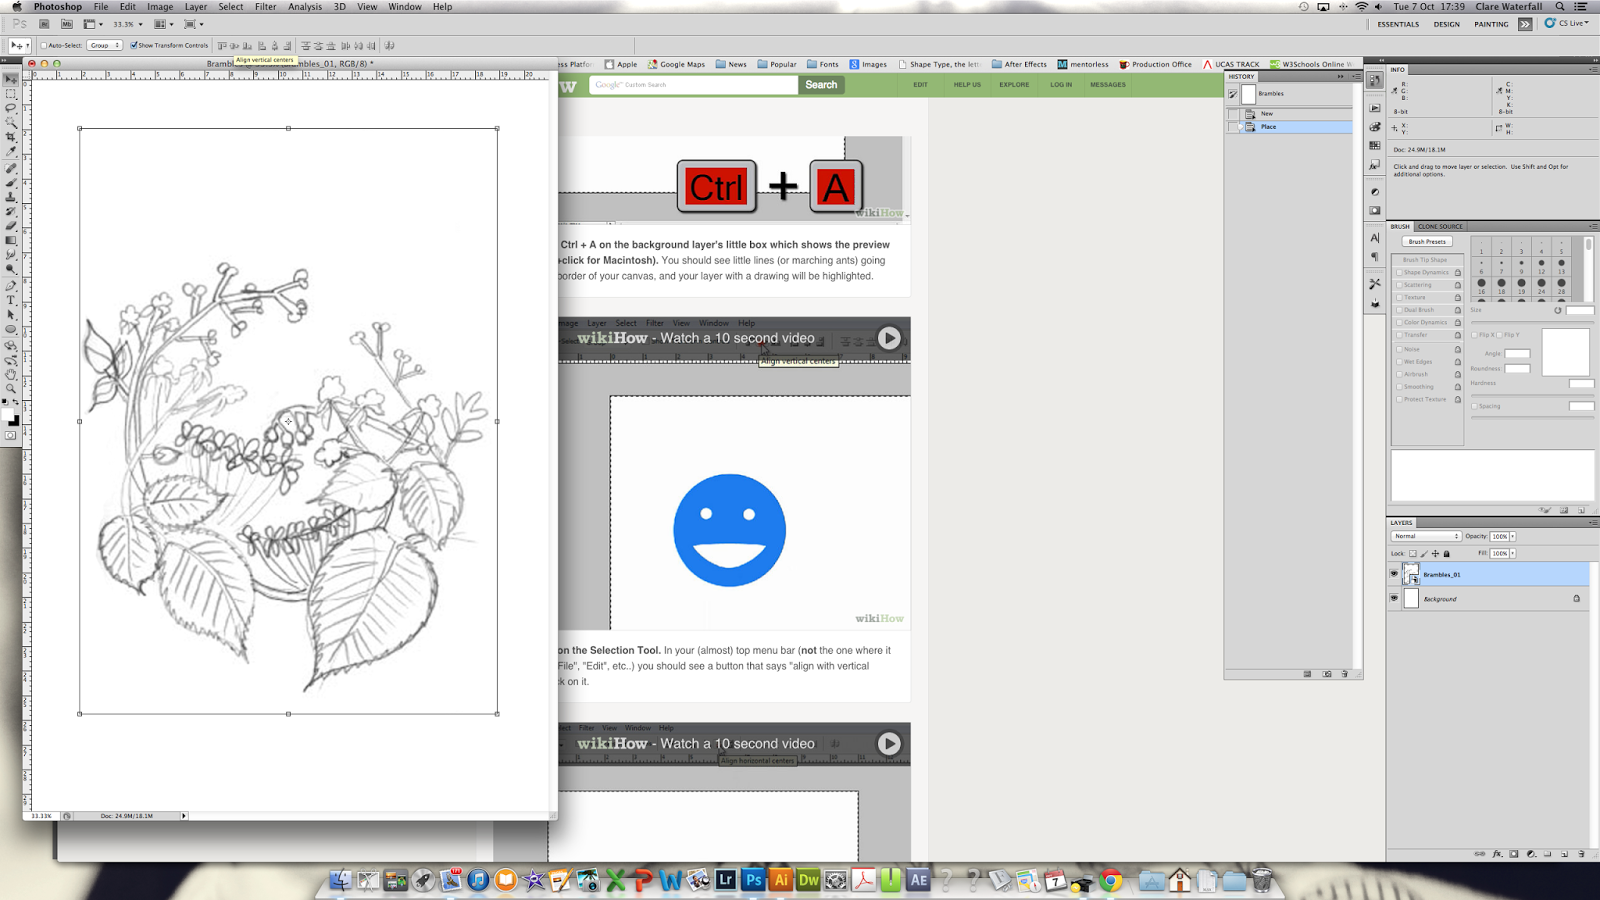 |
| You can align and distribute your scanned sketch, in a variety of ways. You can, using the Move Tool or by selecting V on your keyboard access alignment tools. I want this central. These can be a bit tricky to get your head around at first, I found playing with them helped their functions stick in my noggin...ish. |
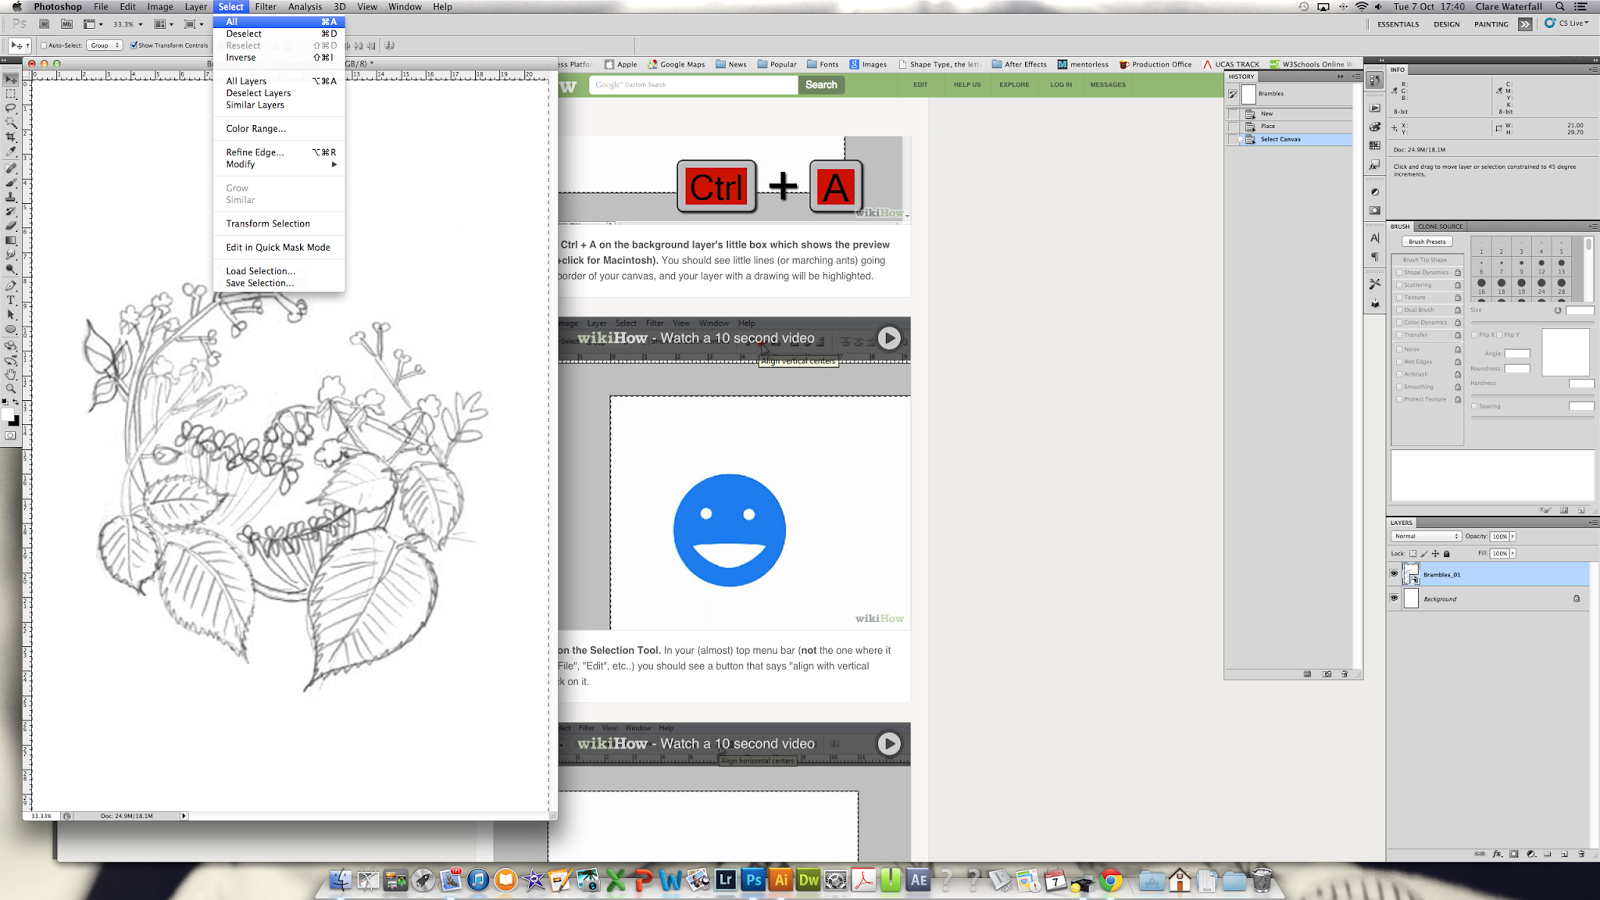 |
| You need all the layers to do this so select all from the toolbar or Ctrl and A (if PC) or Cmd and A (if Mac) |
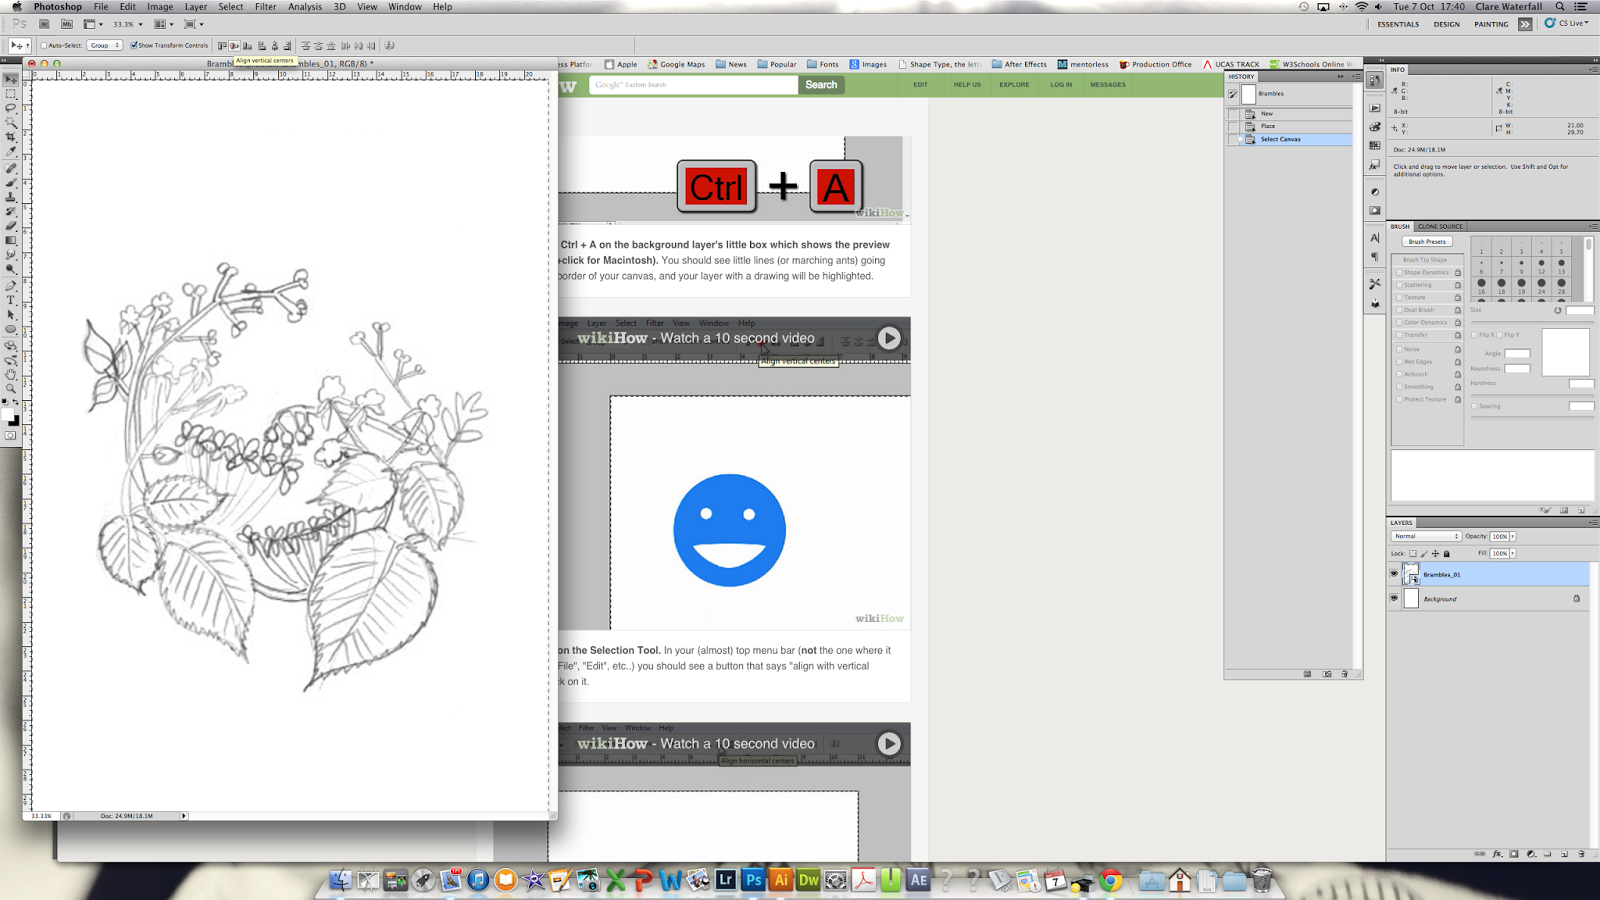 |
| Using the distribution and alignment icons (see yellow highlighted bar) to centre the item 'Align vertical centres' |
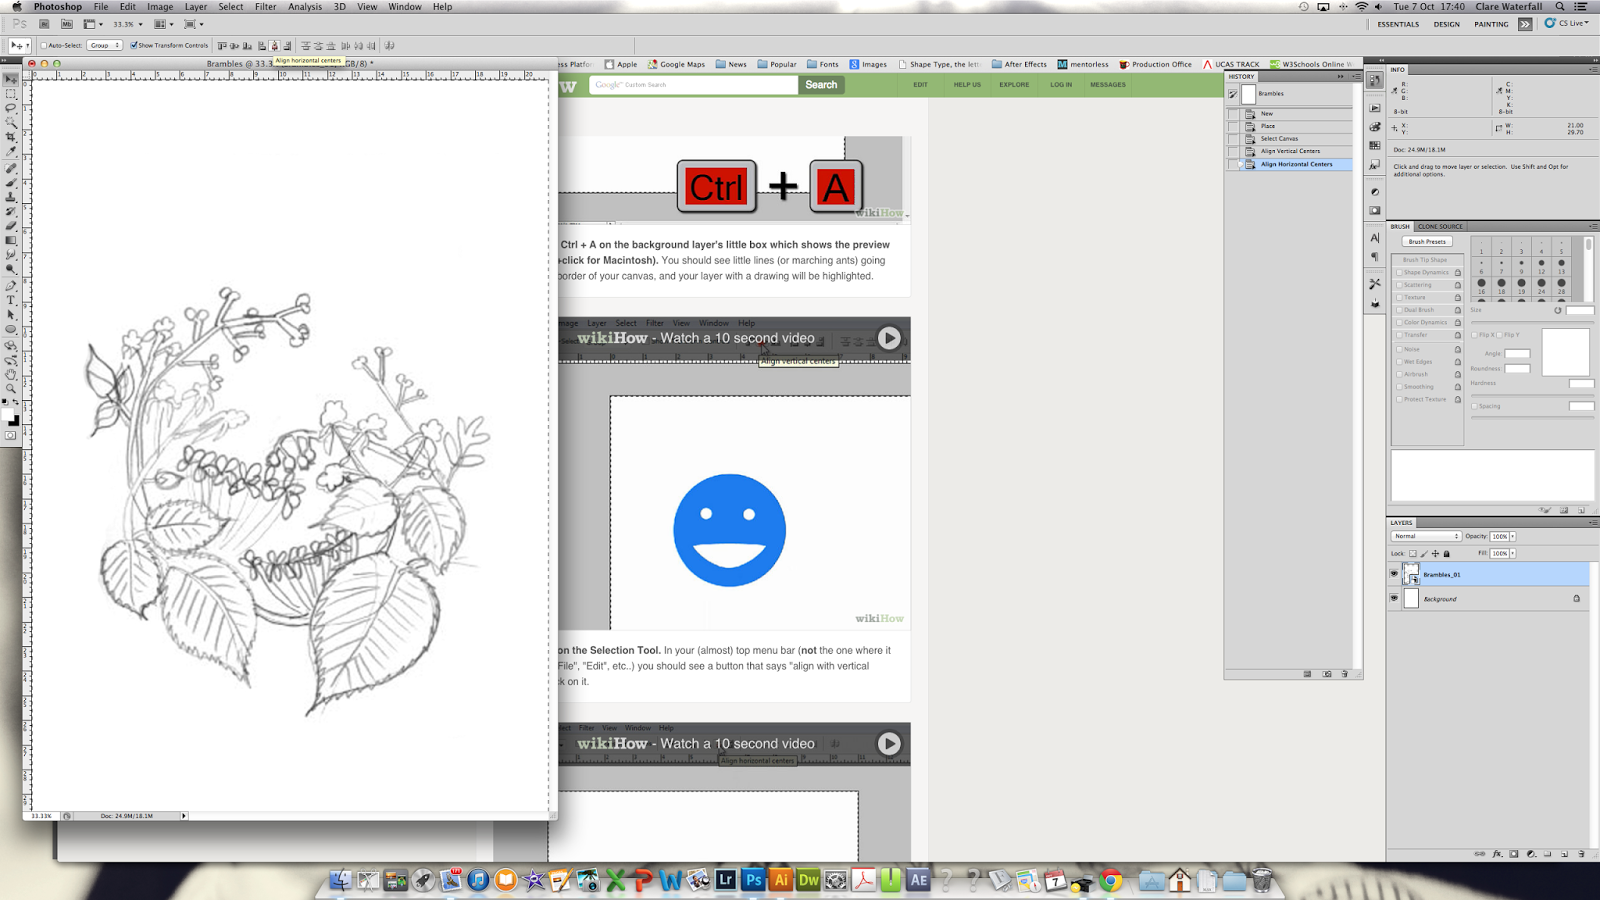 |
| Same again for the horizontal centres. You don't have to do this, but have a play to see what these handy little functions can do for you. Save you struggling to line up manually. |
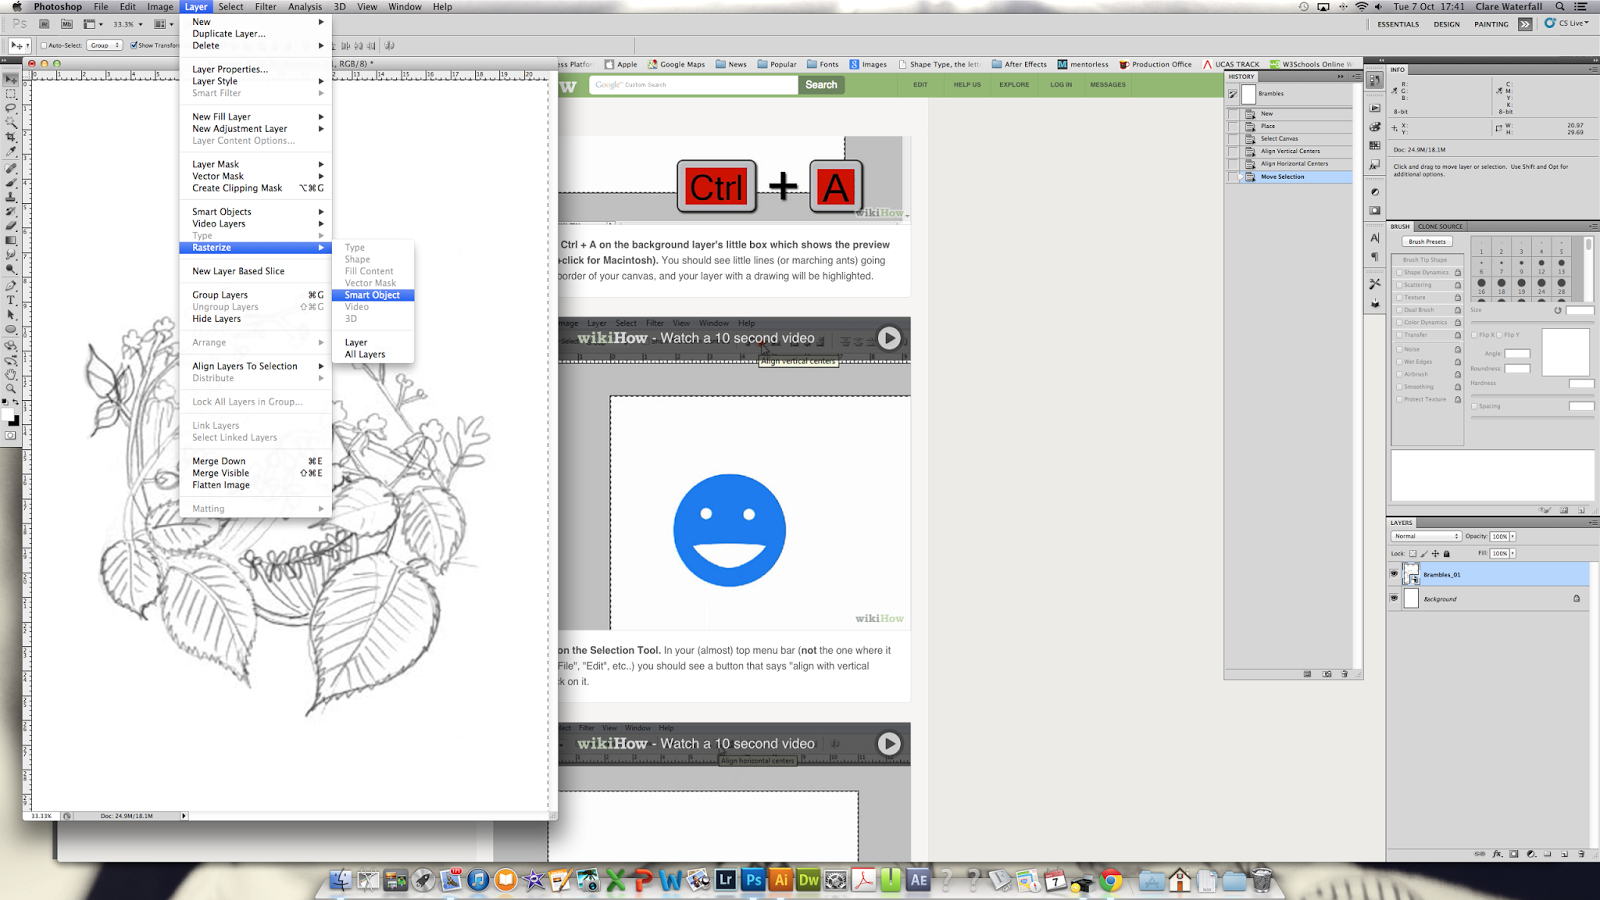 |
| The file you placed is a 'Smart Object' and is not directly editable. To allow you to edit/change it, you need to Rasterize it. Don't worry about what that means for the moment, I'll explain all in another post. Using the tool bars - Layer > Rasterize > Smart Object |
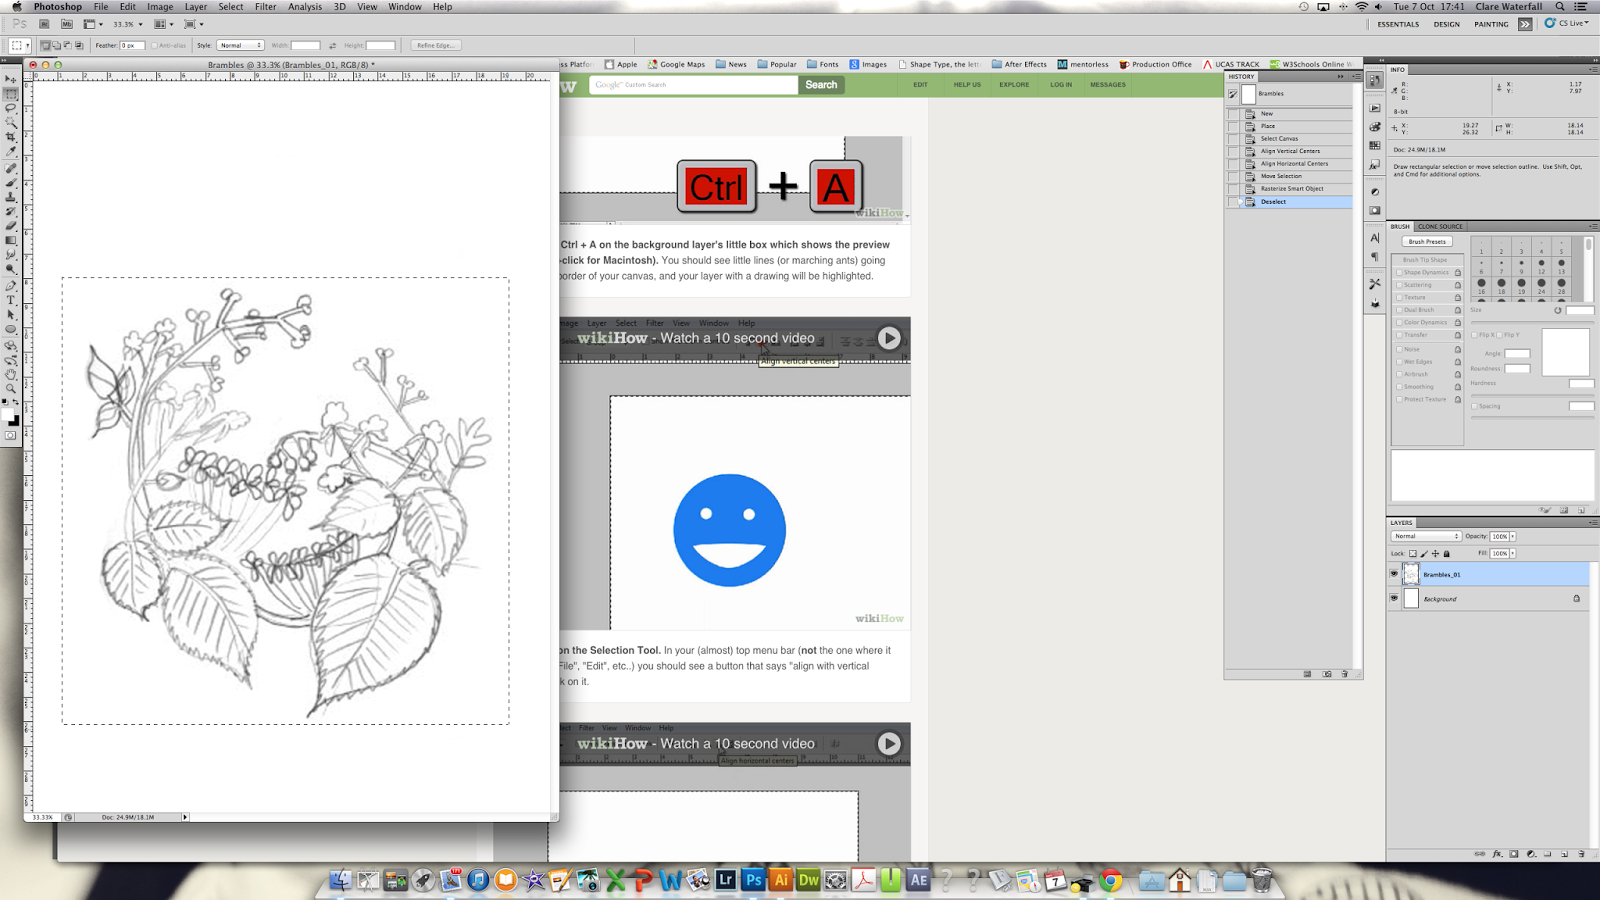 |
| If you don't want to position with the alignment buttons or just fancy giving an alternative method a try, you can use the marquee tool (shape with dashed lines in sidebar - second from top) select any area that you would like. |
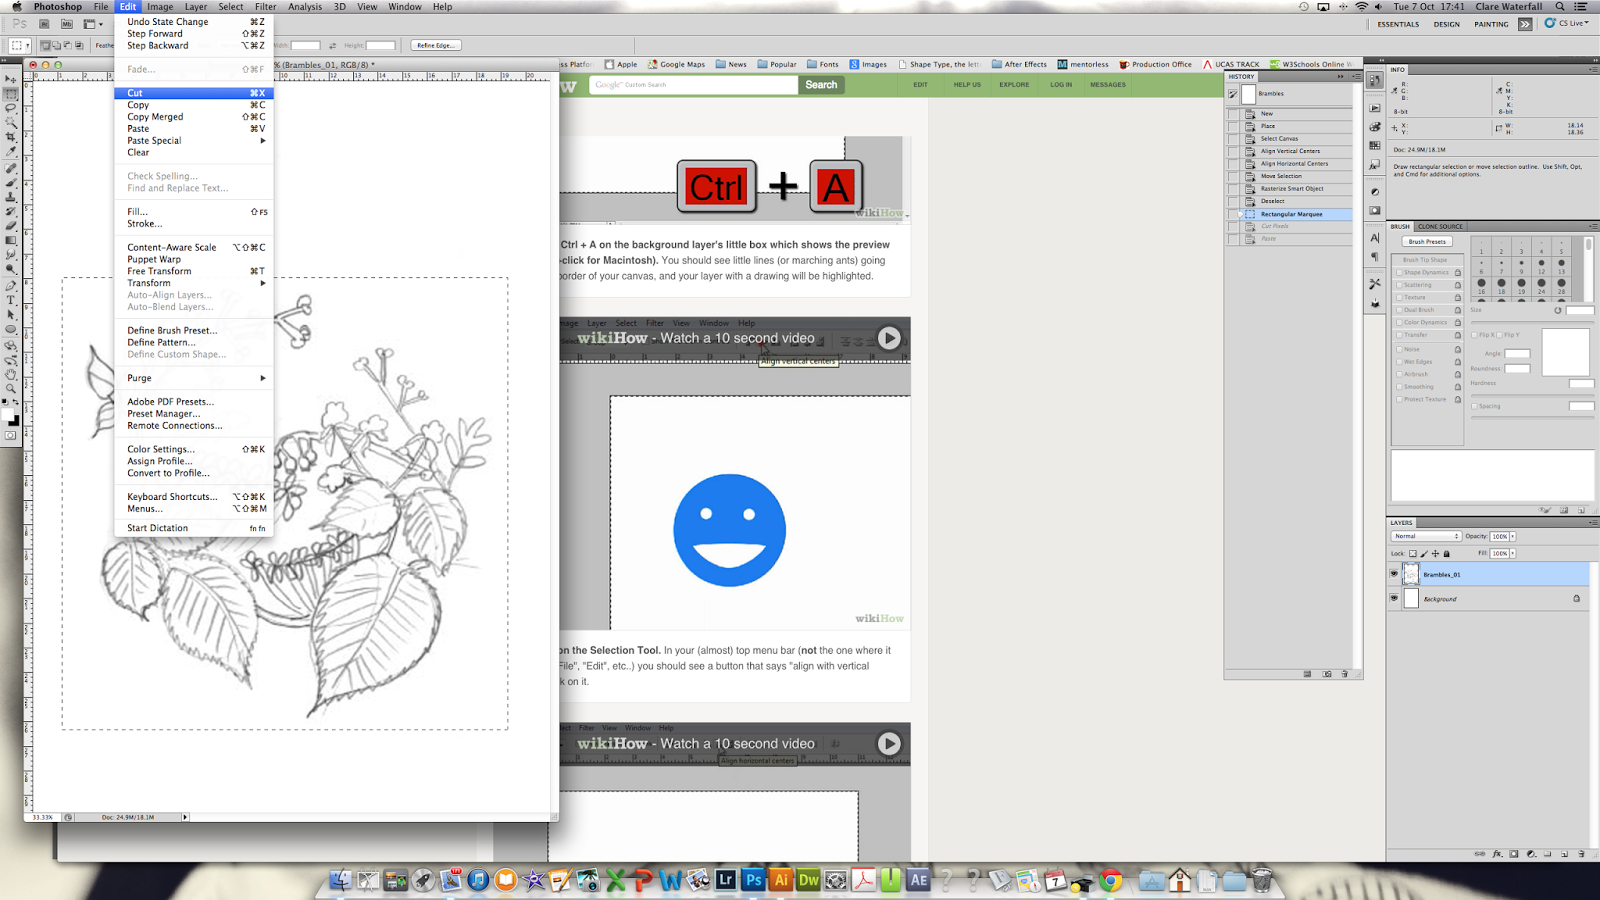 |
| You can cut it |
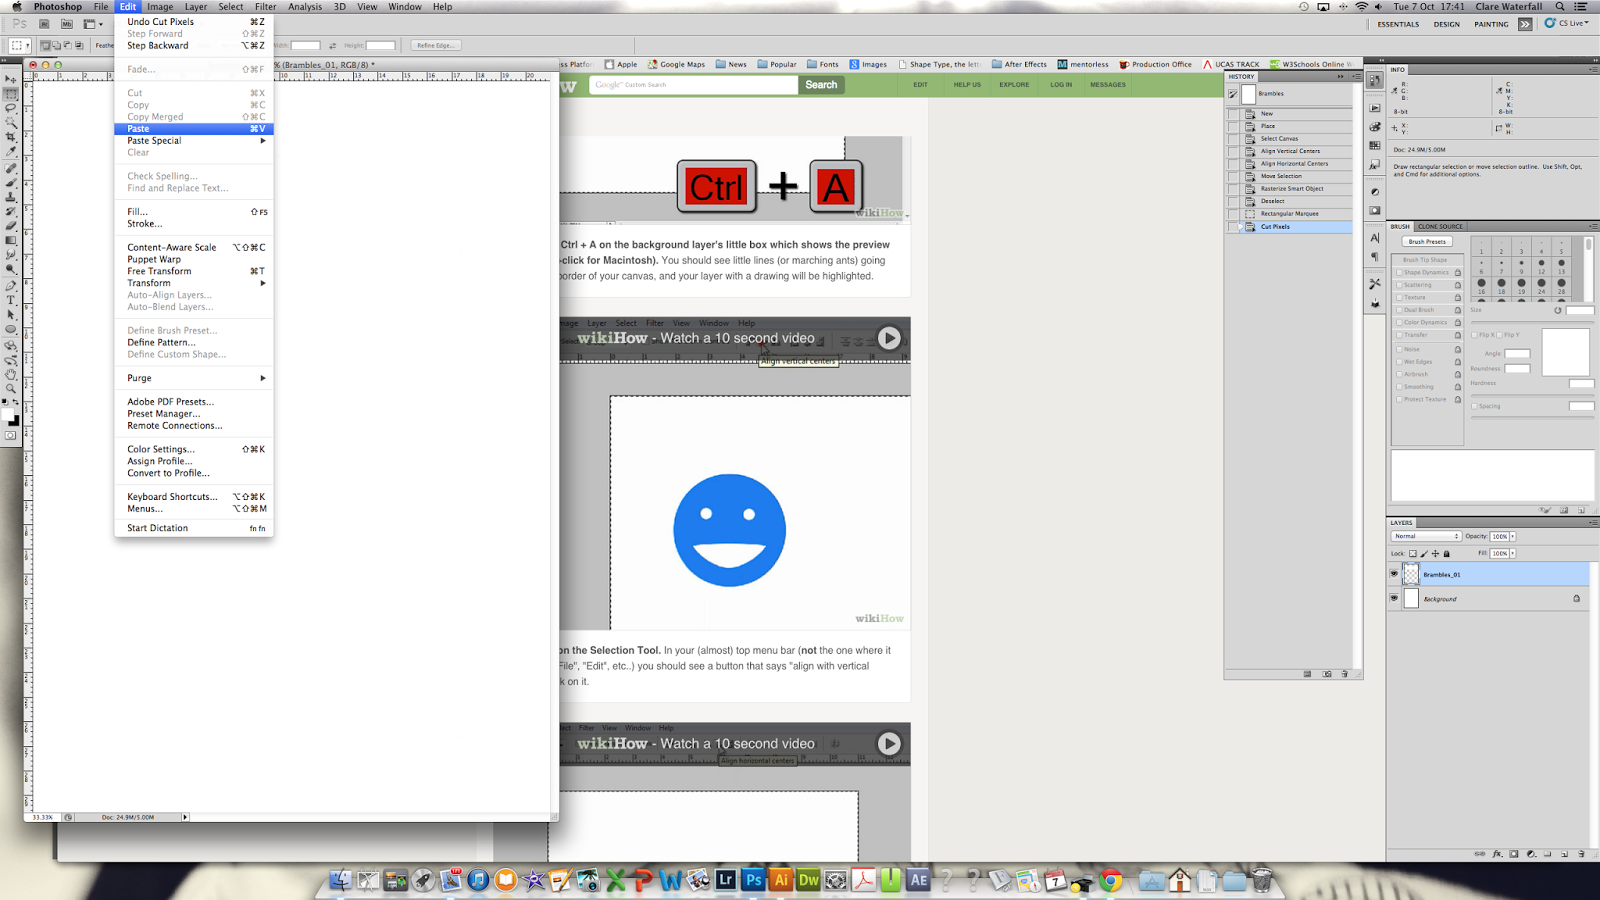 |
| You can then paste it |
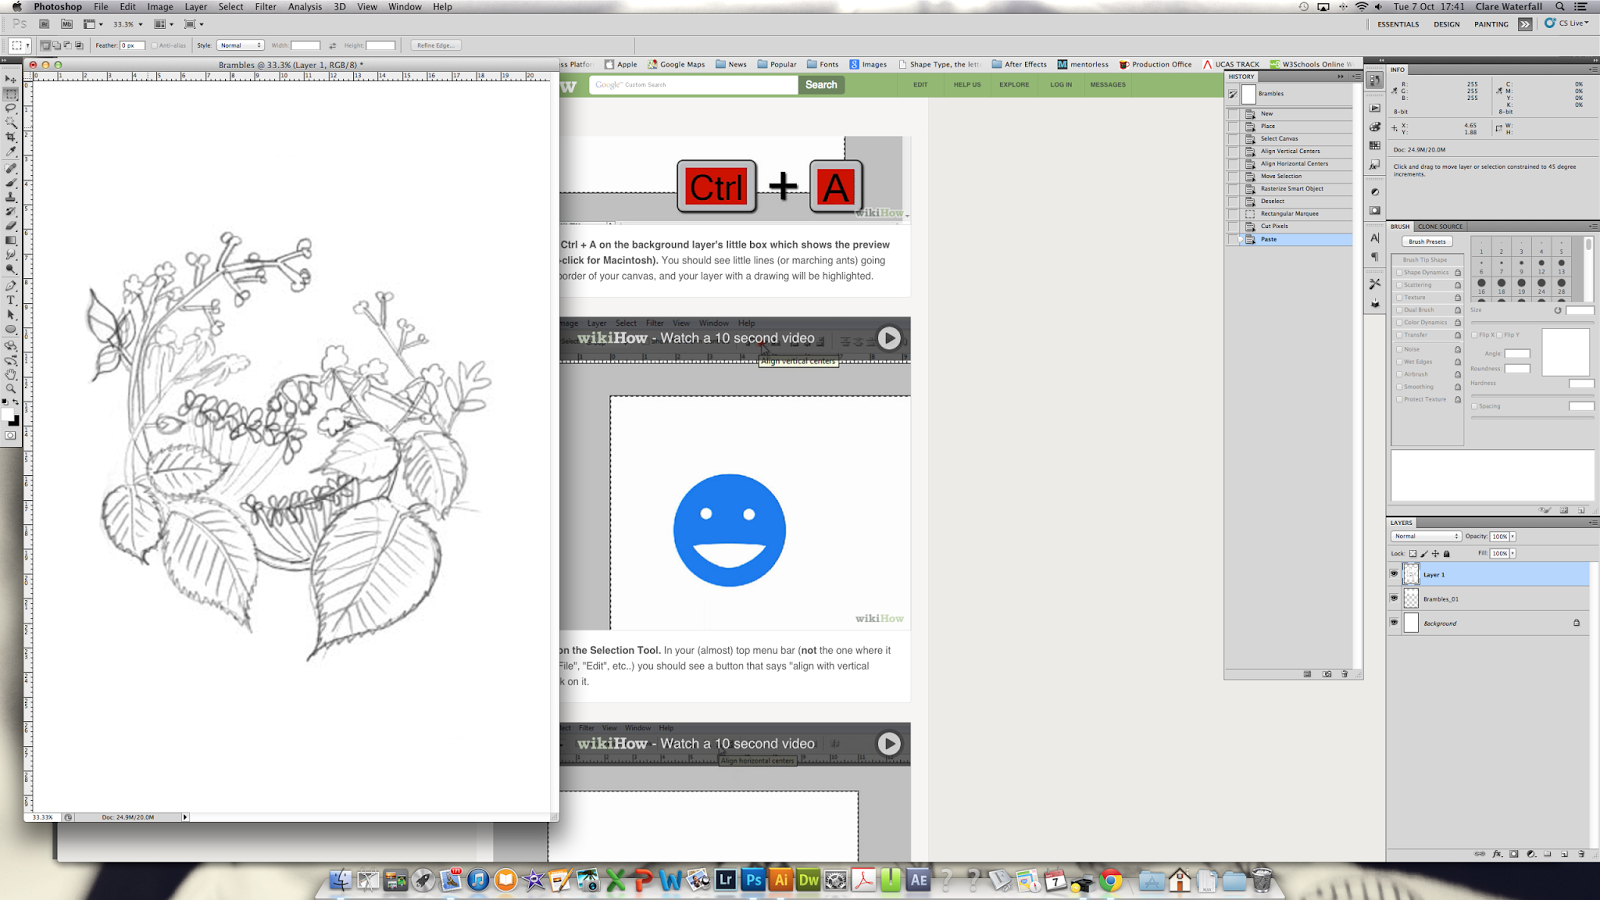 |
| Note: this will be pasted into a new layer |
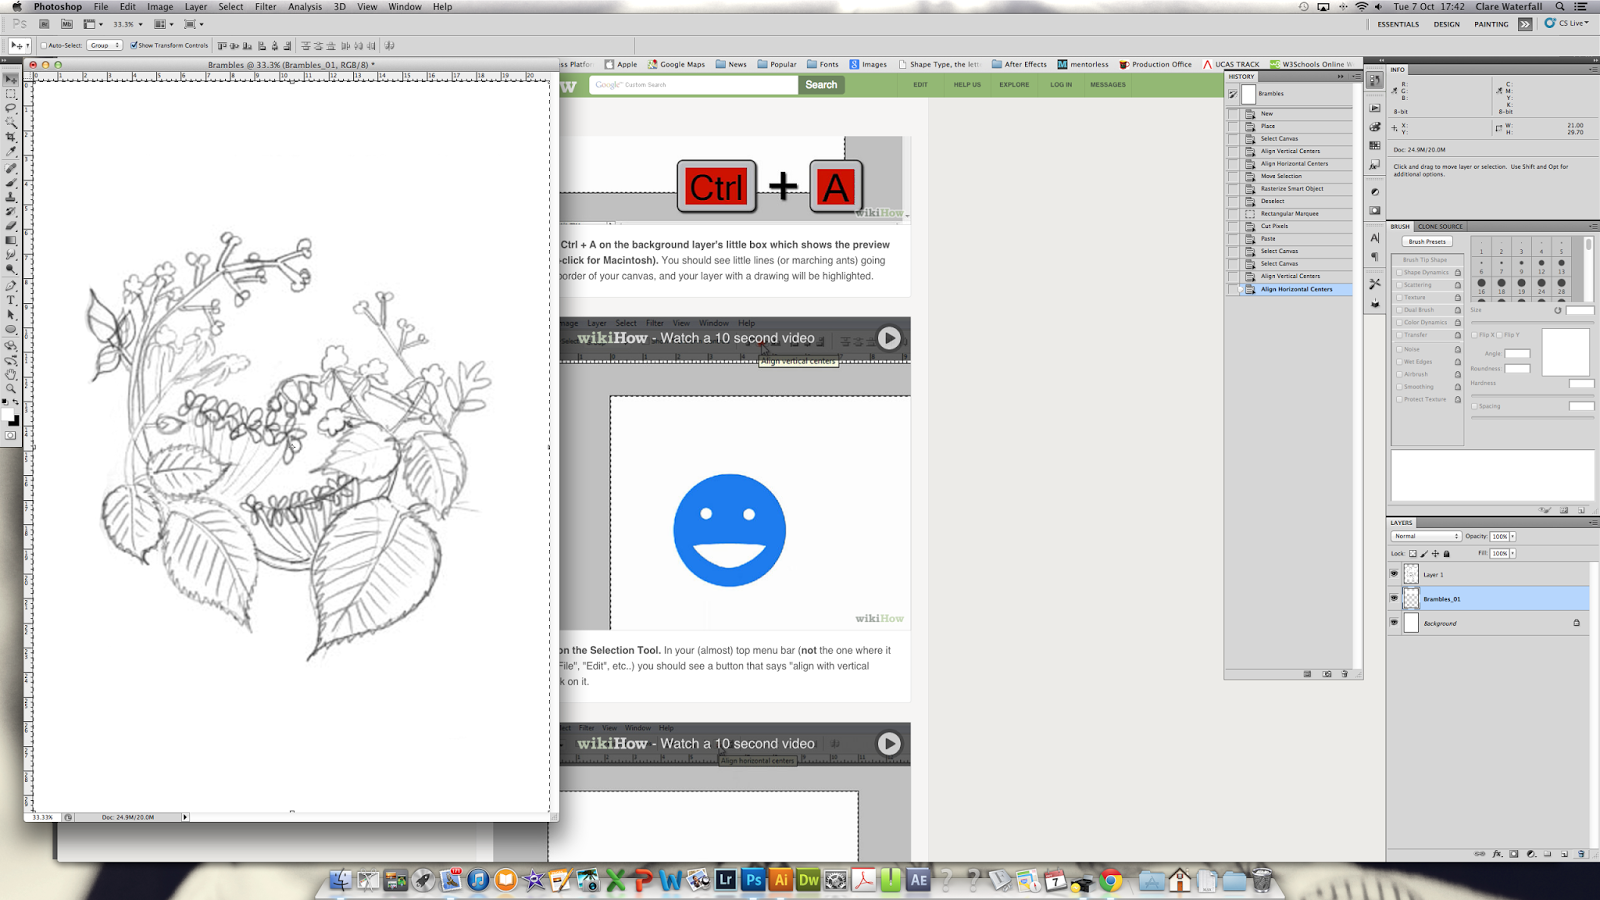 |
| Select the middle layer (this will be your original file layer) |
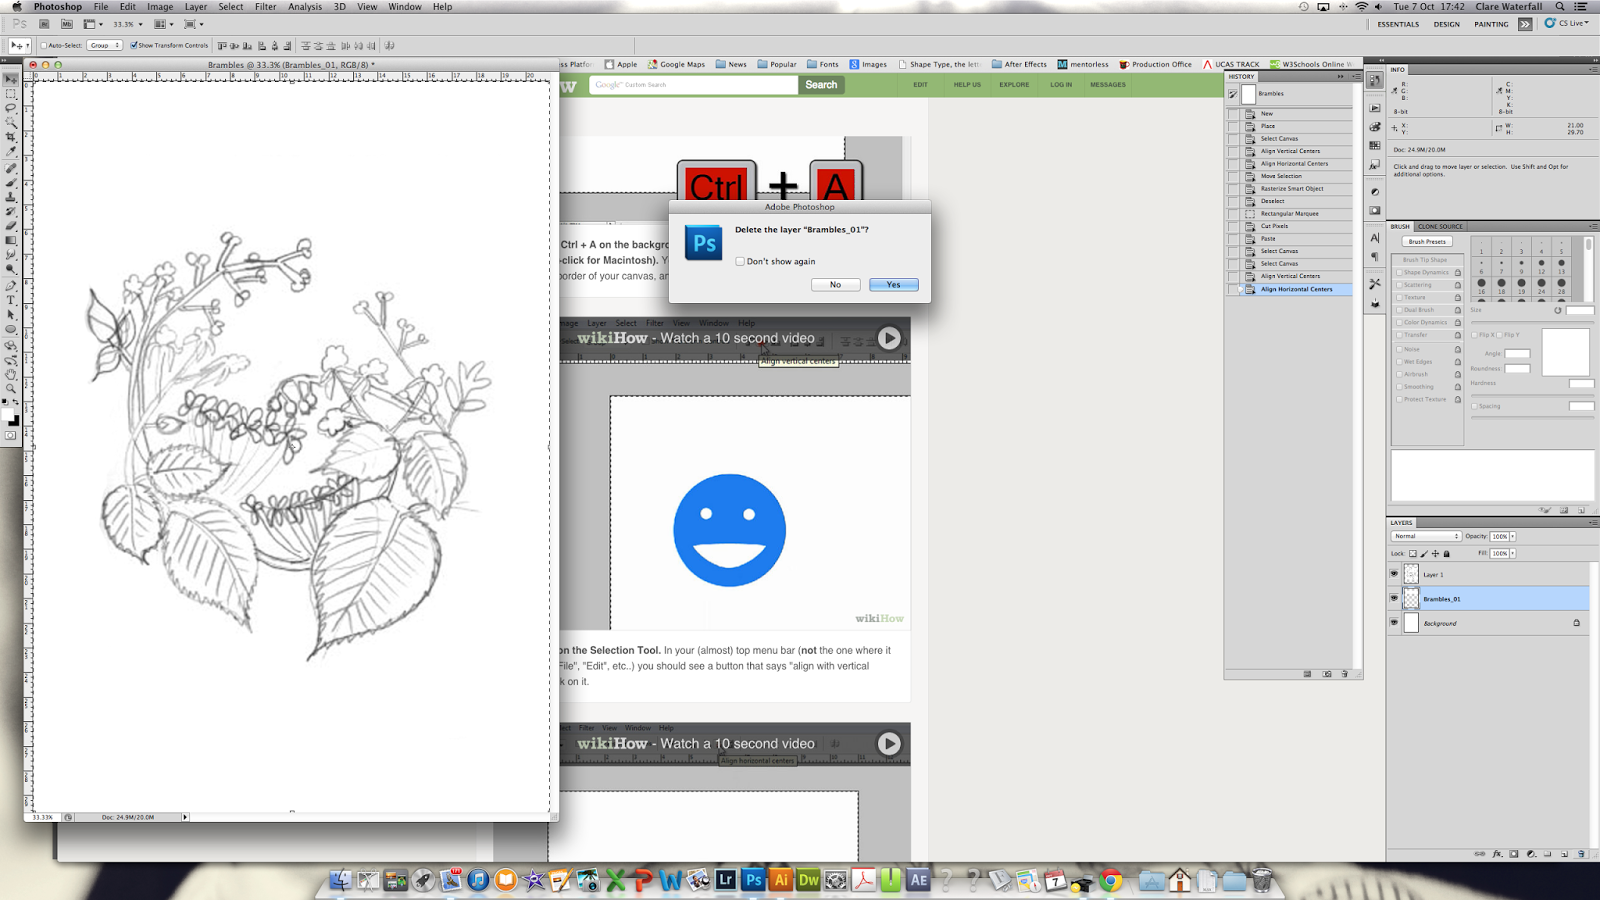 |
| Delete this layer - se little Rubbish Bin icon highlighted at bottom right of screen. We don't need this layer. |
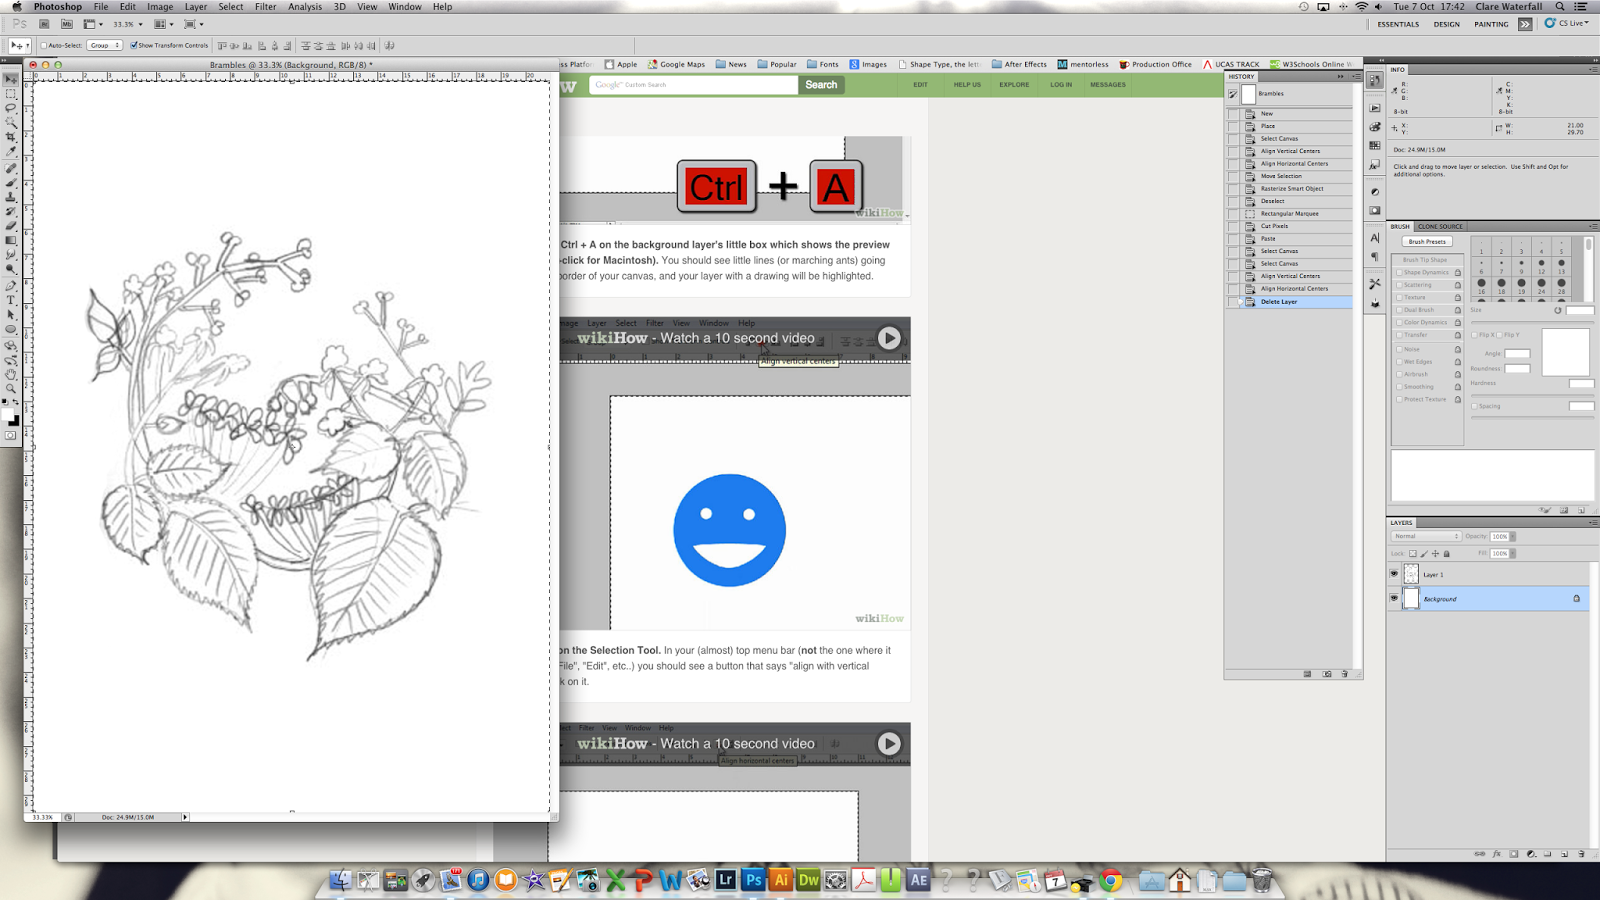 |
| Double click on the background layer - it is currently locked - double clicking unlocks this. |
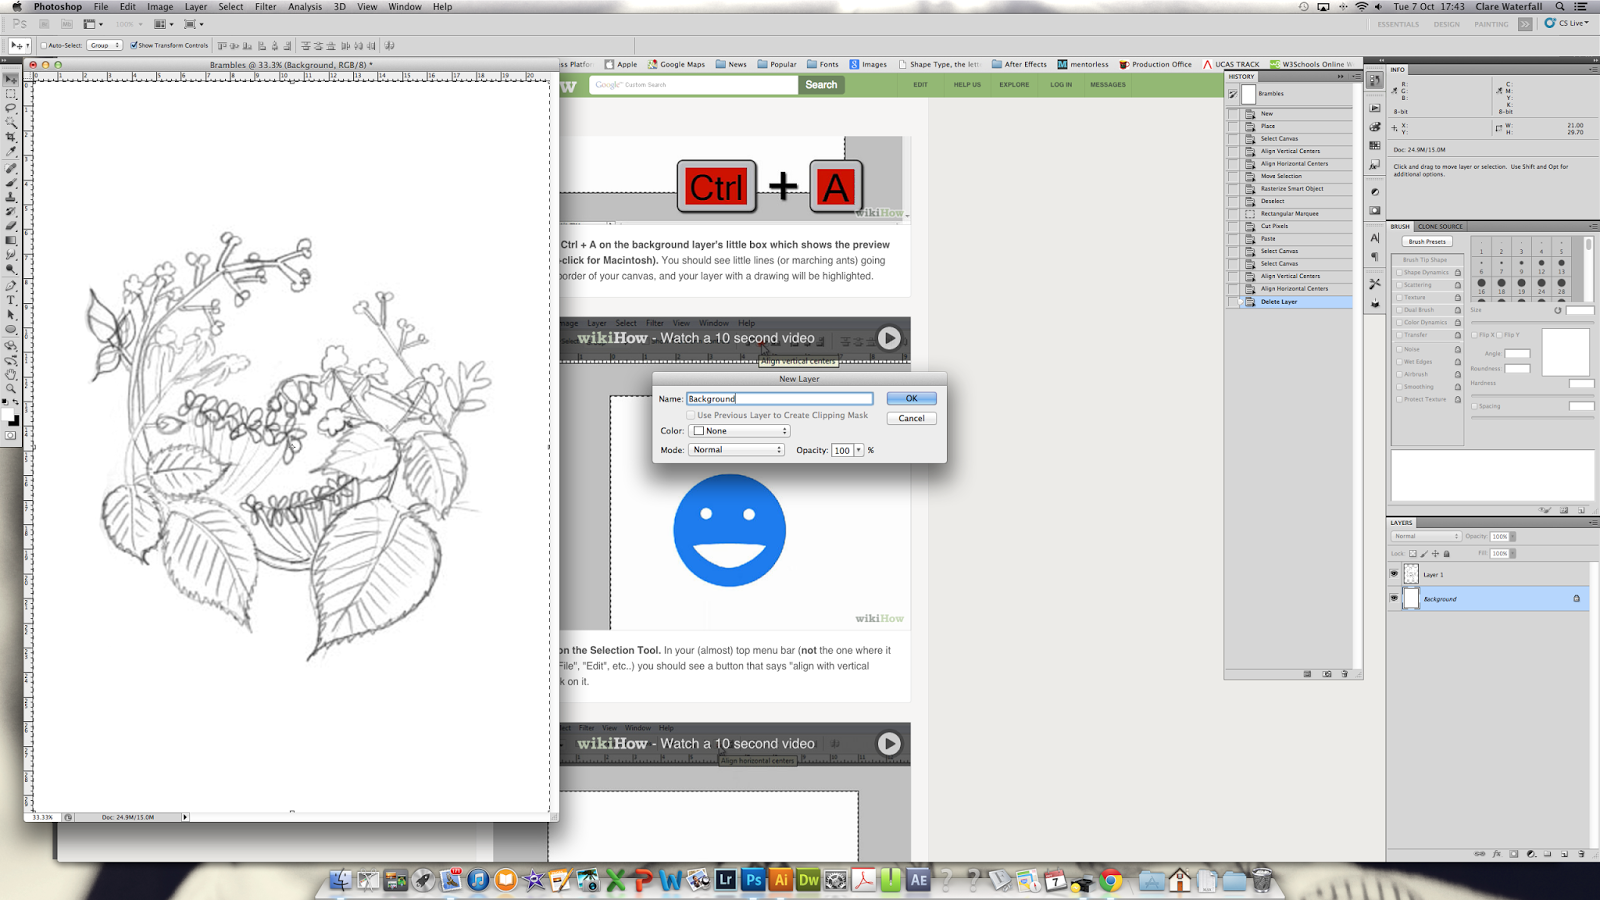 |
| It will give you the option to rename the layer at this point. Now renaming the layers is VERY useful and normally I would hammer home how you have to name everything for the purpose of file organisation. But I will come to that in other posts and this layer already has a logical name but when you double cick it to unlock it, it becomes layer 0. By all means rename if you like. |
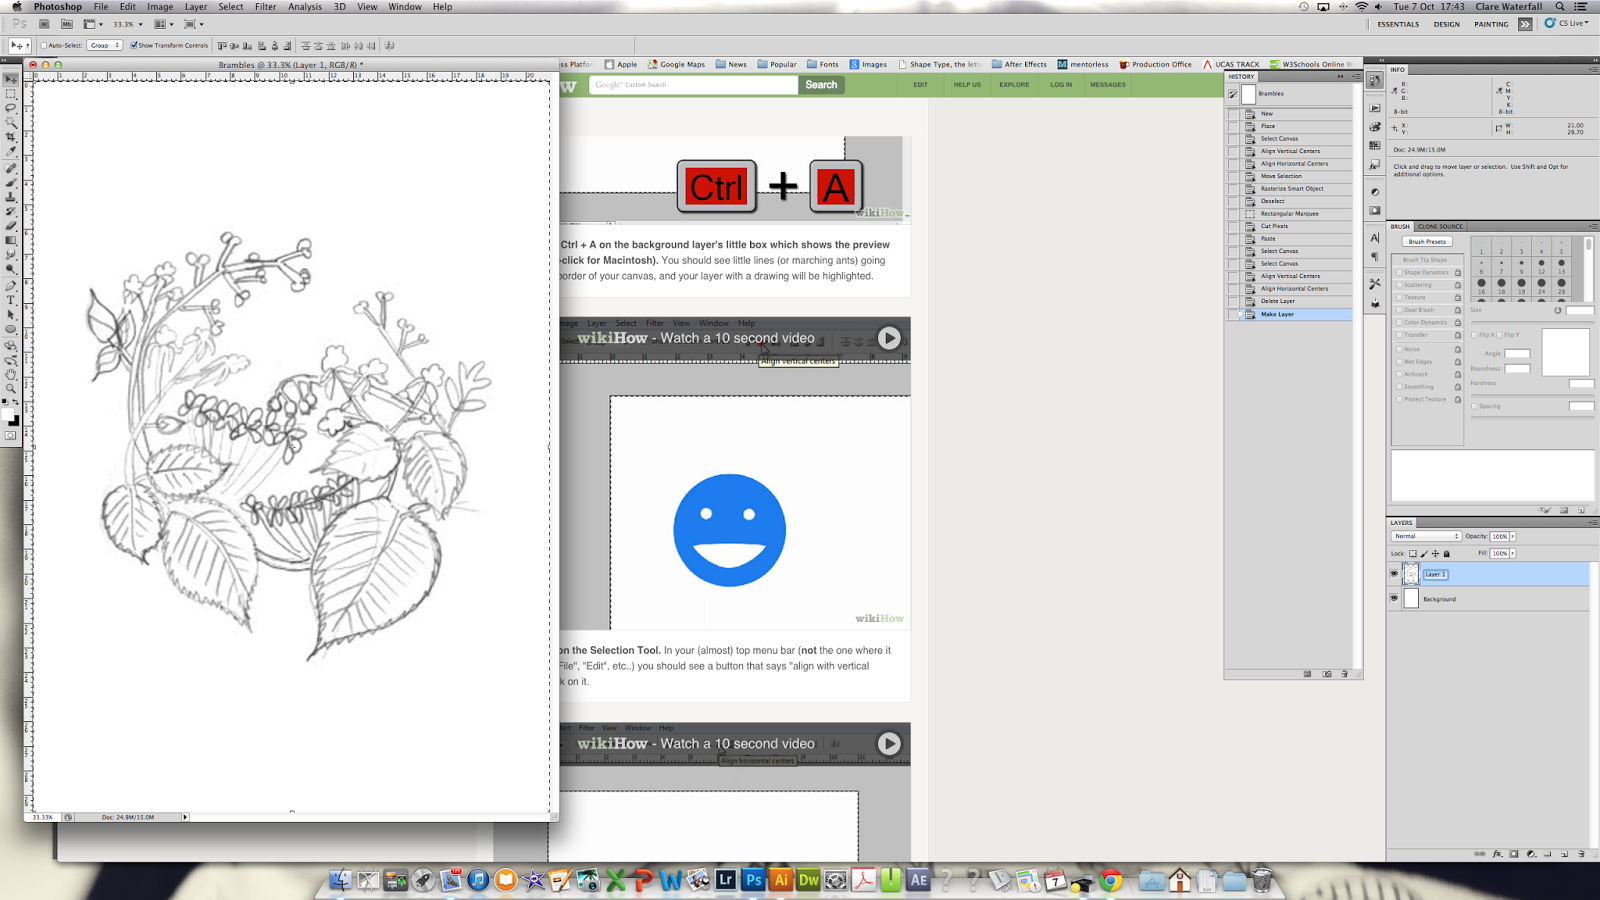 |
| Practicing what I preach :) Now rename your other layer, Layer 1, double click on the name (see blue highlighted area) |
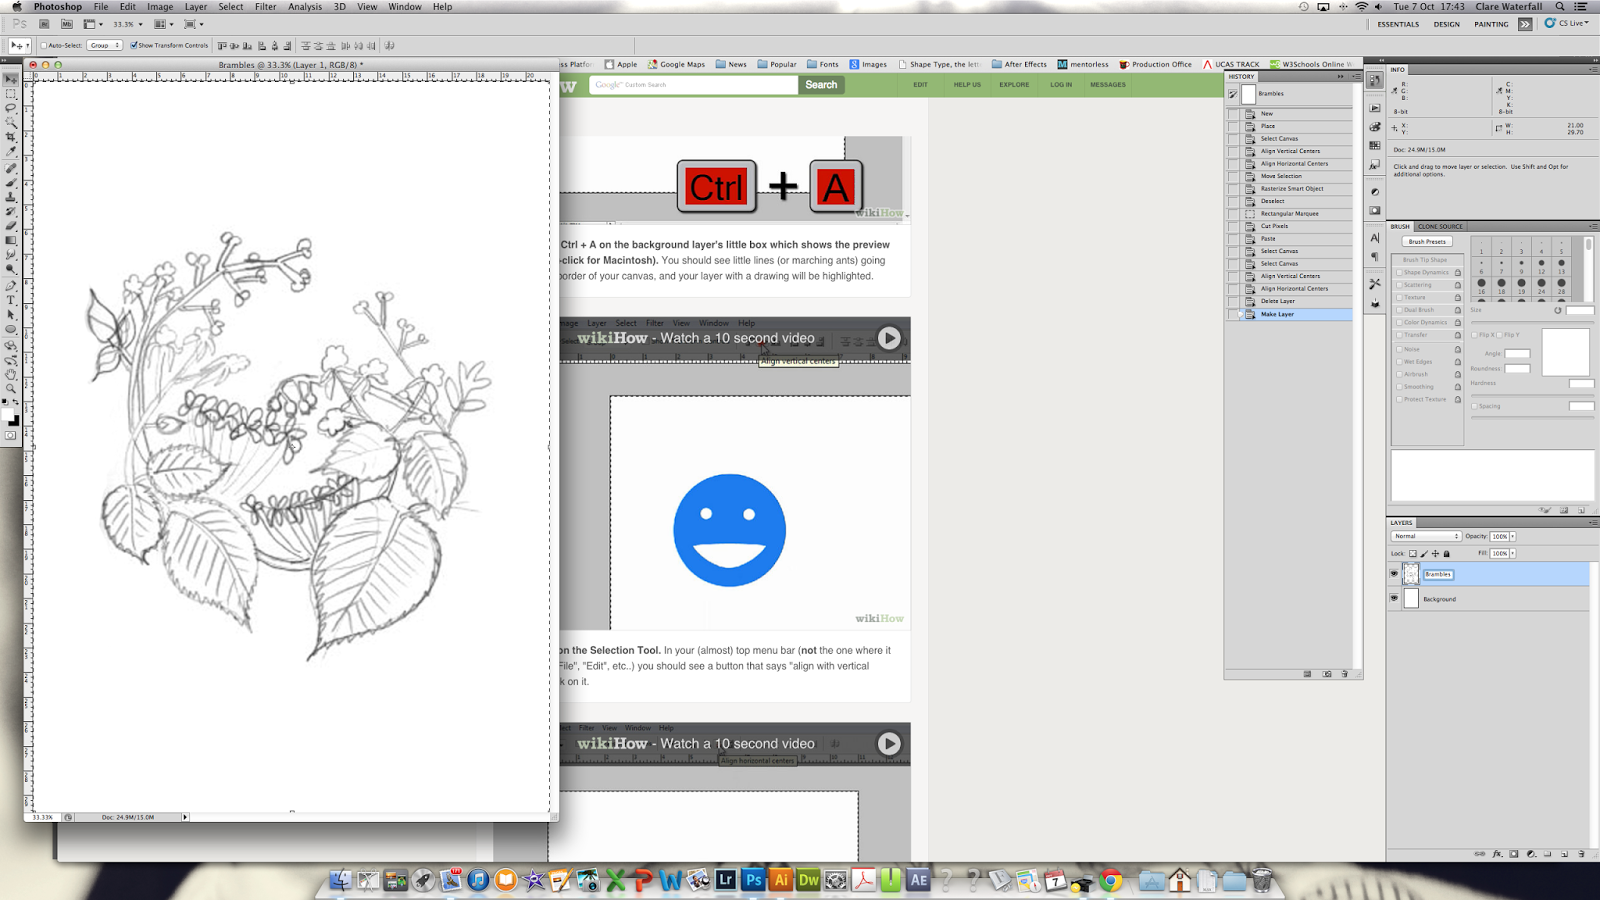 |
| I choose Brambles as this is what I have in this layer, simples. Pick whatever will make you remember what is on that layer, your work, your filing system so use your methods and own logic. |
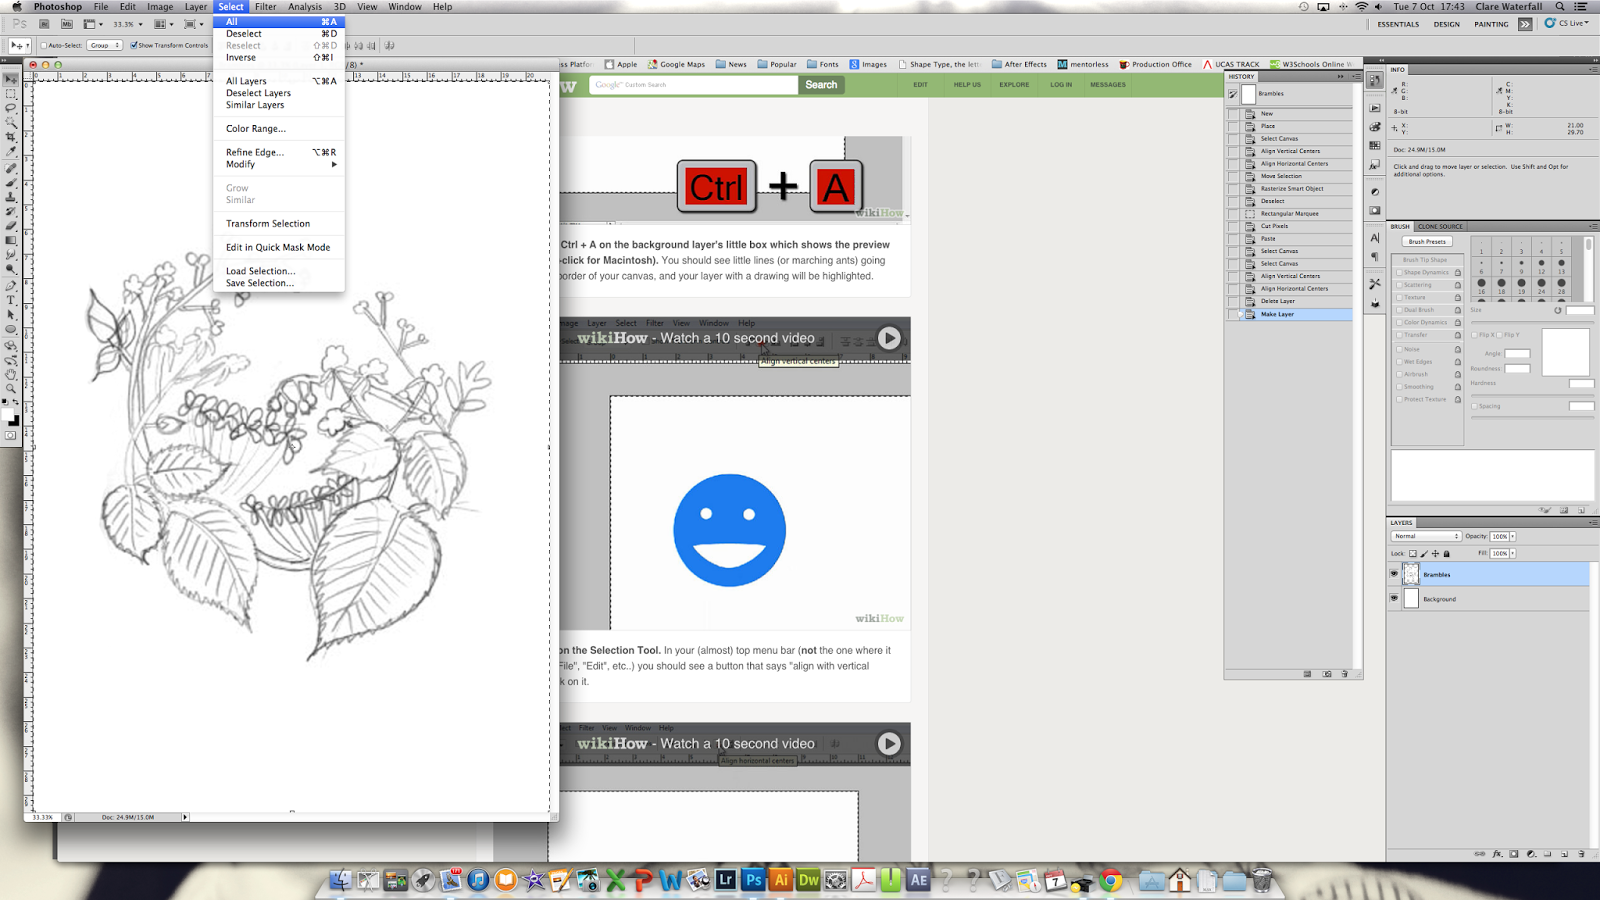 |
| Select everything - Select >All or Ctrl/Cmd A |
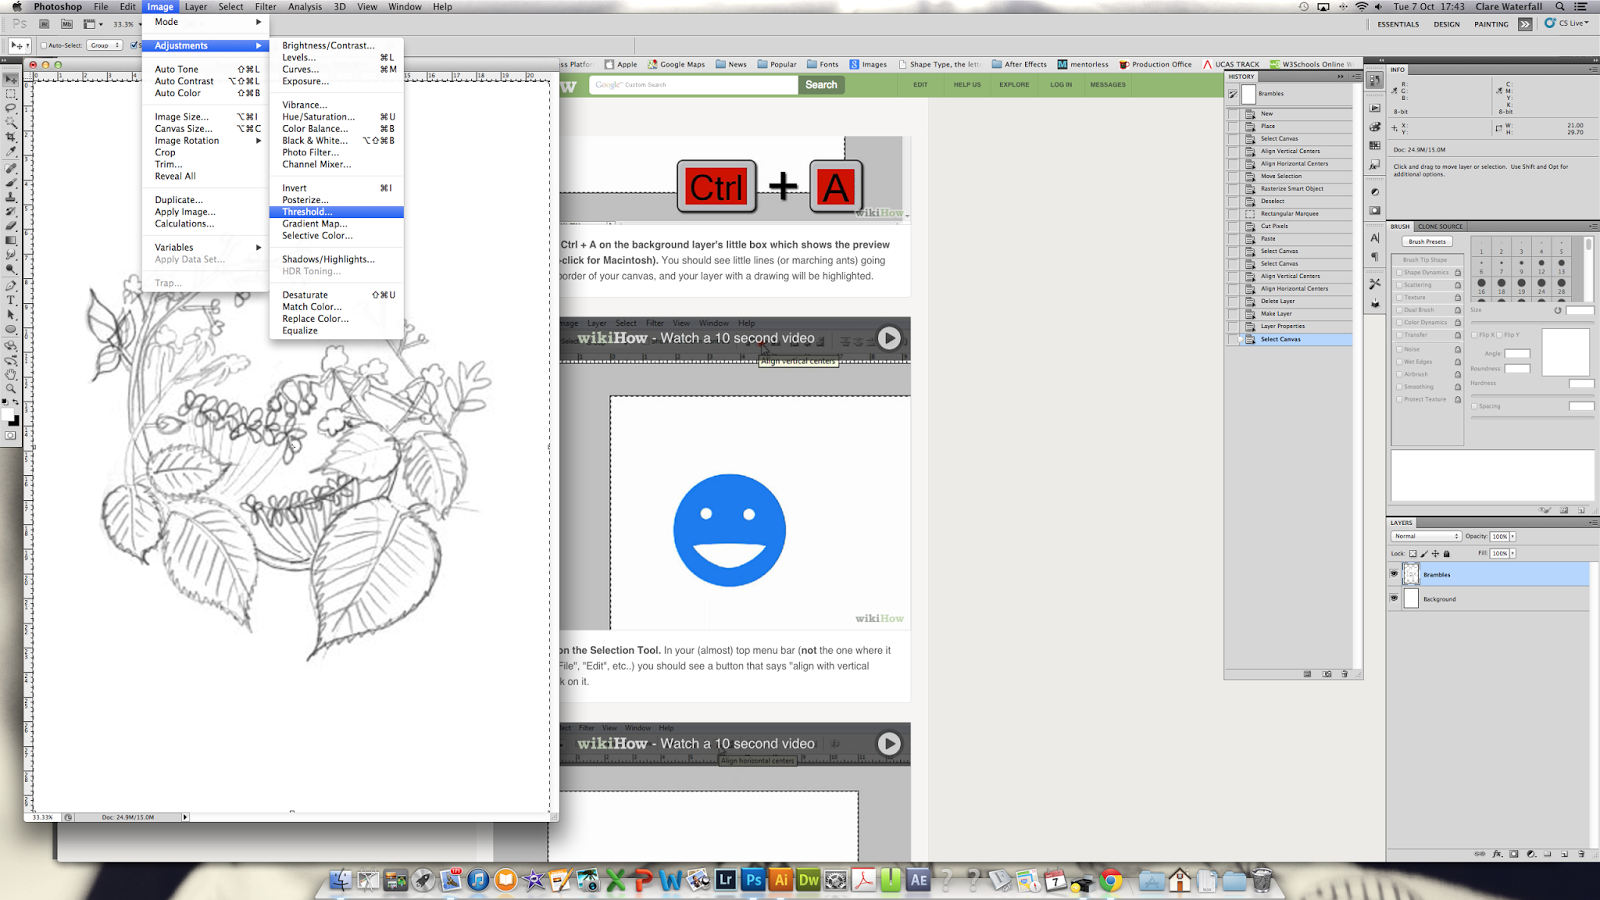 |
| We now want to adjust the Threshold. Basically the threshold is a limit that determines if a colour in the image is darker than this limit, it will turn black and if it's lighter, it will turn grey. This is a very quick way of getting a high contrast image, getting rid of greys and leaving good old black and white. So using tool bar Image > Adjustments > Threshold |
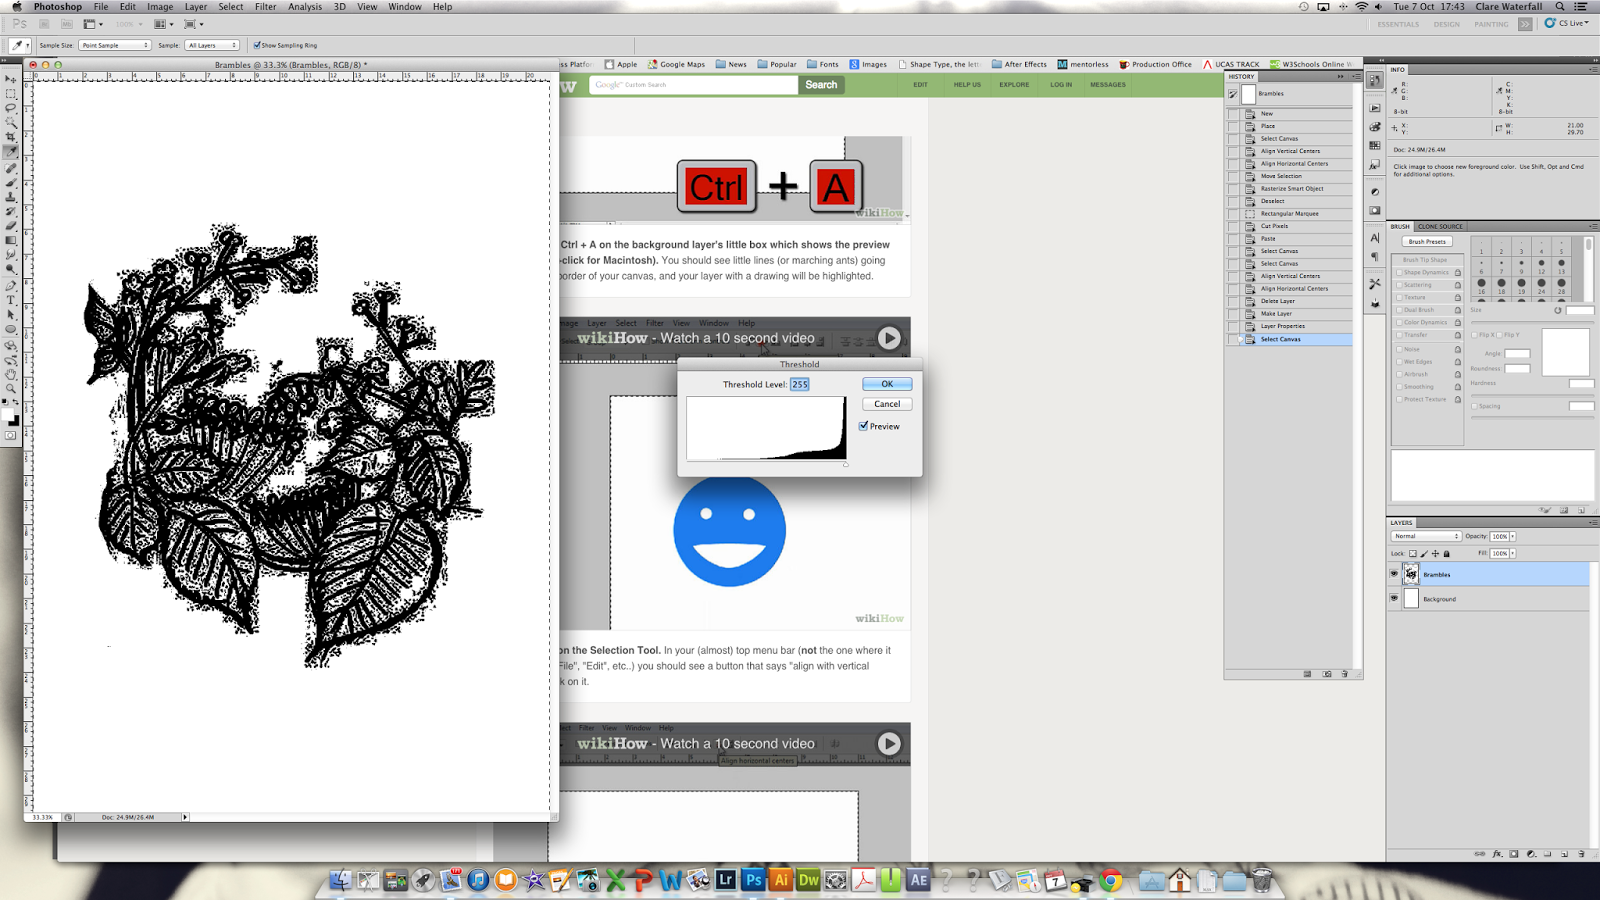 |
| Using the slide scale adjust your image, the higher the threshold, the blacker the image |
 |
| The lower, the lighter/whiter |
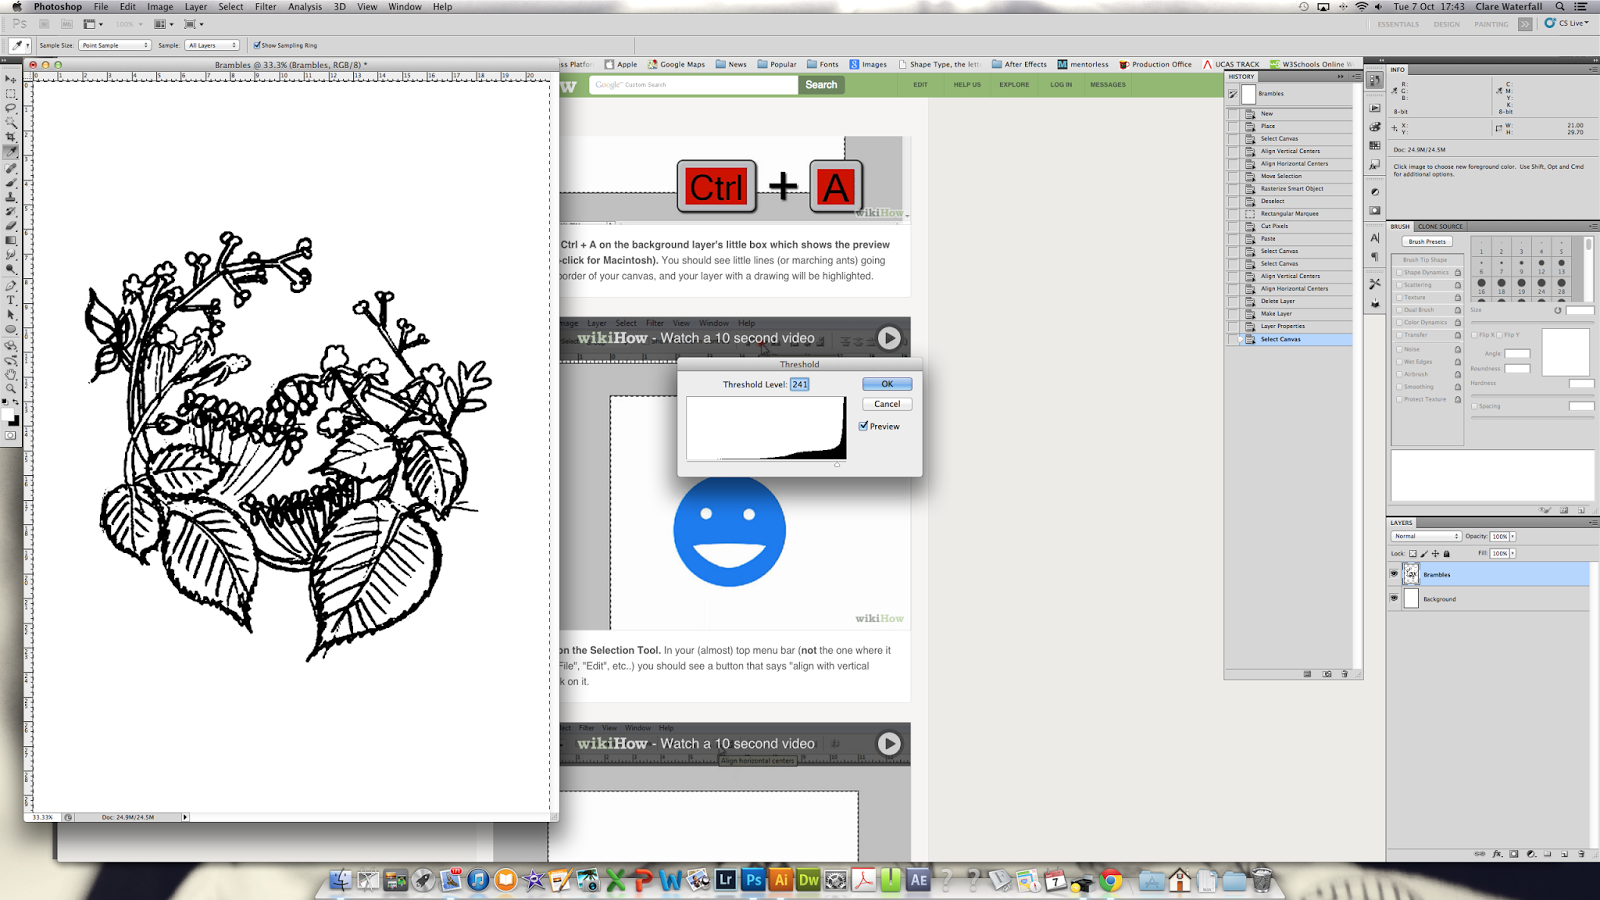 |
| This seems good for me, not your value (241 etc. will differ depending on subject so don't just take this value as gospel) |
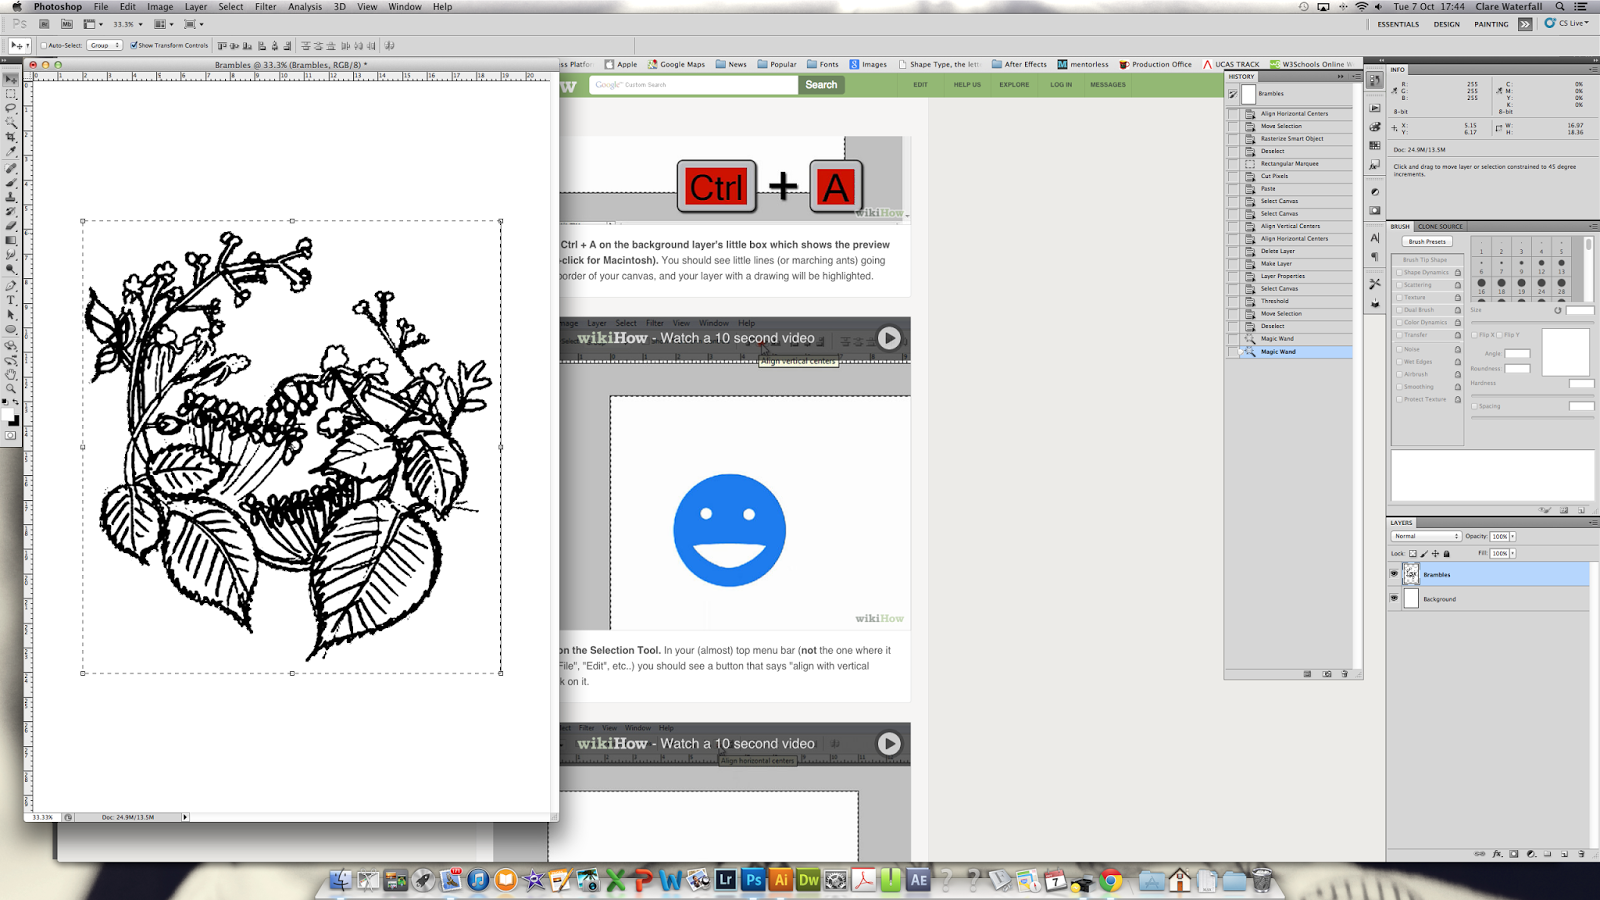 |
| We want to get rid of our white areas. Using the magic wand tool (select from sidebar or hit W) select your whites - this is simply done by clicking with the curser on any of the white area |
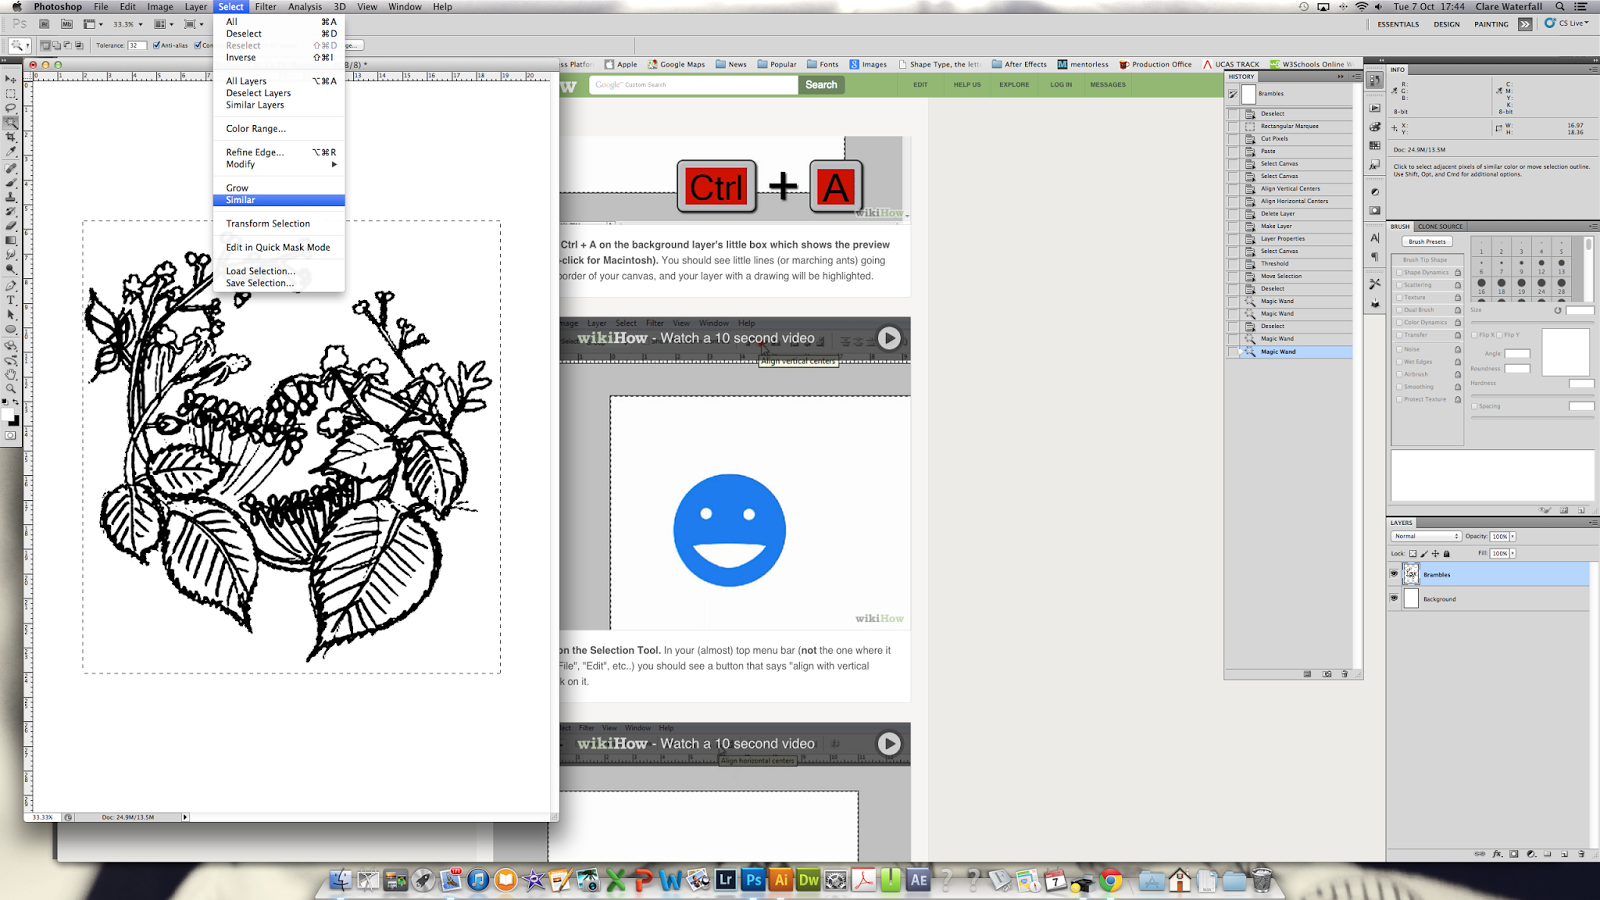 |
| We want to also select all the whites within the sketch, we can do this be looking for the same/similar colour using Select > Similar. This will look for all areas of white. |
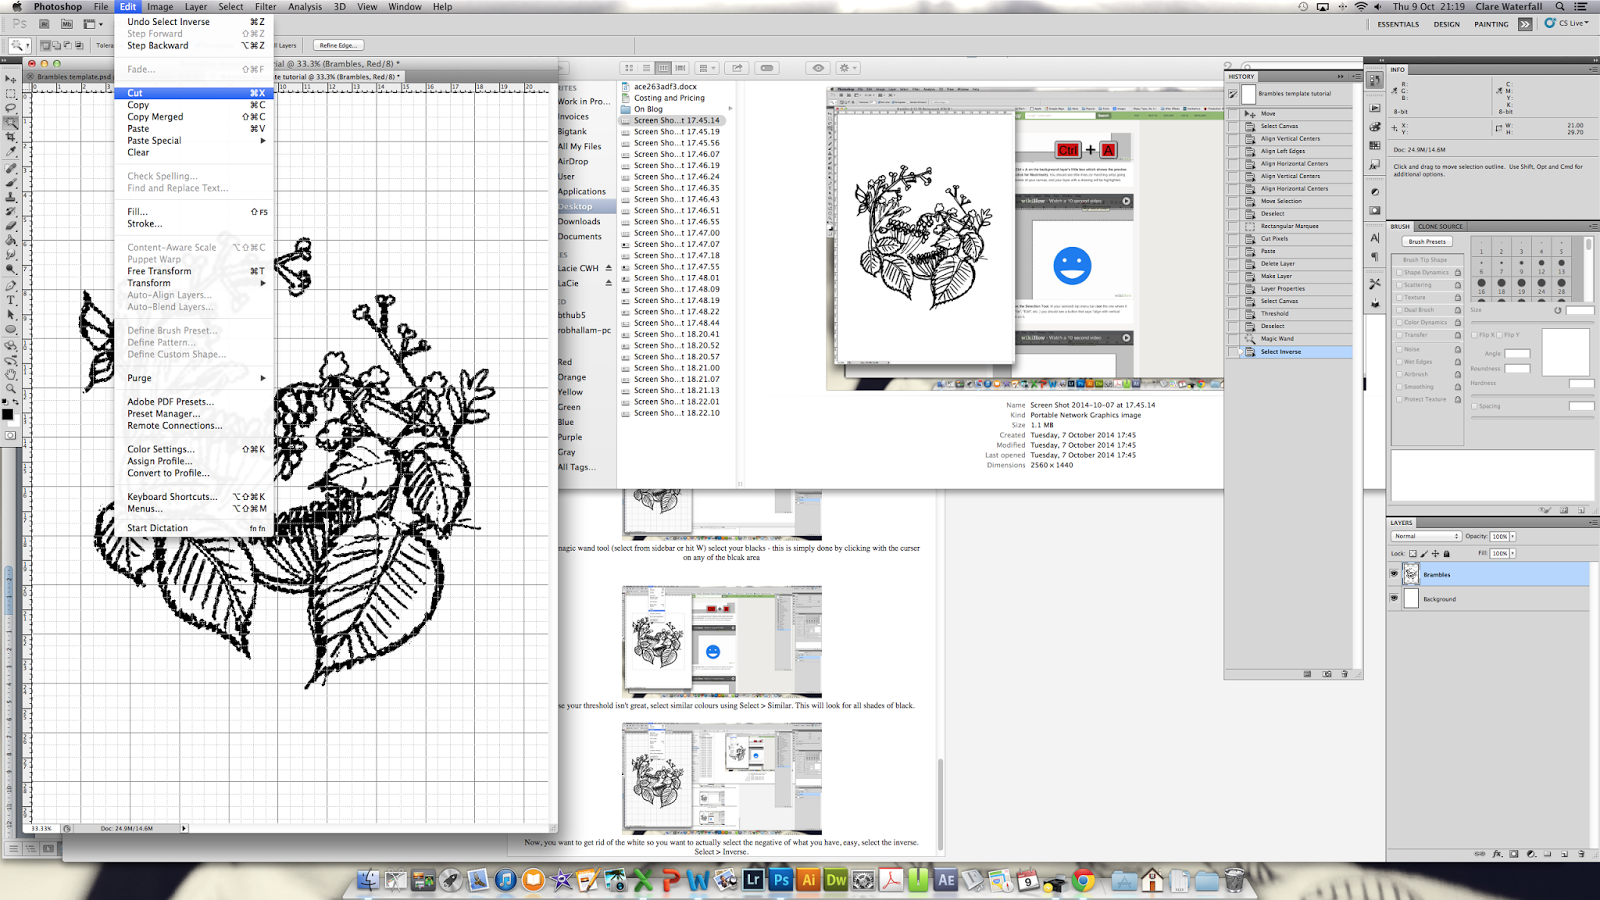 |
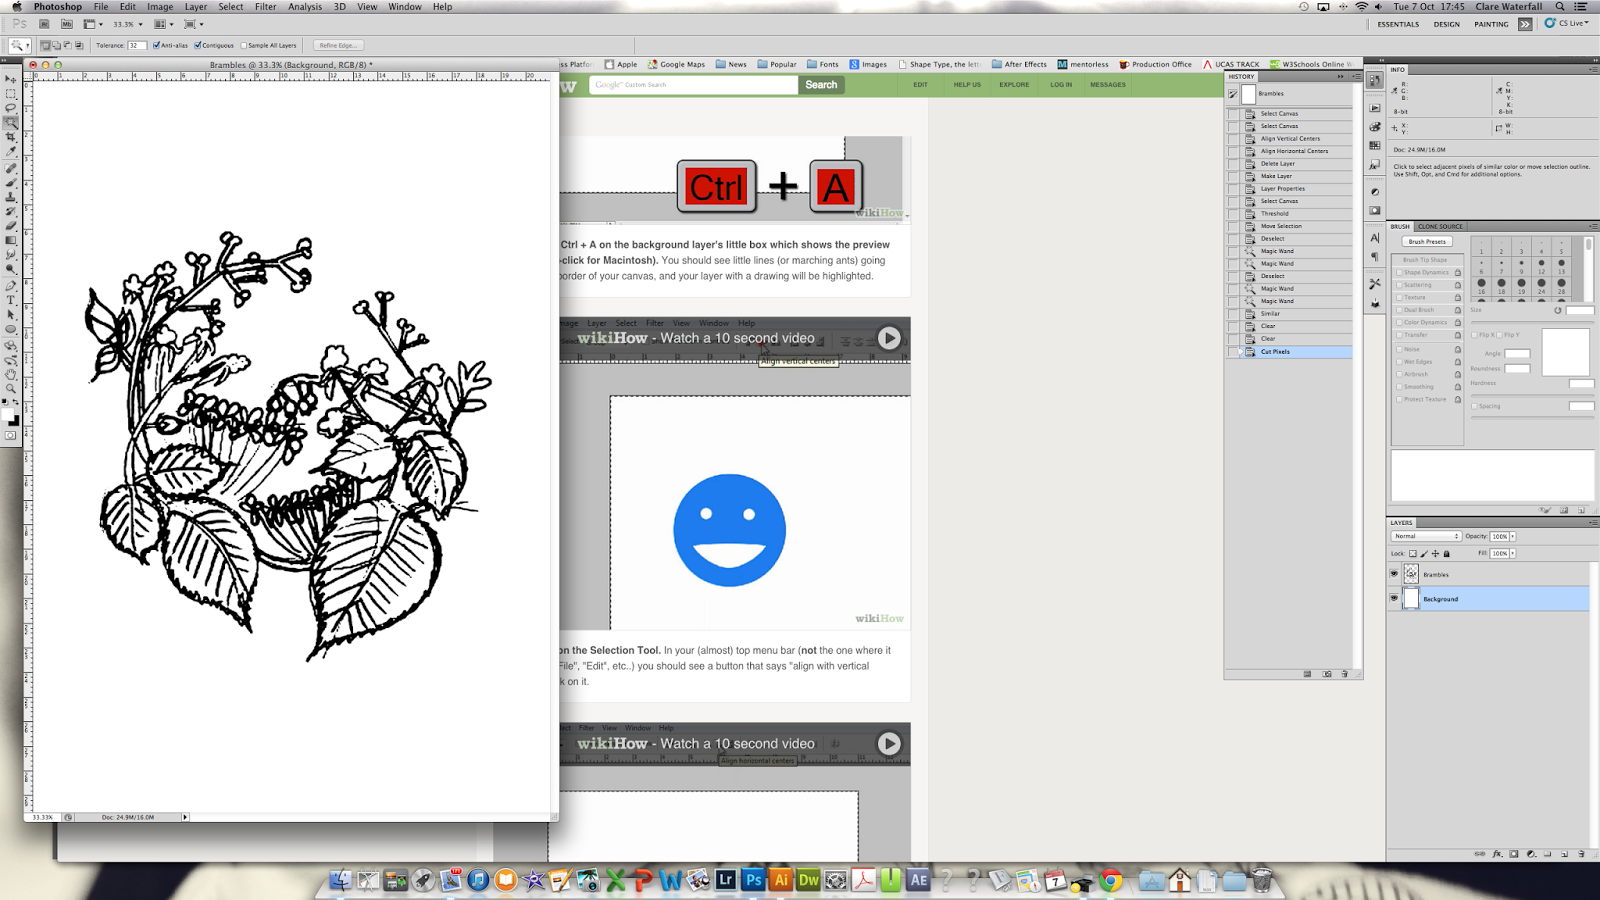
| Cut this away: Edit > Cut |
 |
| Now, select your background layer and hide it by clicking on the little eye icon. This keeps the background but we cannot see it. |
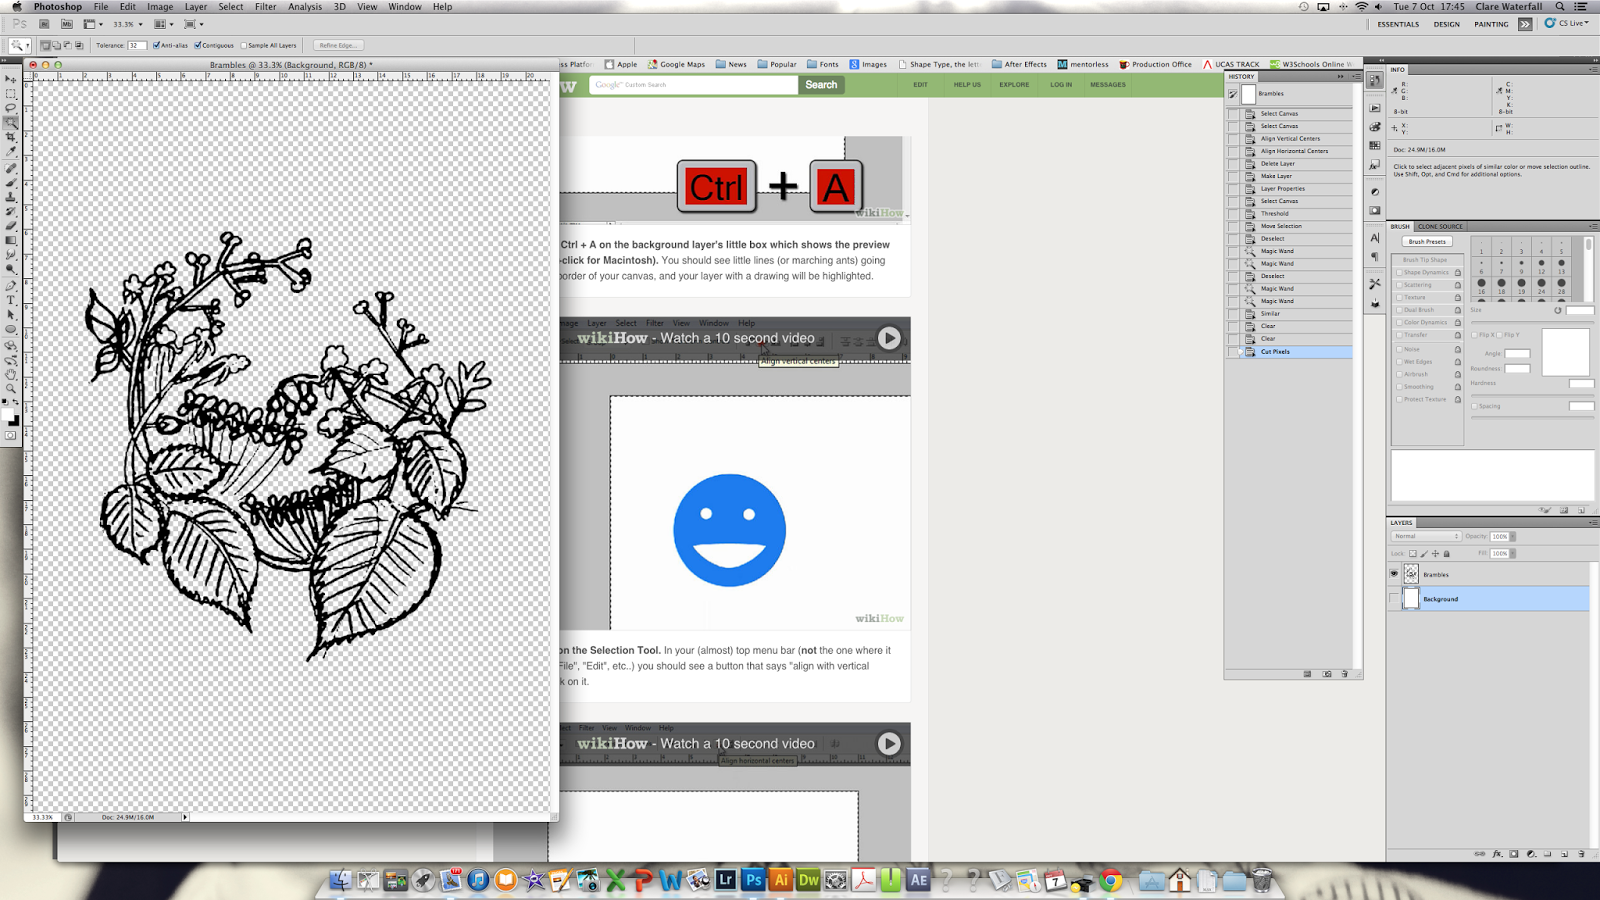 |
| See? actually we don't do we? :) |
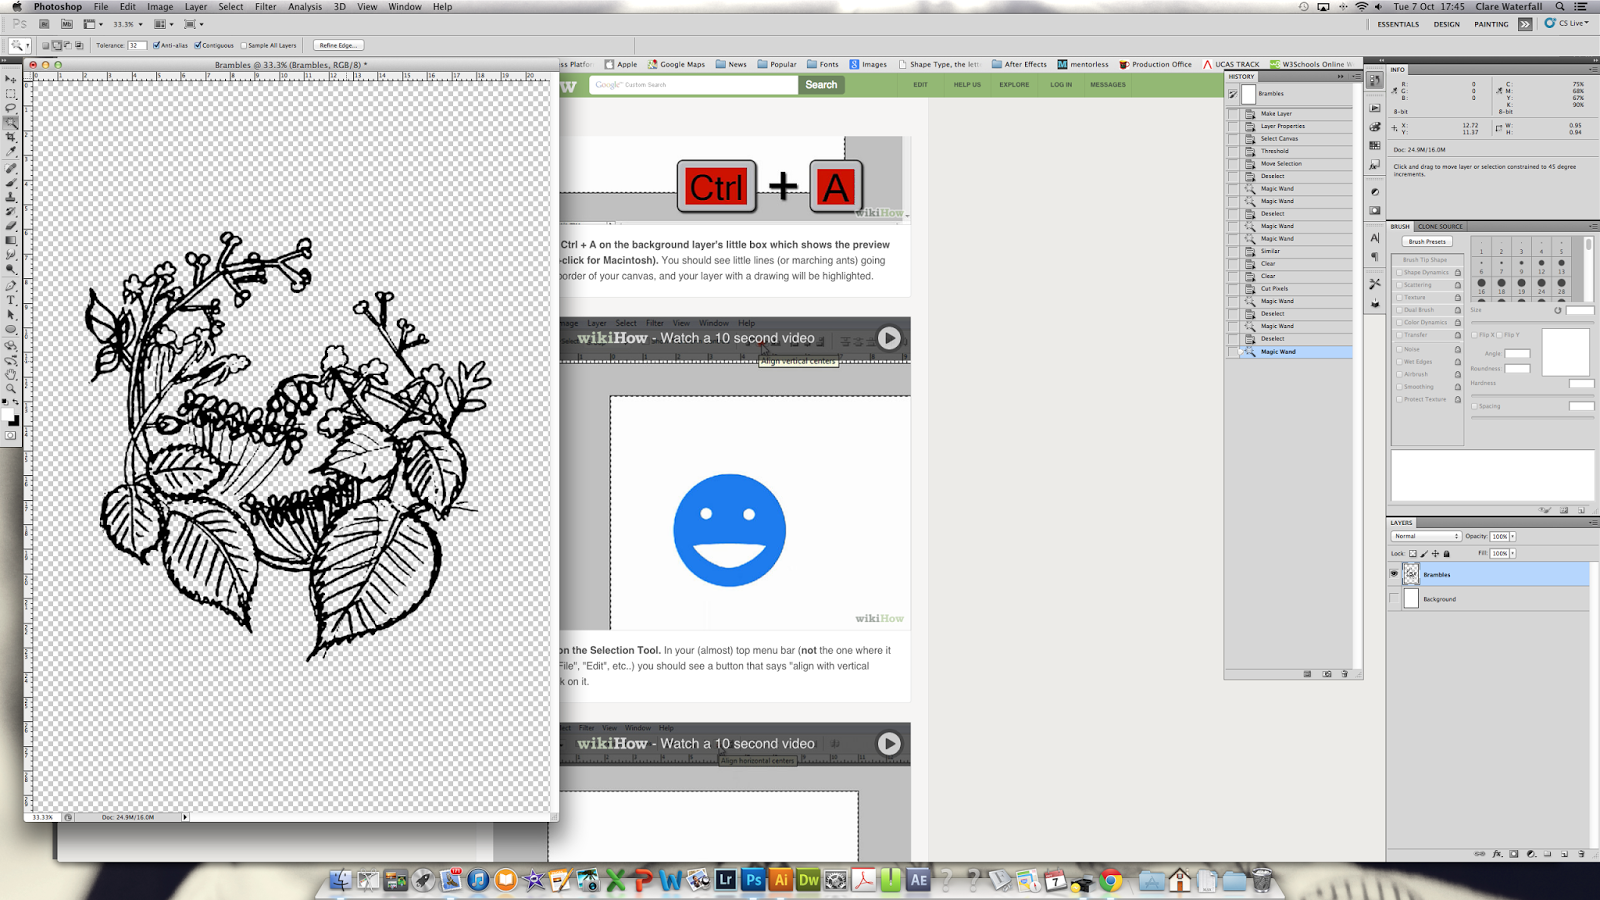 |
| Go back to your image layer (Brambles, whatever you named it) select the blacks with the magic wand tool (W) |
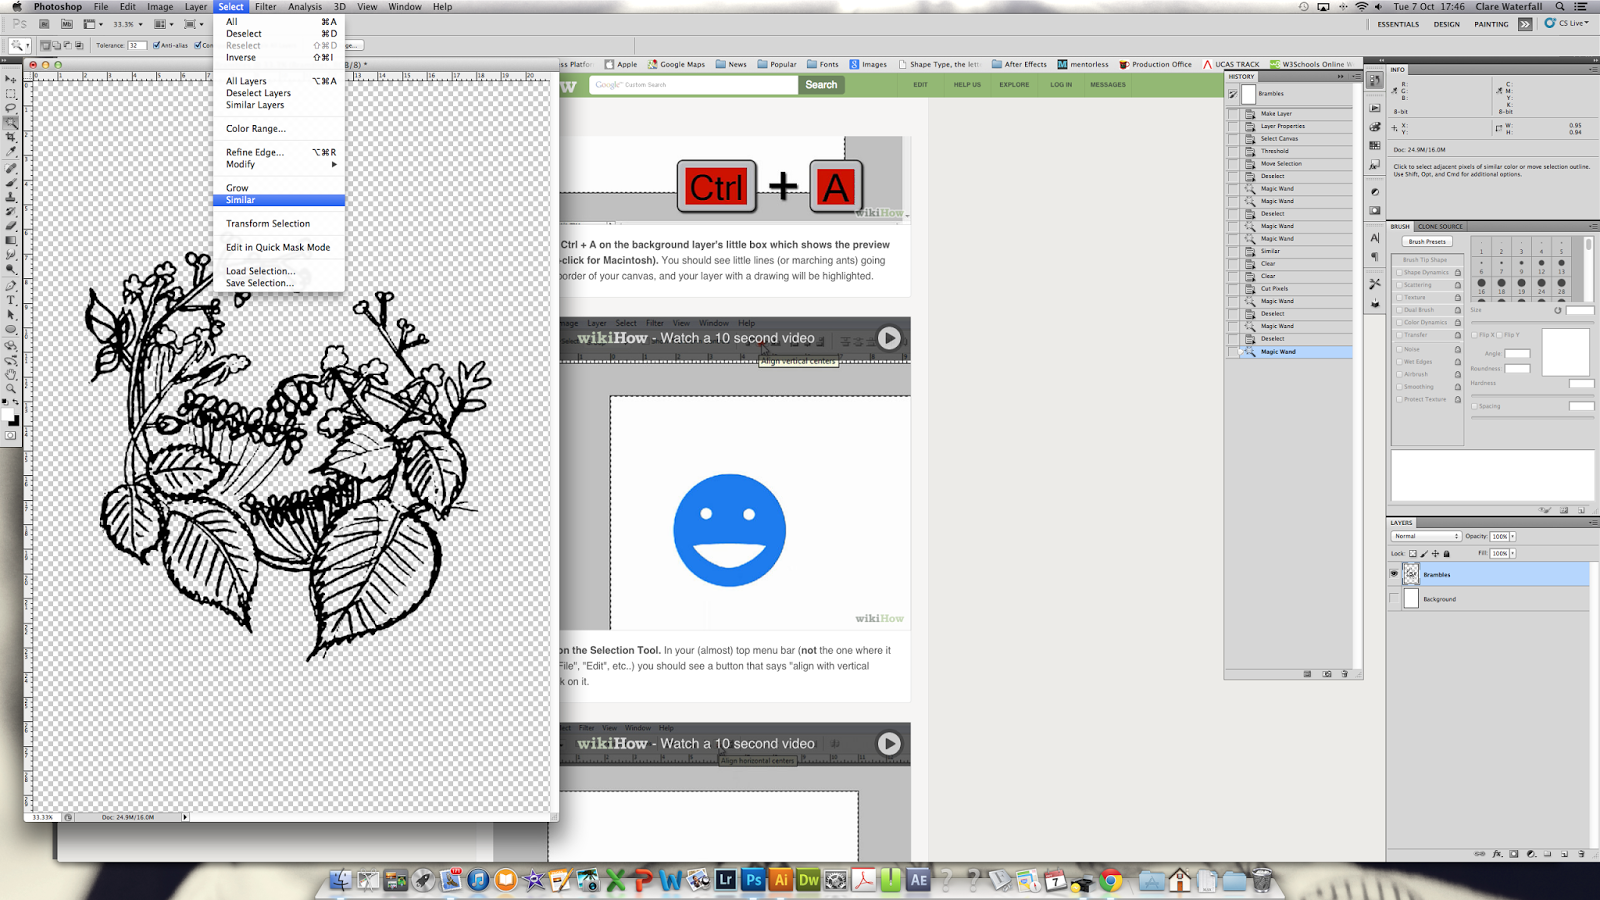 |
| Select similar colours/shades (just in case our threshold adjustments didn't actually give us true black throughout) |
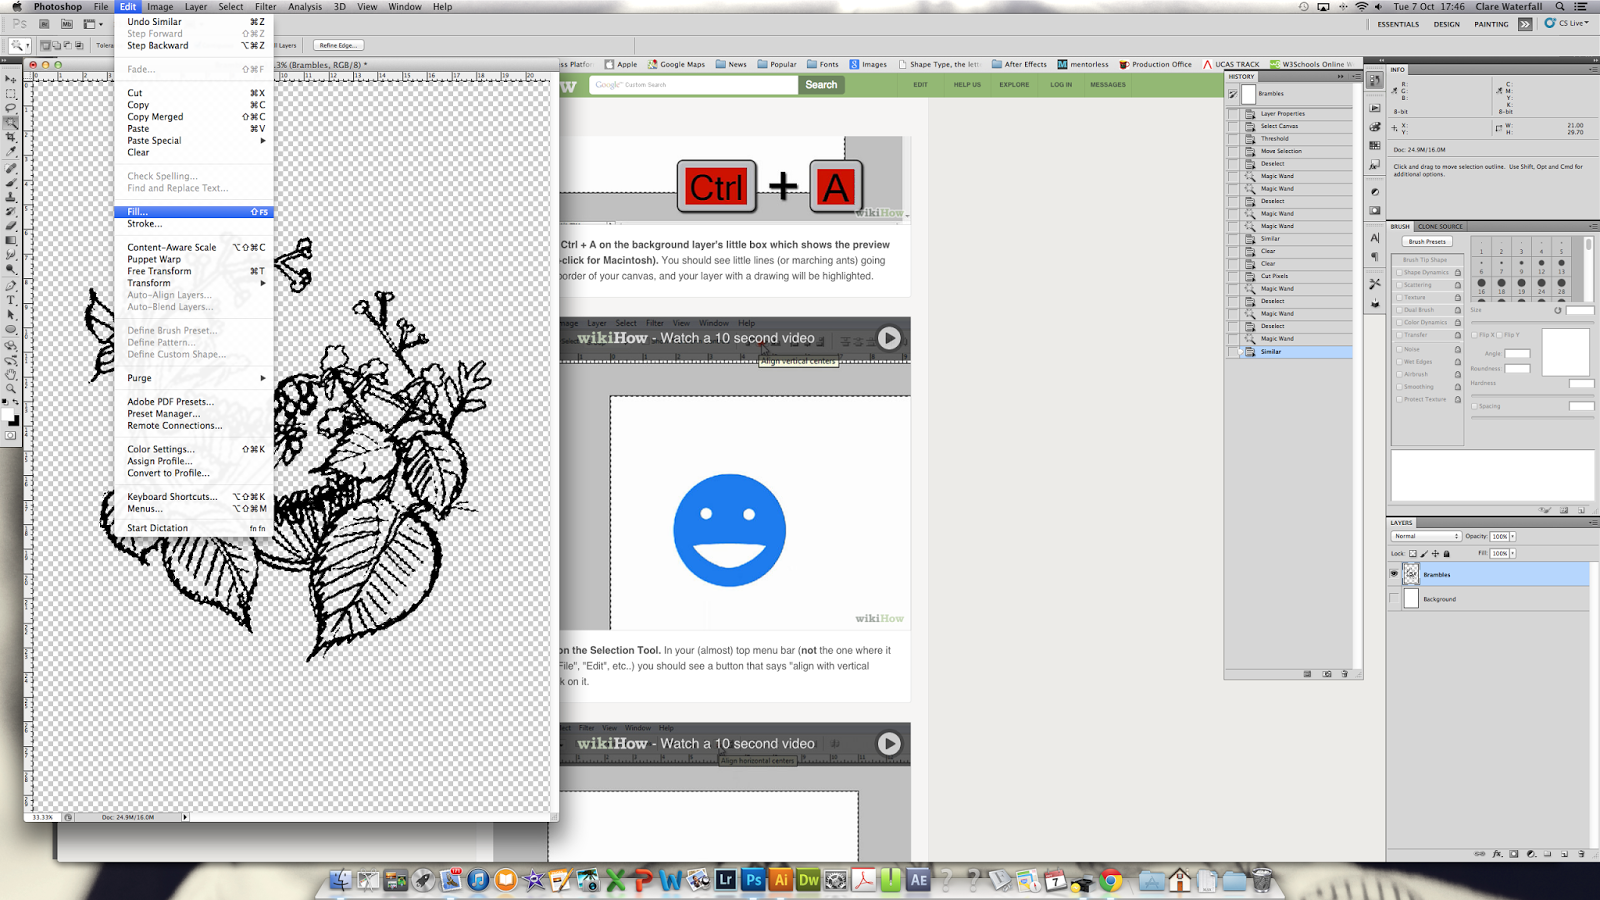 |
| We want to make this white. We could Inverse the whole image to make it a negative, but we are going to fill all those areas in with White. Again this is to safeguard in case we haven;t got the same shade of black throughout. We are using the toolbar Edit > Fill |
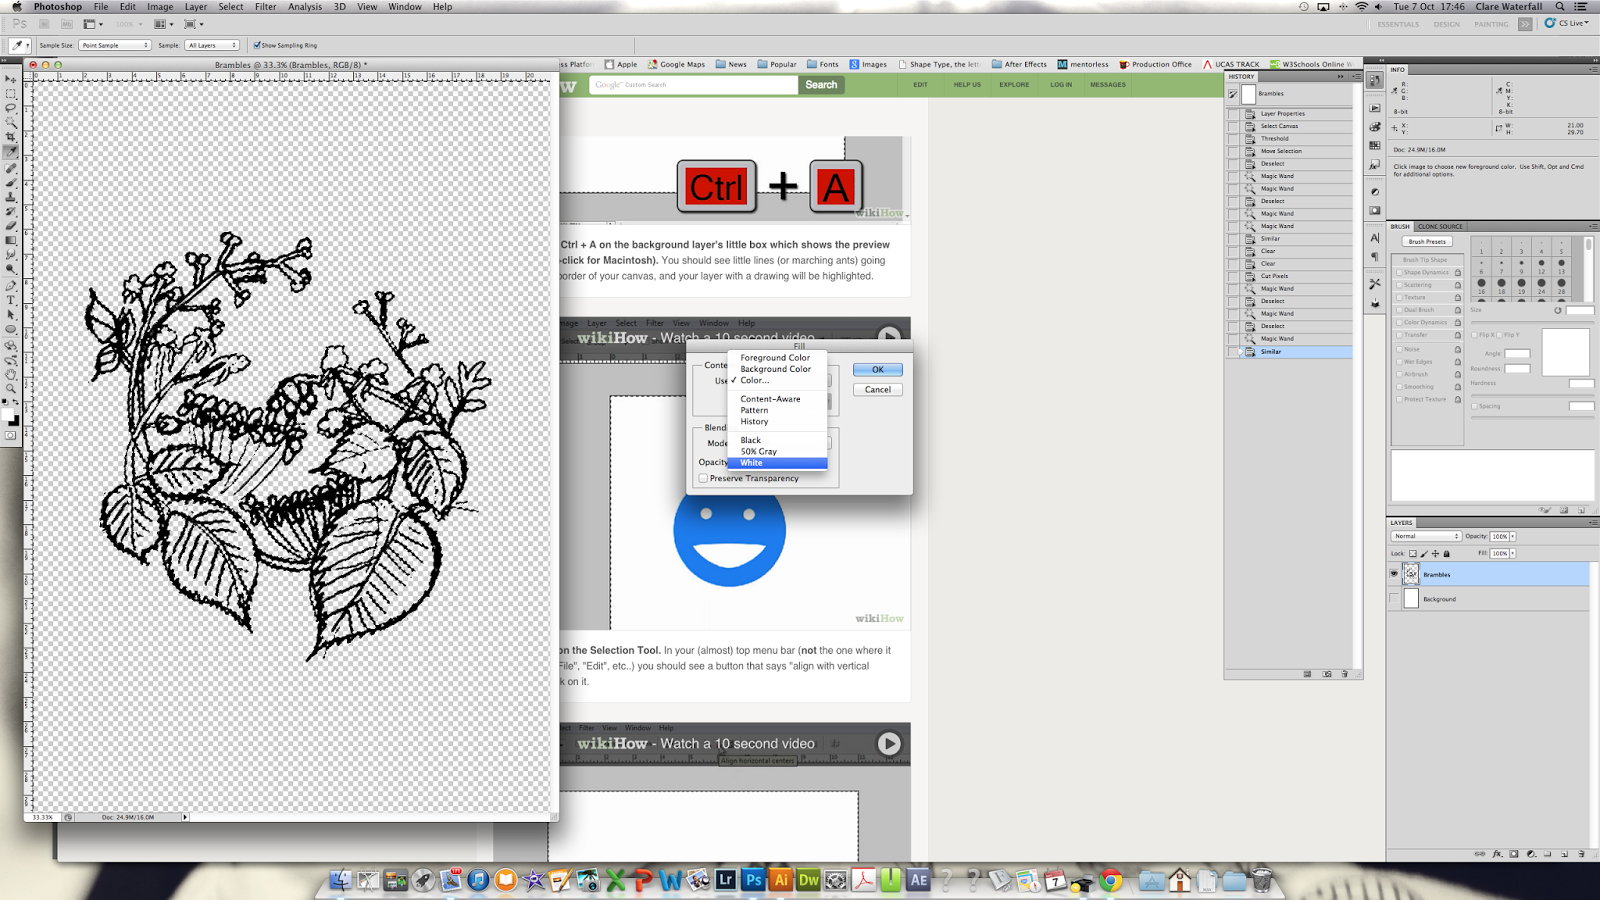 |
| Select White from the dropdown menu. |
 |
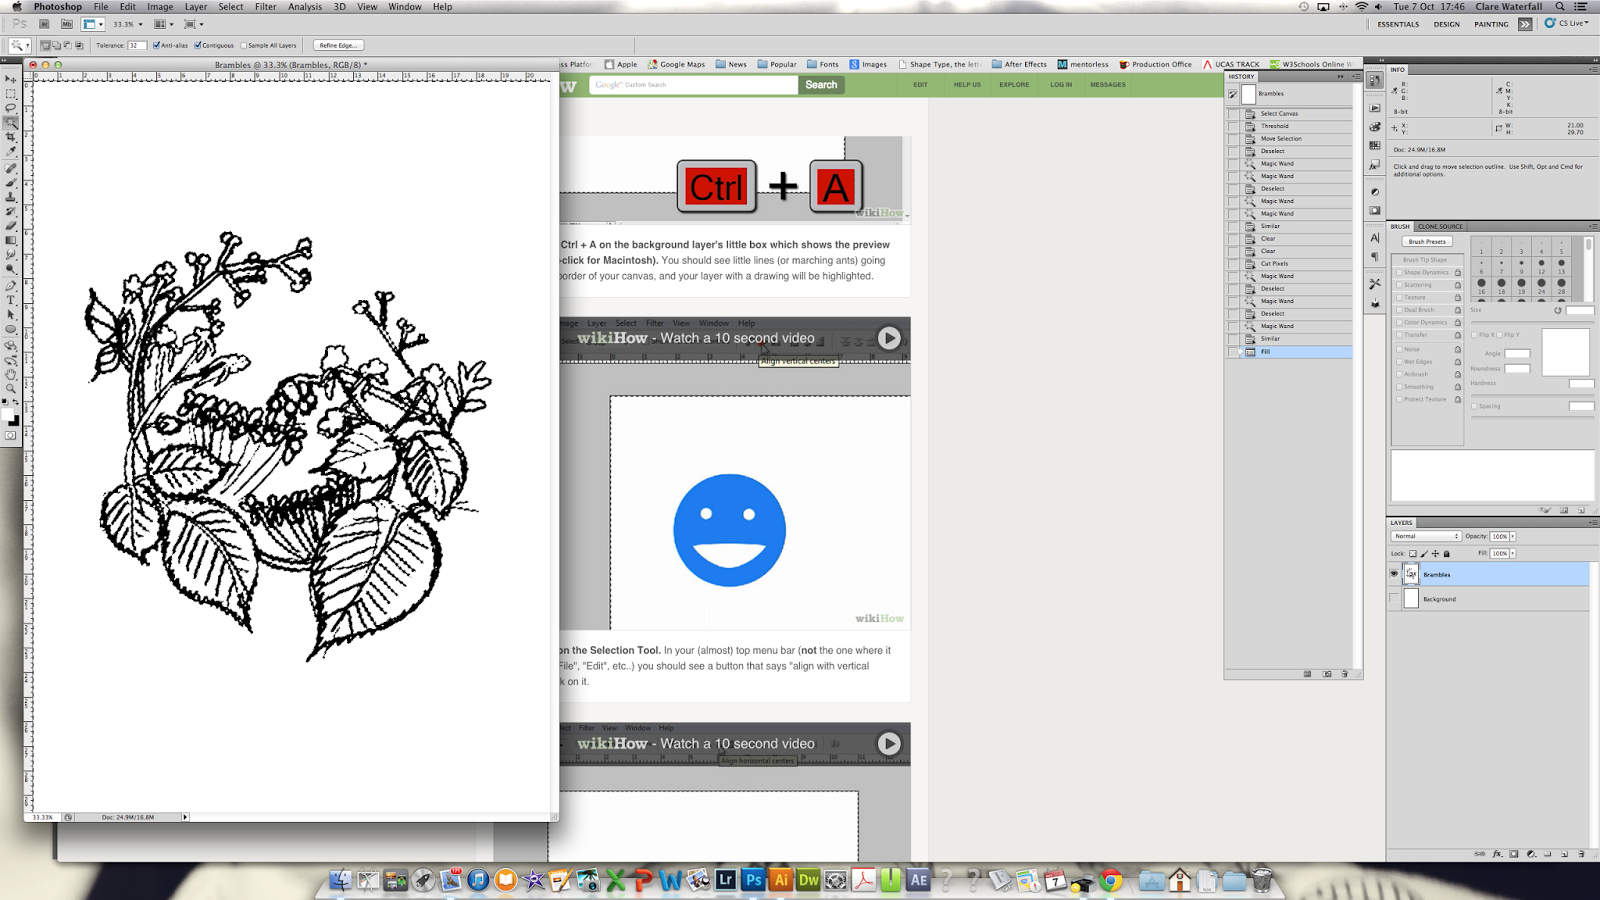
| This is what you are left with. *****Now hold it here. *****We'll pick this up shortly but I am going to show you the other method too. Whichever way you use, it will take you to the last area of filling in the background to grey. The areas of your papercut template that you will actually cut away! |
 |
| Instead of getting rid of the extra white bits and changing the black bits to white... confused? I am.... just select all the areas that aren't black... Magic wand, select black, Select > Inverse. Then Edit > Fill with white. |
 |
| Select your background layer |
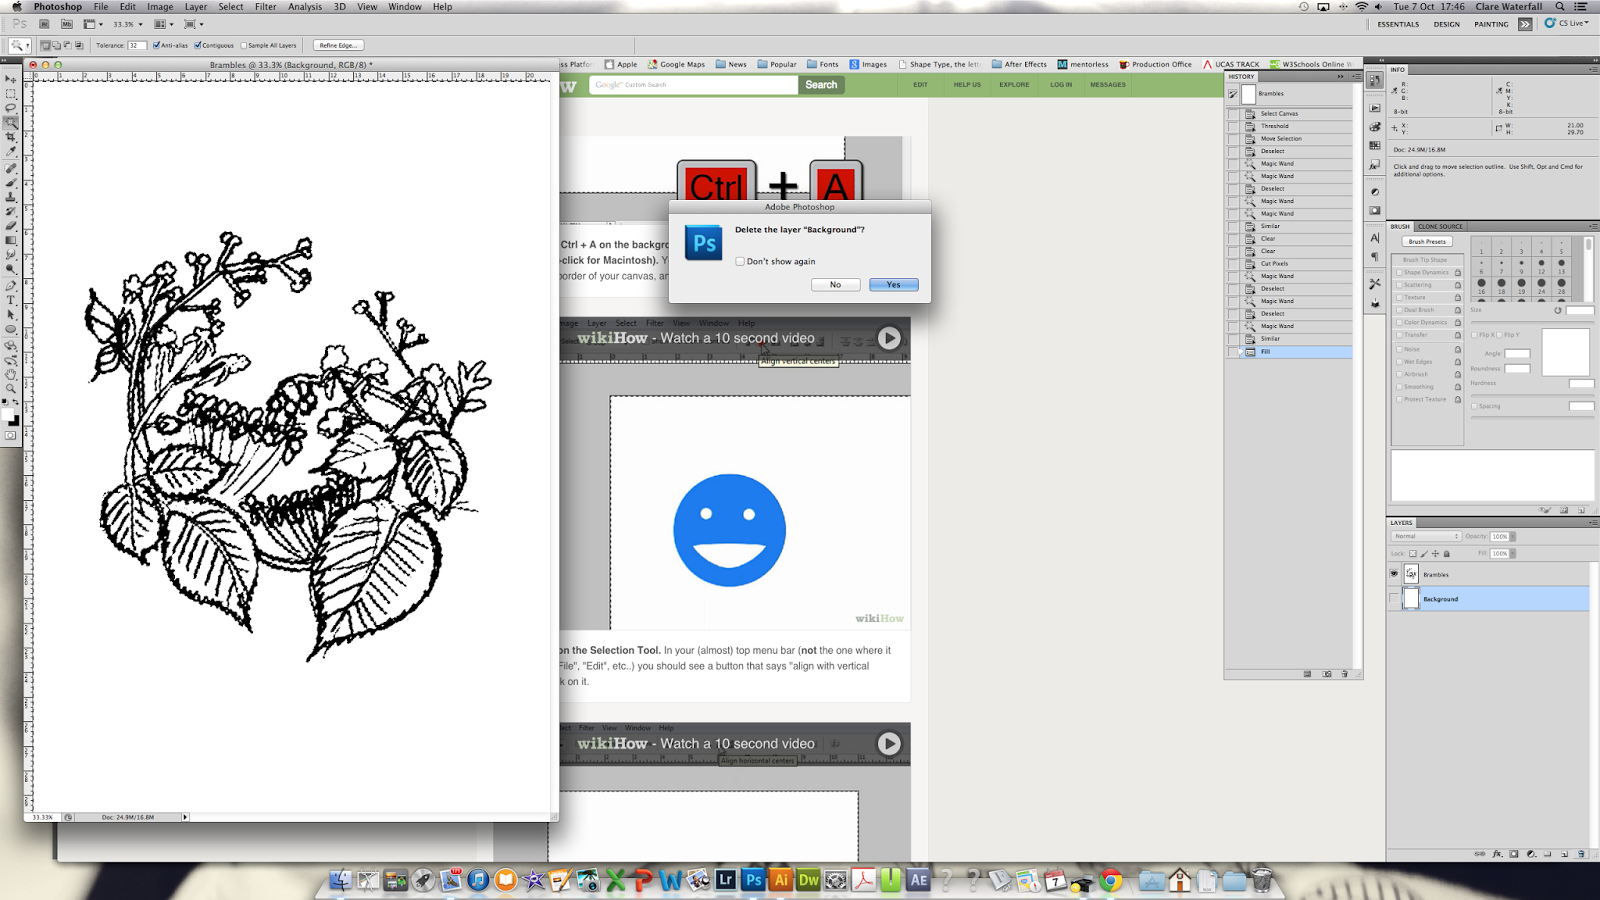 |
| Delete your background layer |
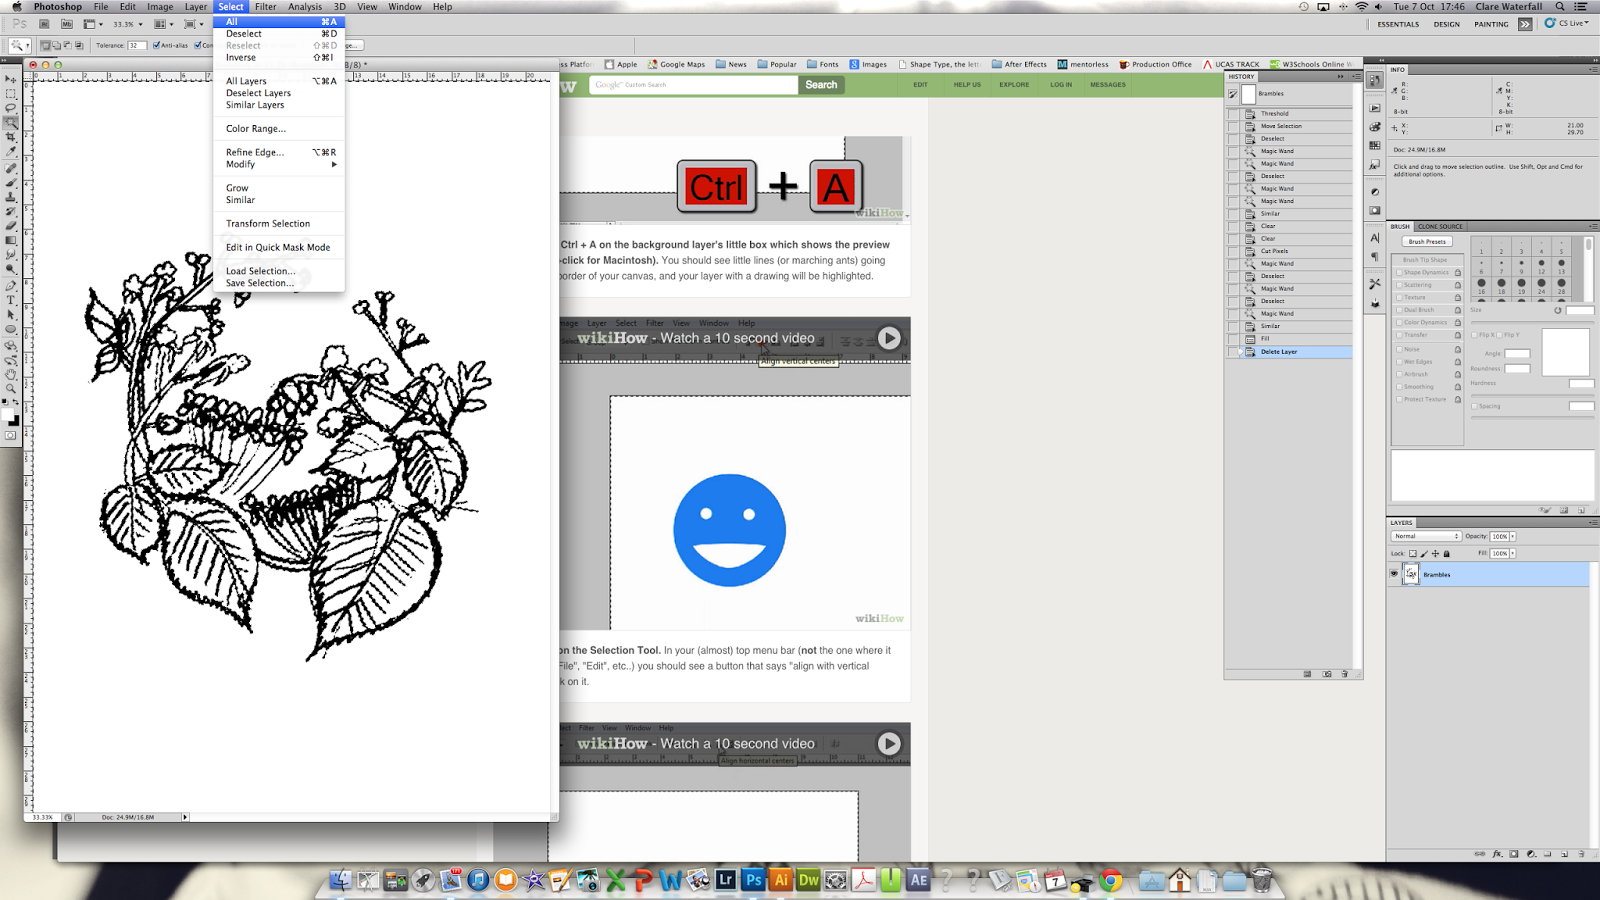 |
| You only have one remaining layer. Select >All |
 |
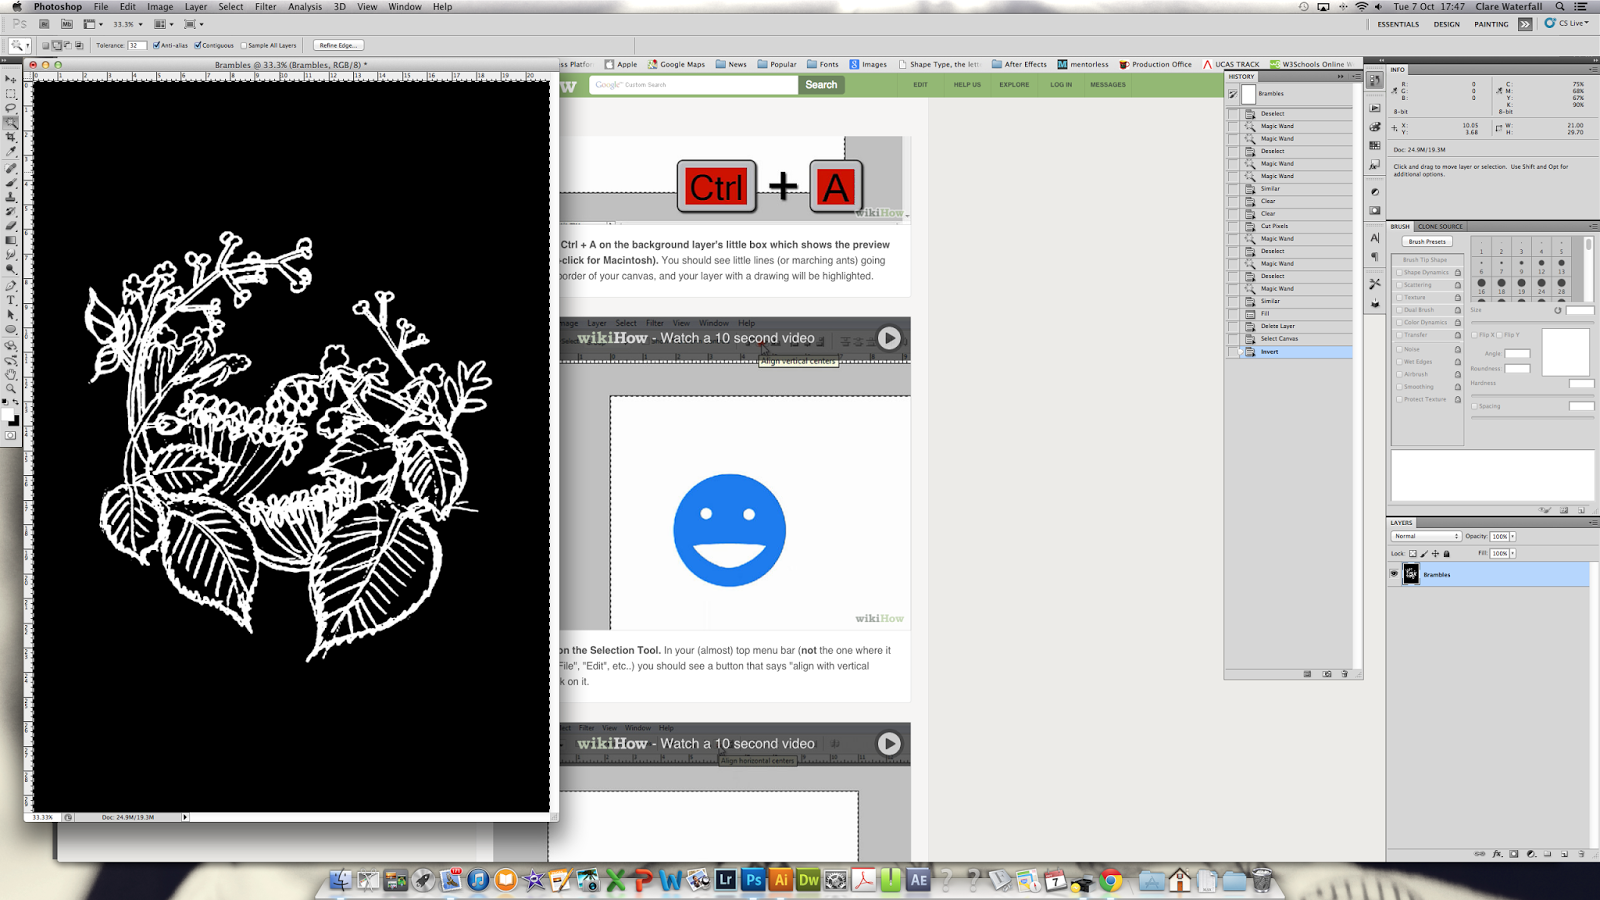
| Here is where we make the negative image. Image > Adjustments > Invert |
 |
| Ta Dahhhhh! |
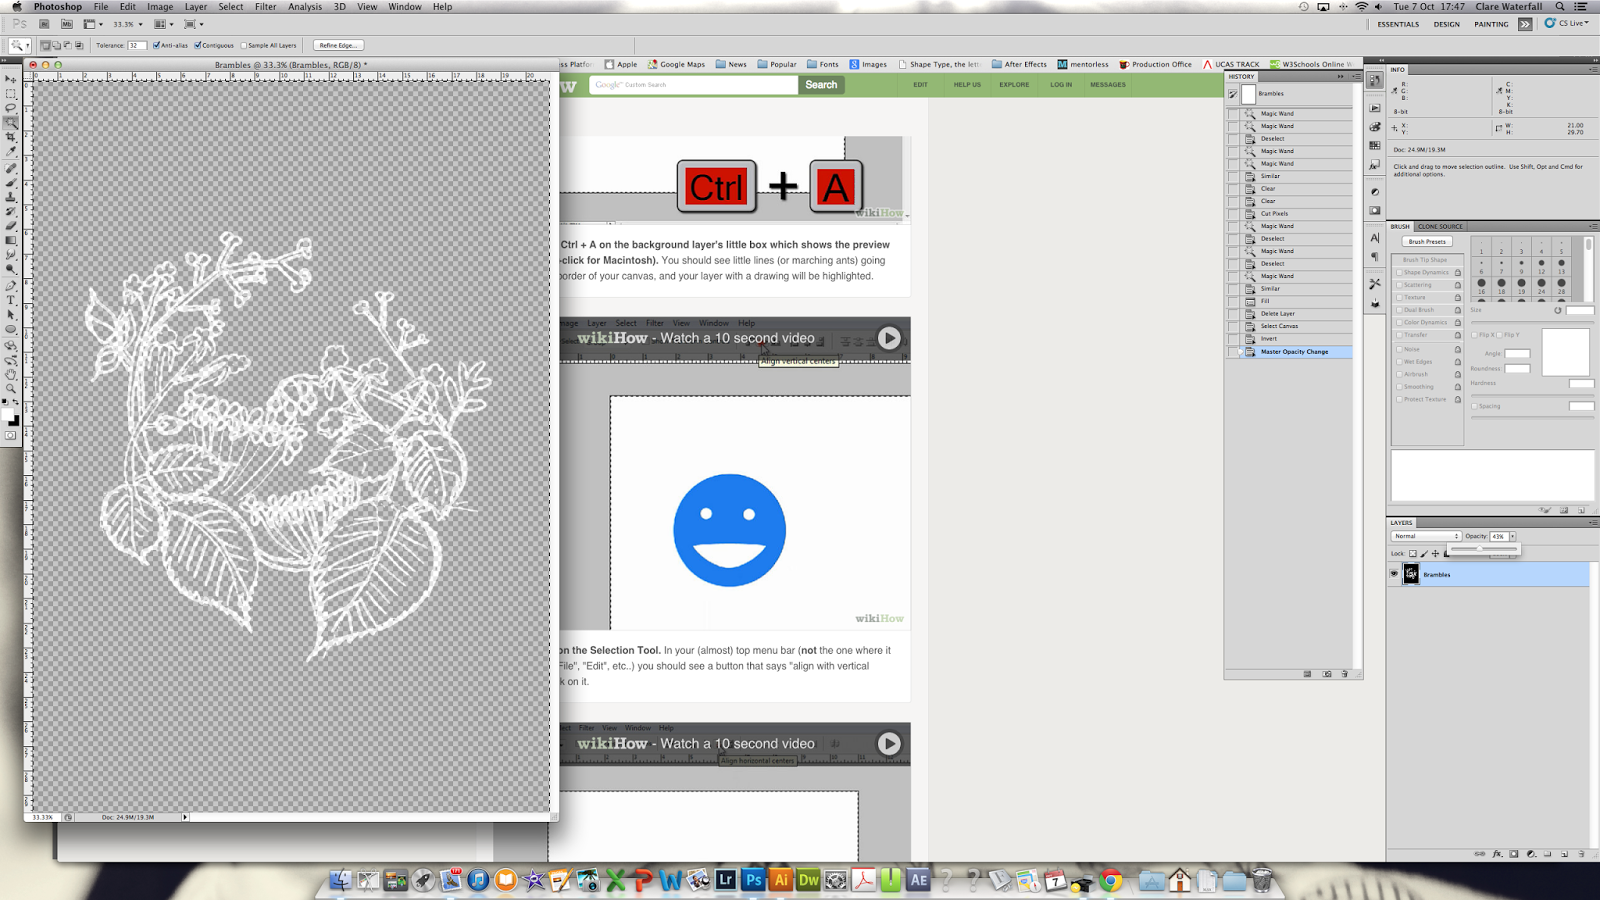 |
| We want this background to be a pale grey. We can do this a number of ways. We can turn down the opacity, see the highlighted box above the layer. You can adjust this until it looks good for you. Or... instead of reducing the opacity, you can do the following. |
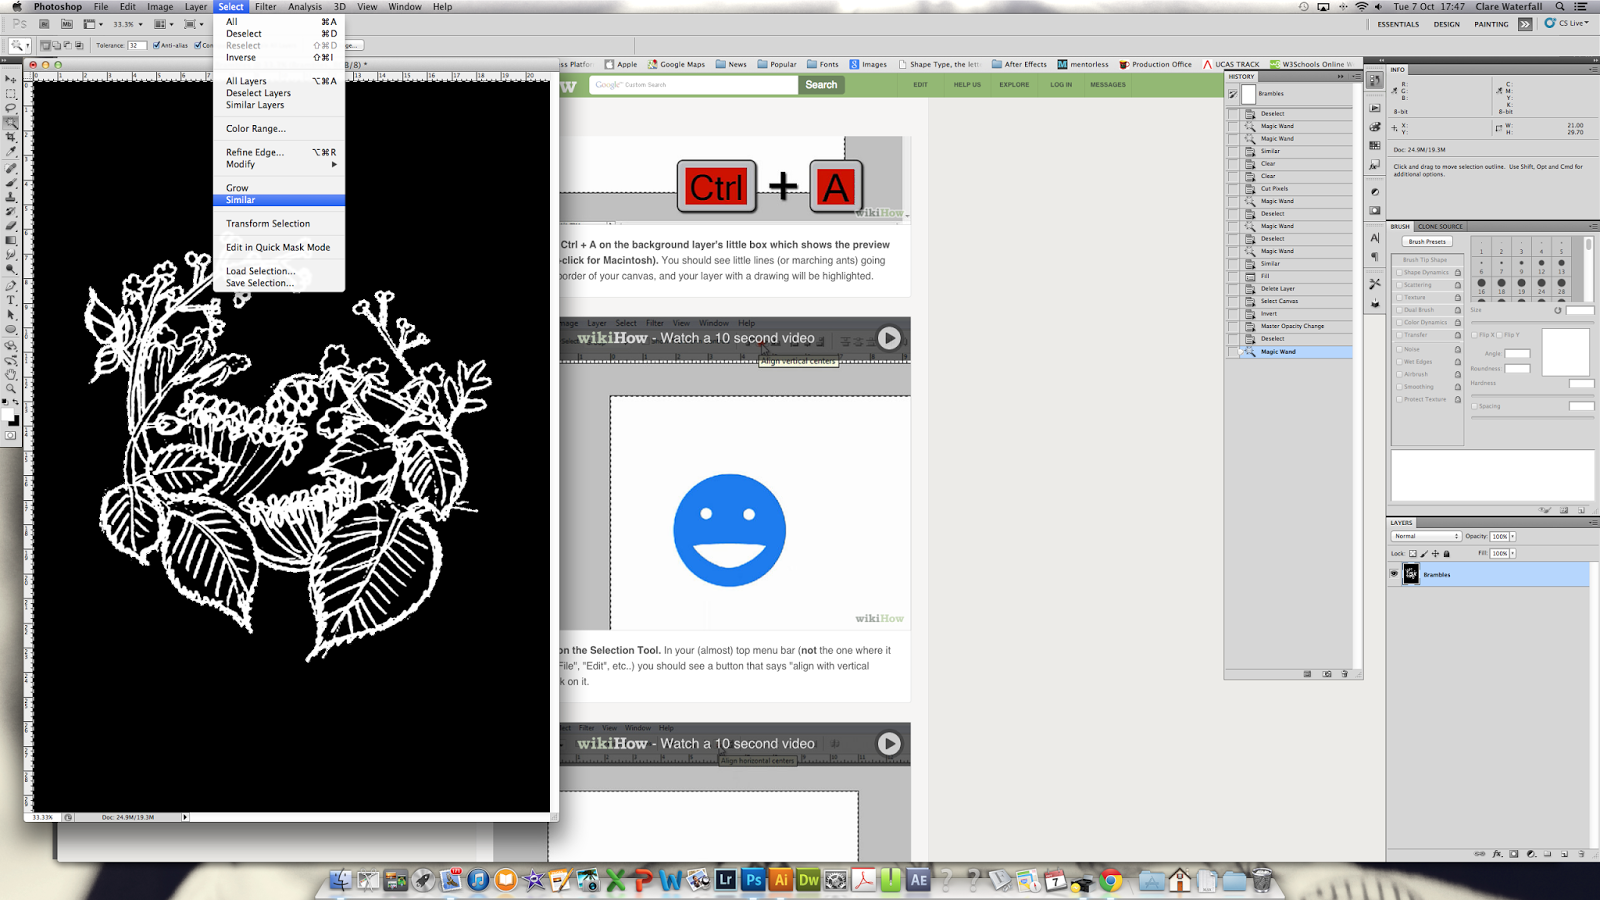 |
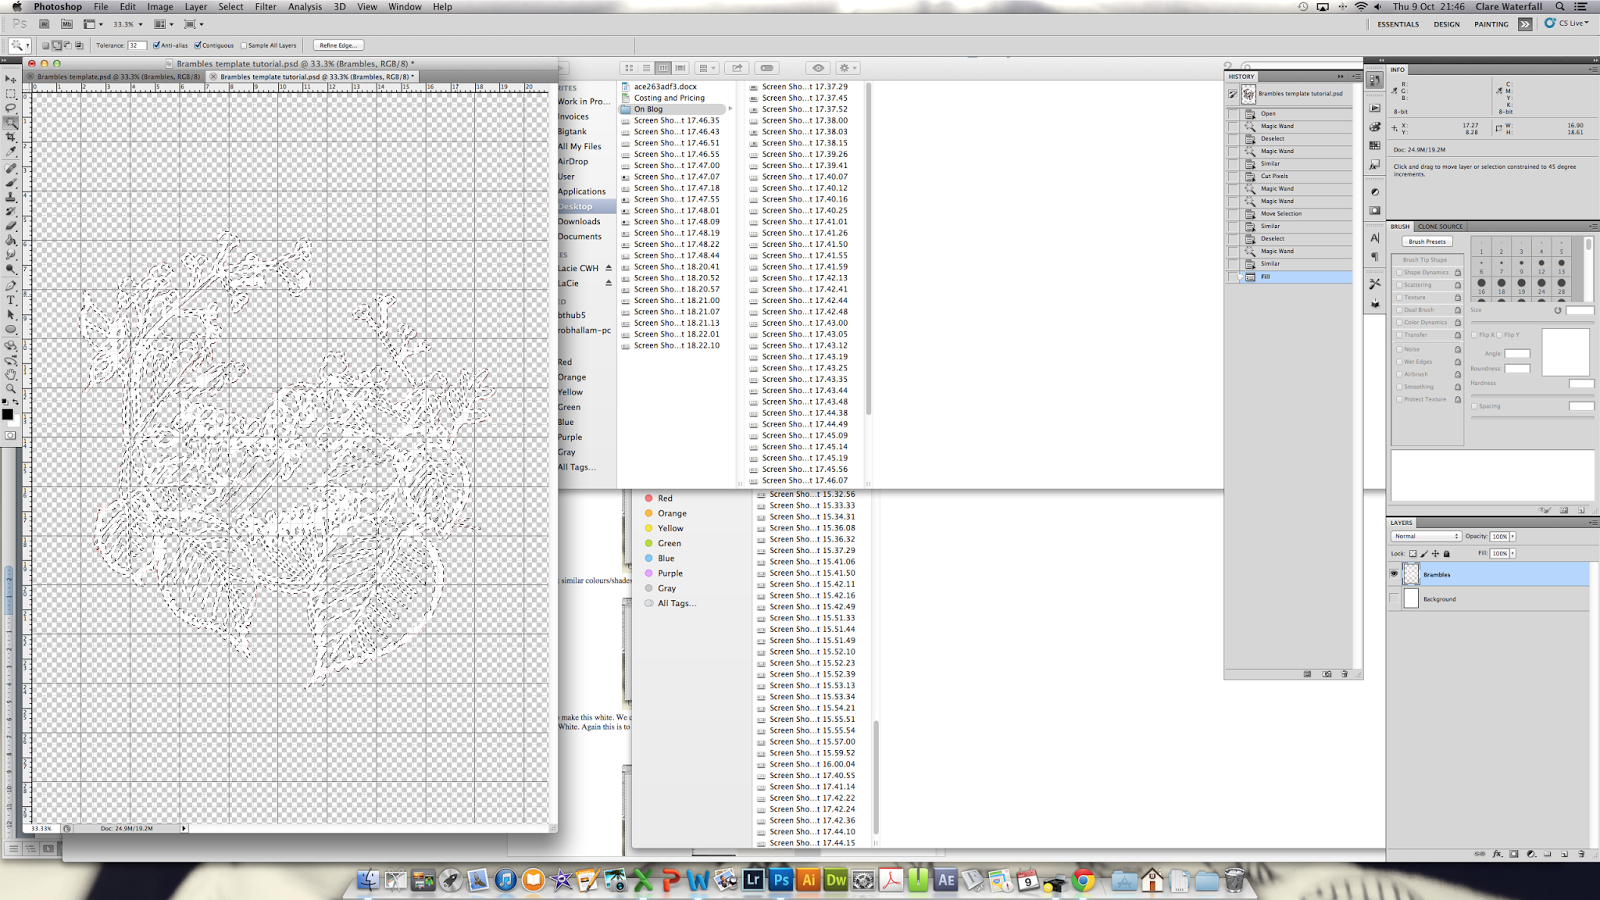
| ******Come back all those on hold from before!!! You can fill in the background areas with a paint colour. At this stage you will either have a blackground (if followingthe last method) or a translucent background (the grey squared grid) Using your Magic Wand tool (W) hit the black area and Select > Similar |
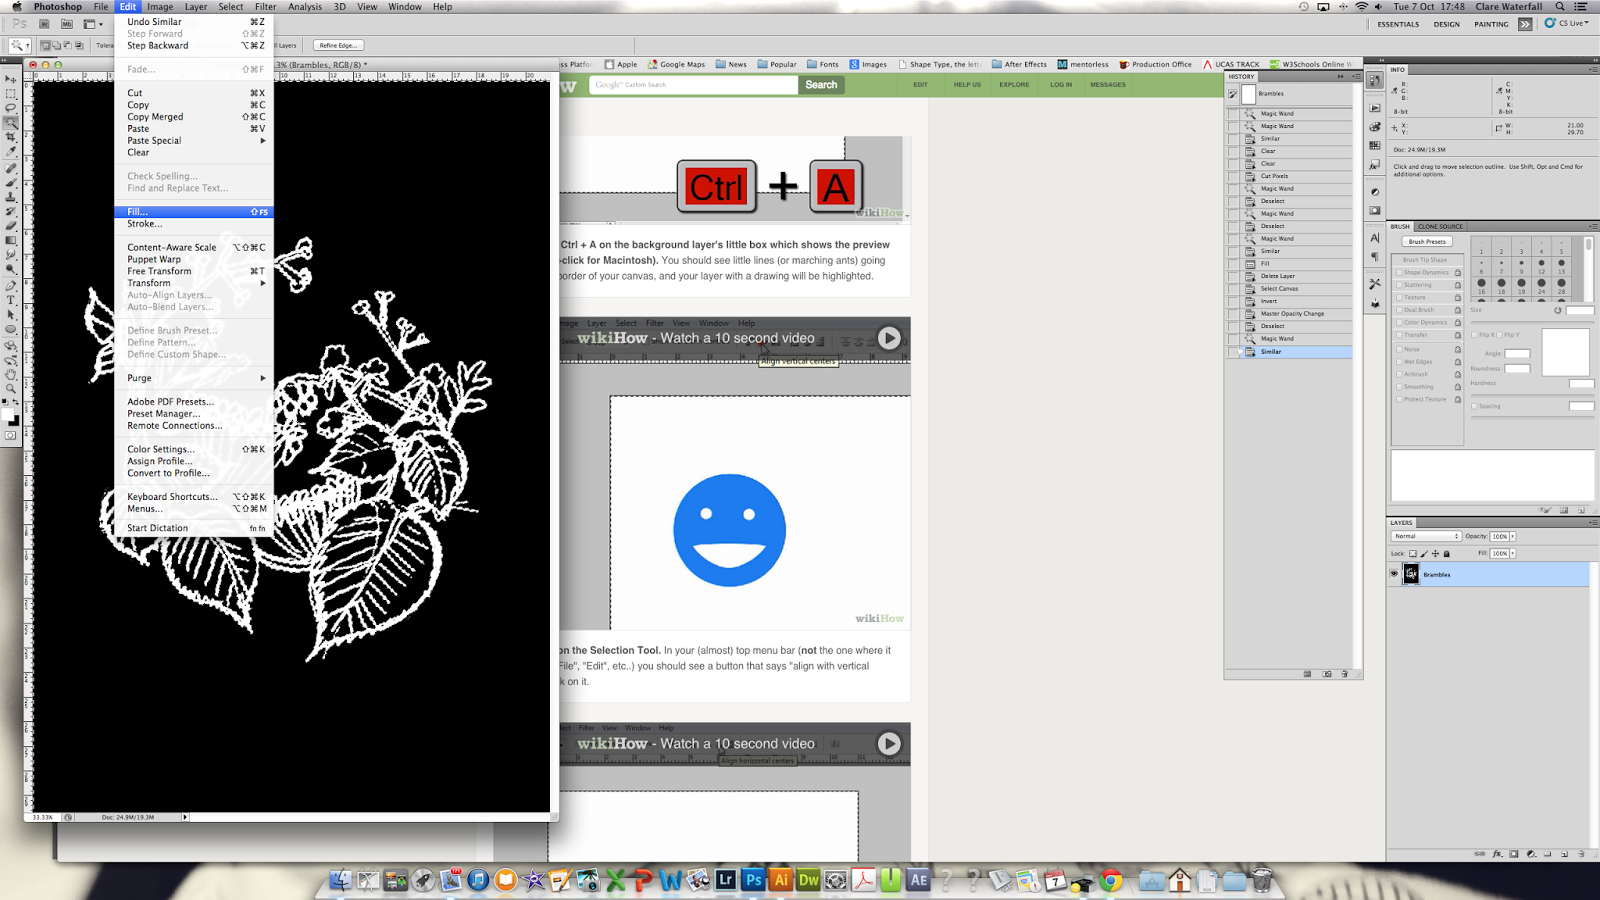 |
| Fill the background, flood this area, with a pot of virtual grey paint. Edit > Fill |
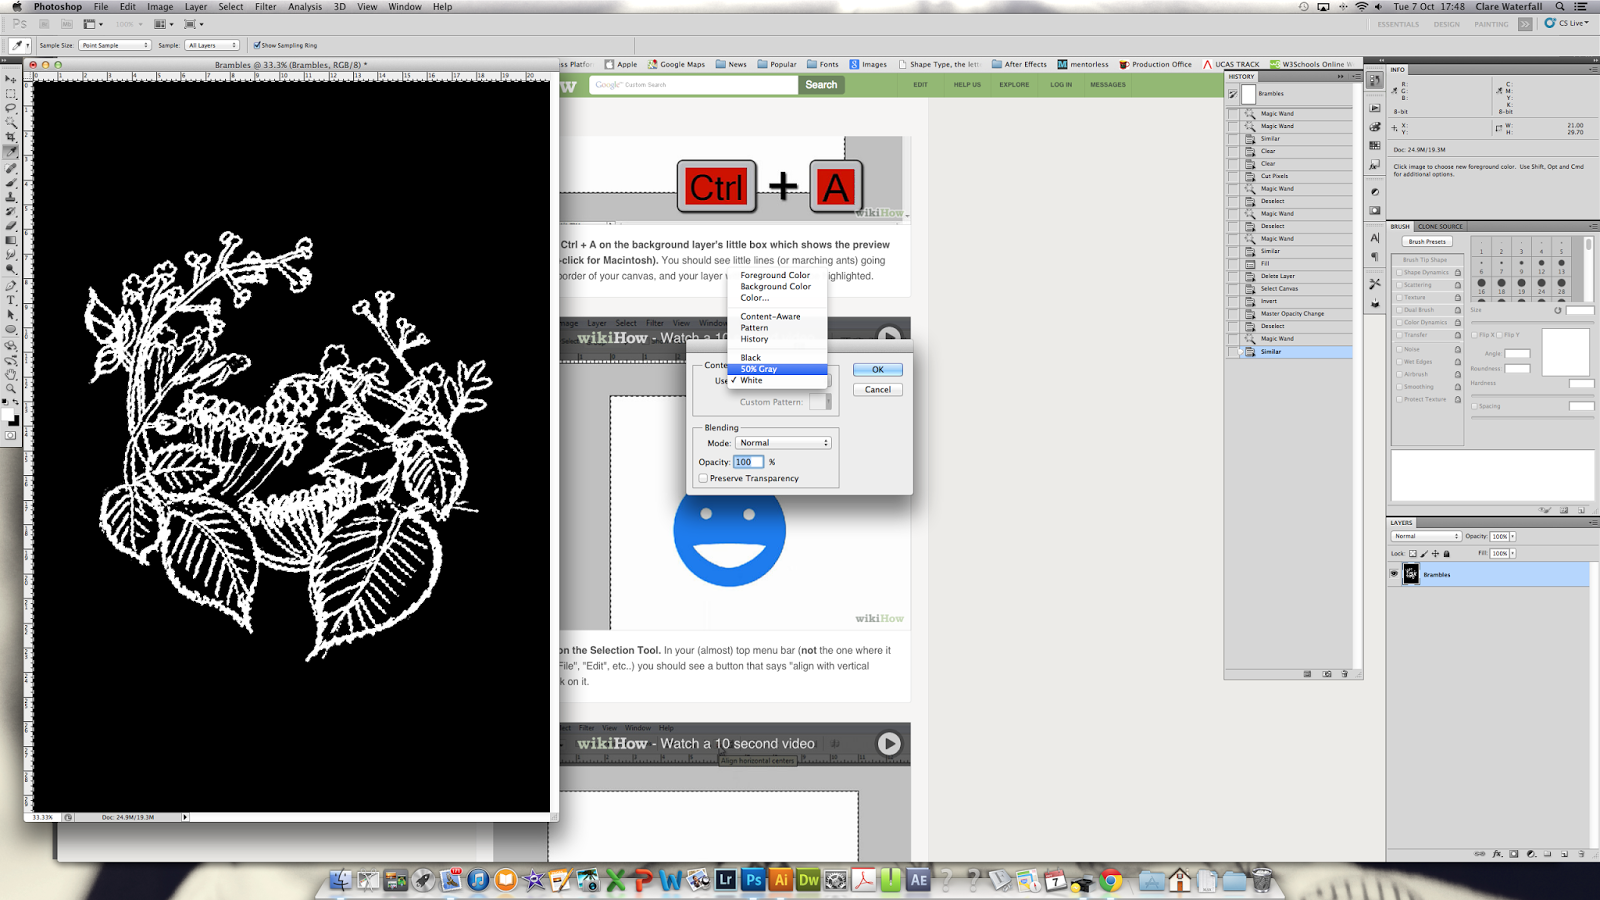 |
| From the dropdown bar select 50% grey |
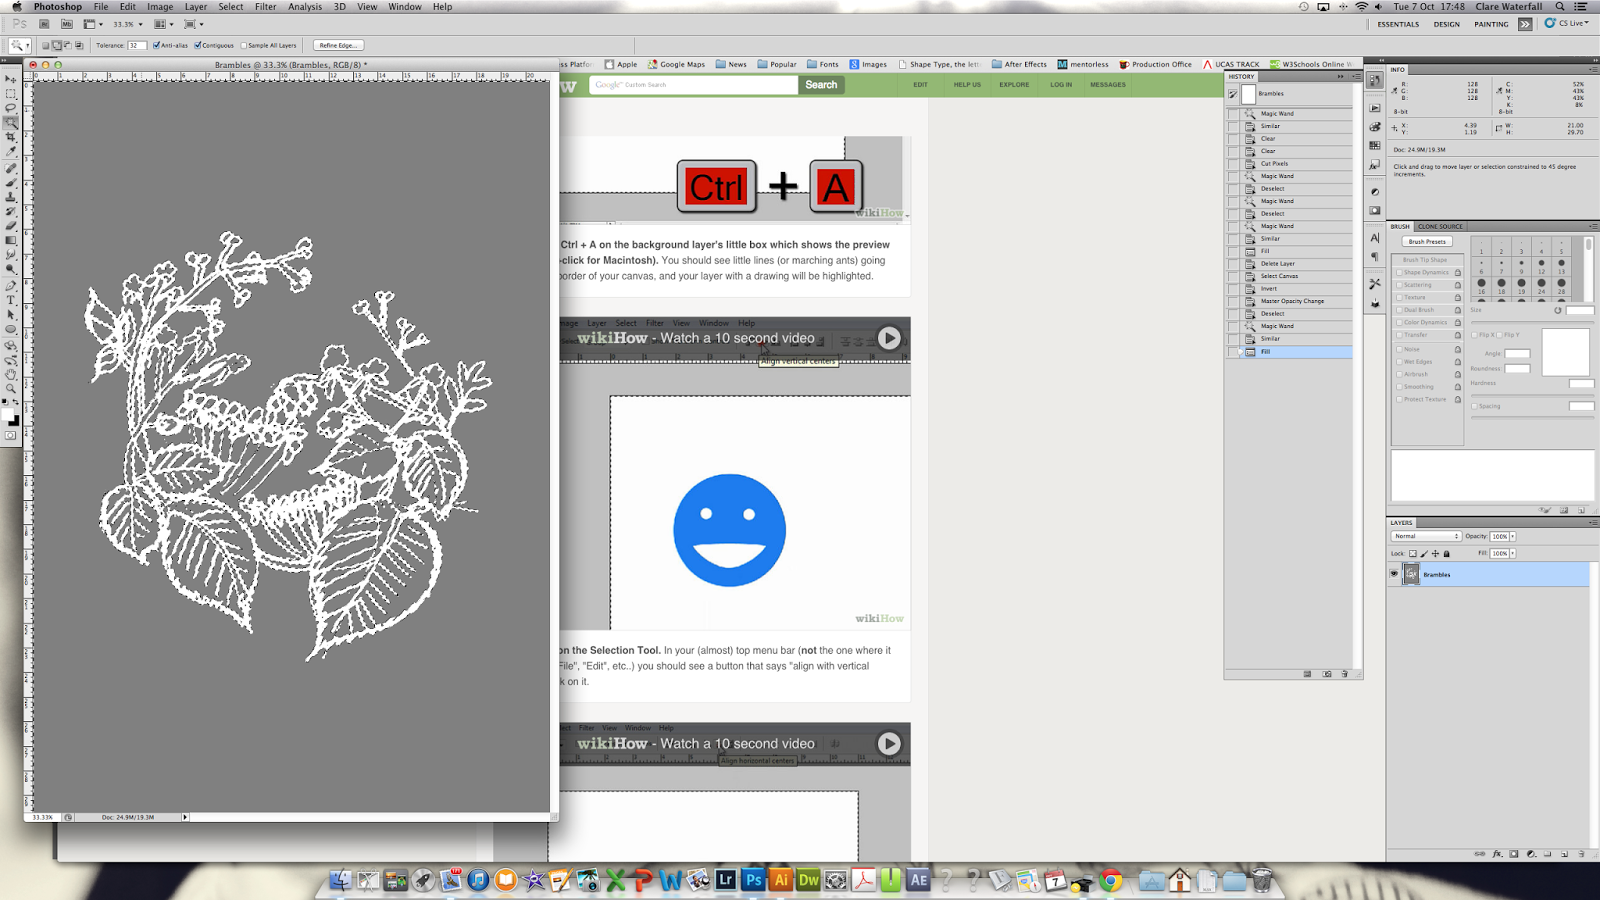 |
| Ta dahhhh... again. Home stretch now! |
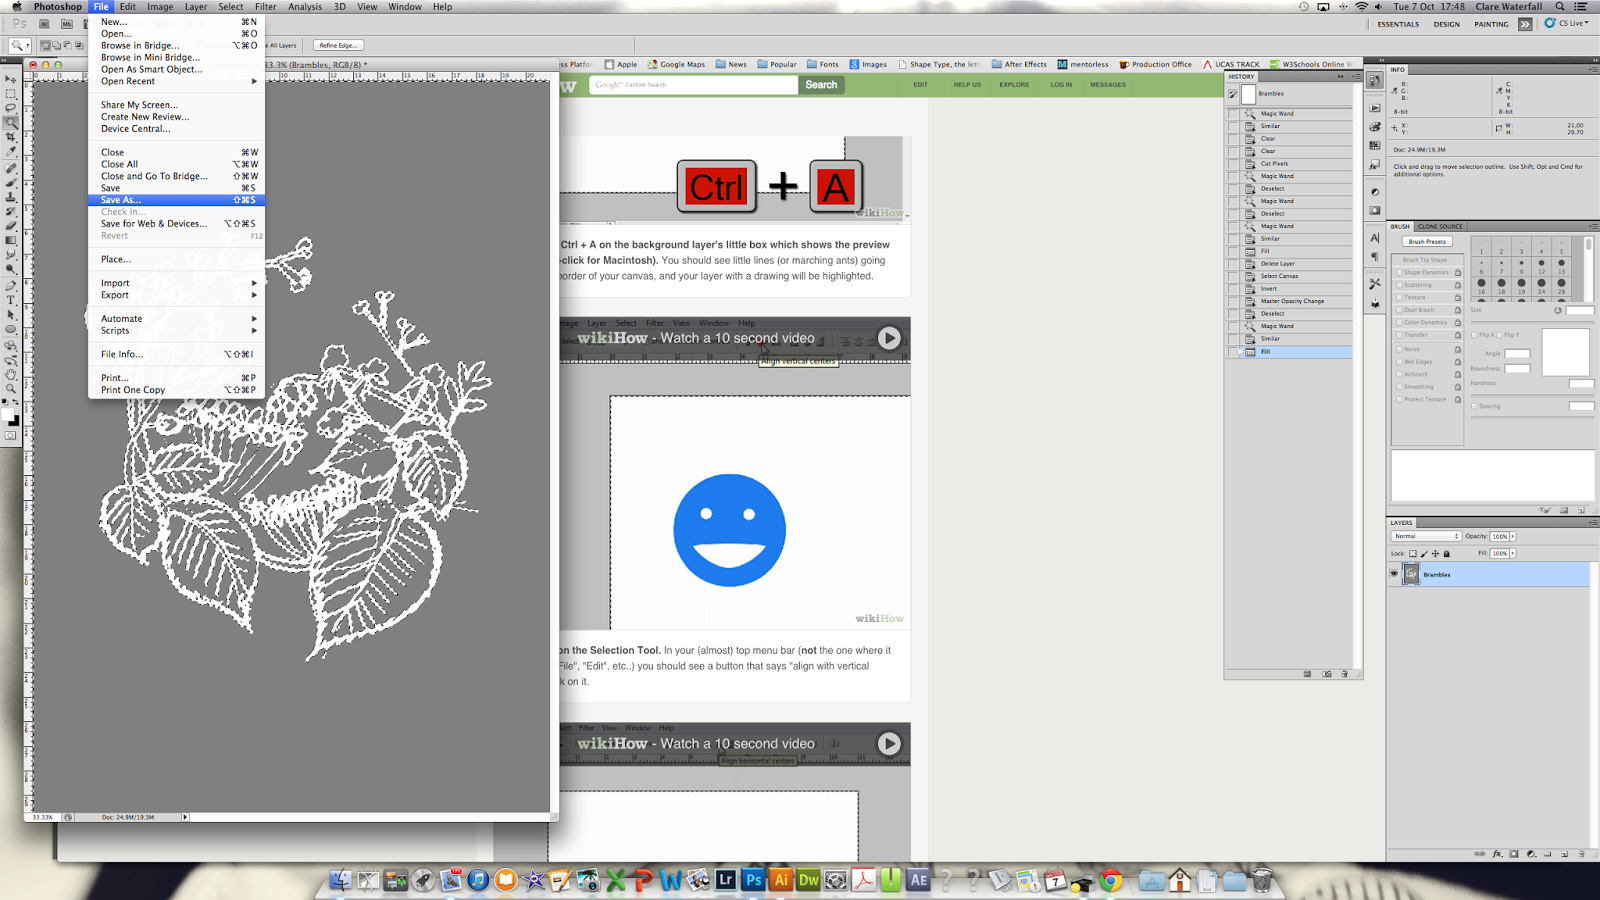 |
| If you ahve been a good girl/boy and named/ saved your file at the start, you can just Ctrl/Cmd S or File Save. If not, no worries, or if you want to change the file, go to the toolbar File > Save As |
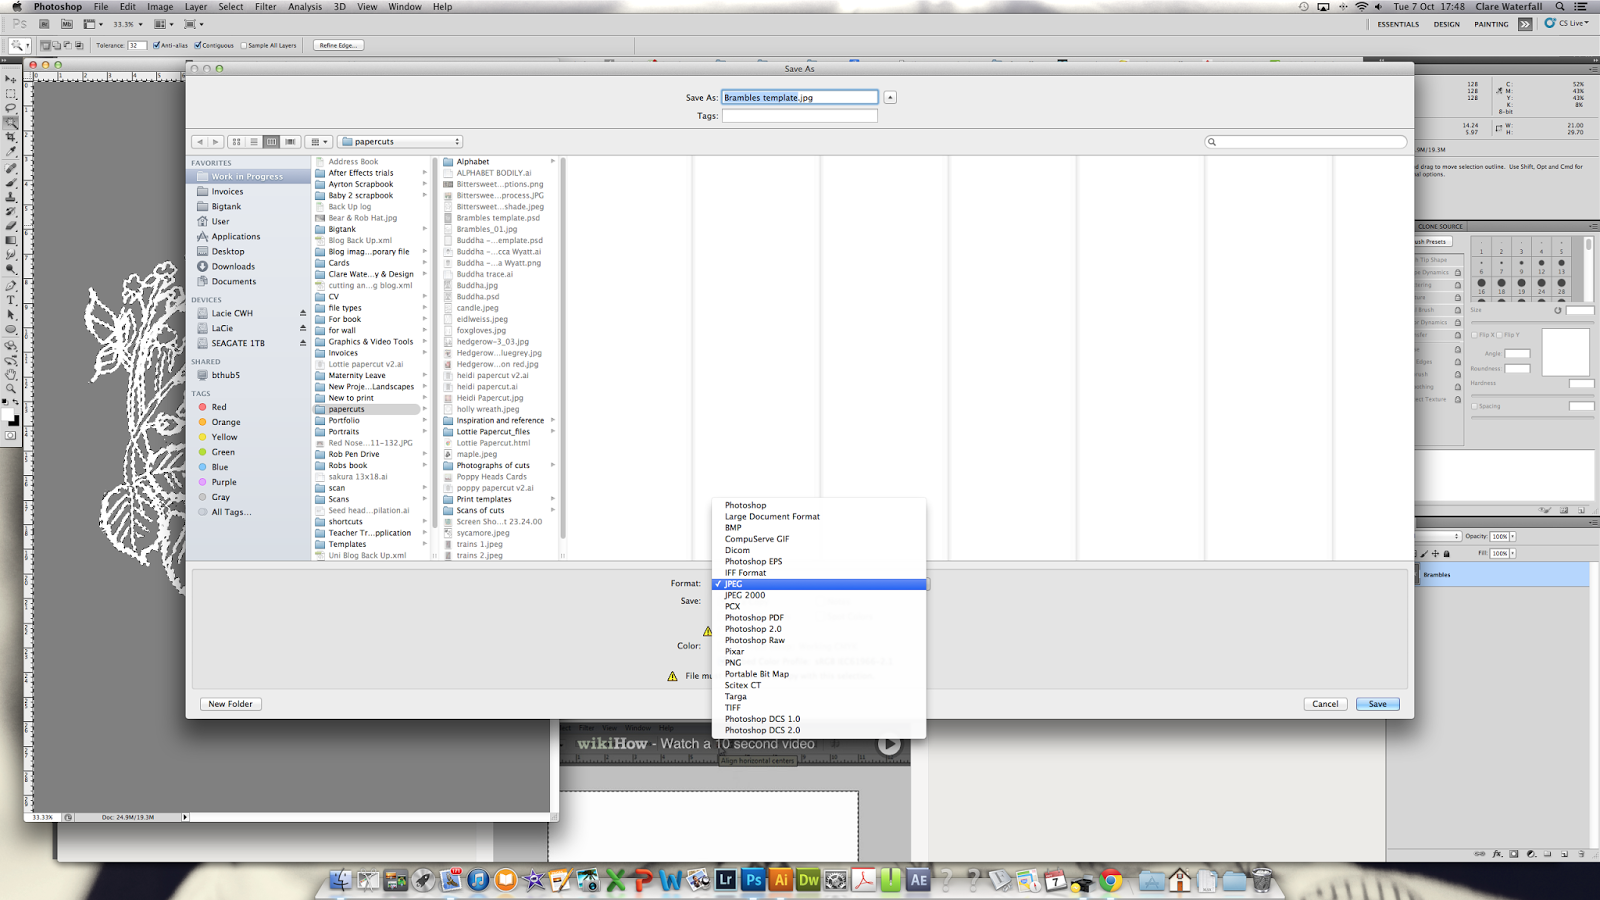 |
| Pick the file into which you want this file popping. You can change the file type to .JPG or .PNG or .PDF for simpler transfer to other computers that might not have Photoshop, for example, if you are printing at another location, school, work, college to save your home ink... shhh I didn't say that!! |
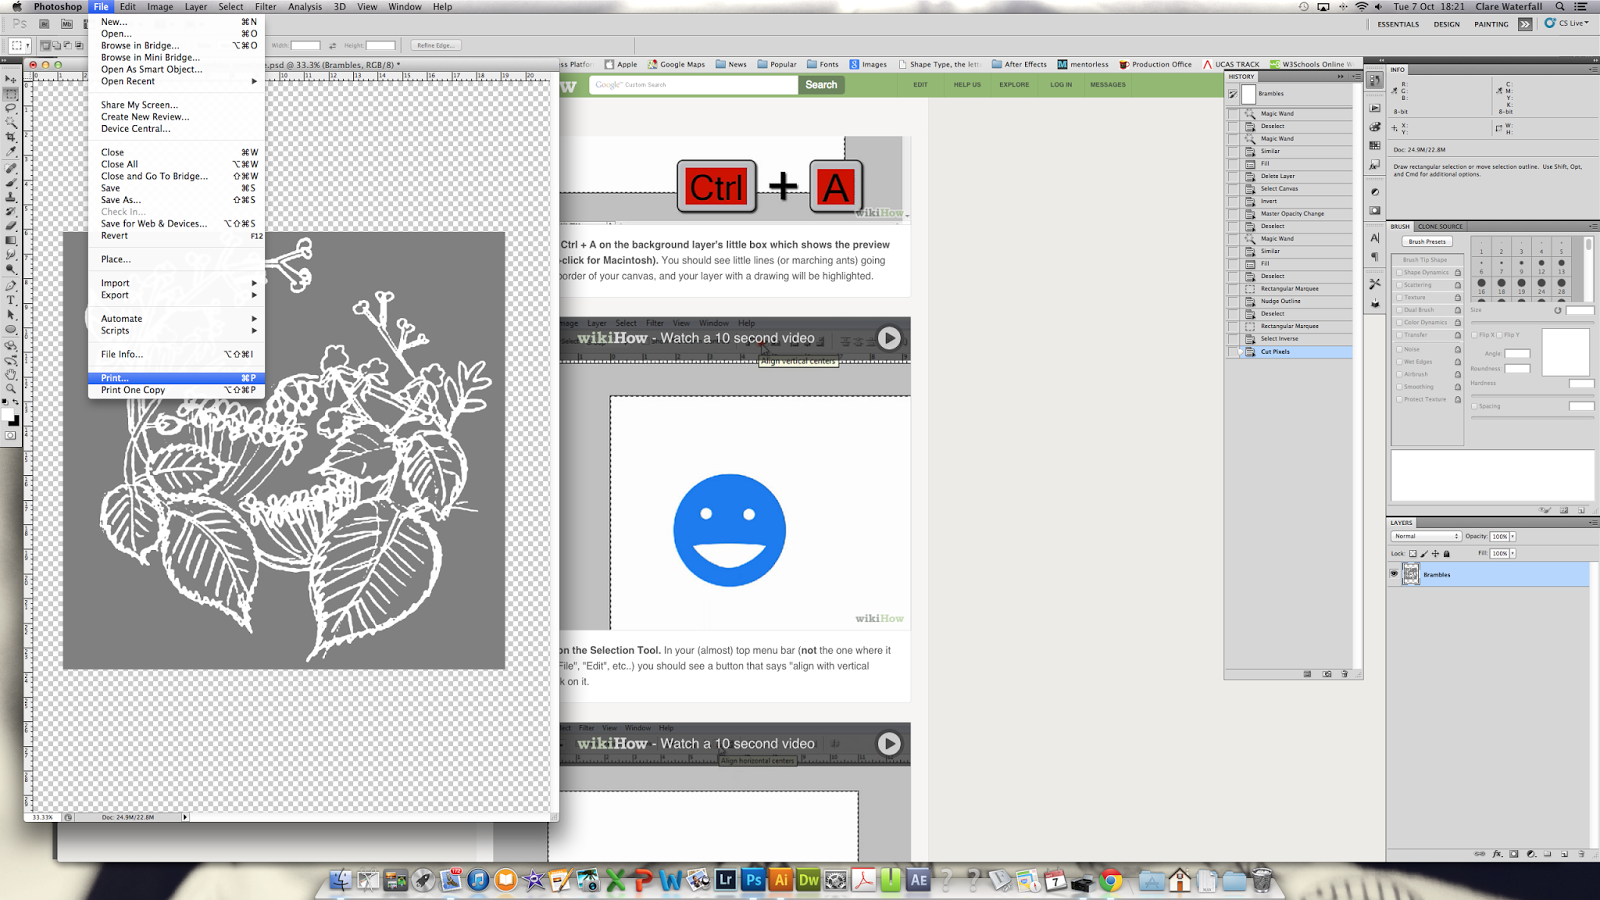 |
| Lastly, because as a former colleague once noted, I am a tree hugger. I'm not really but I HATE waste. So if you can be minful of your paper consumption it makes for a healthier world for our babies and grandbabies etc. Soooo, when you print there are a few things you can do. |
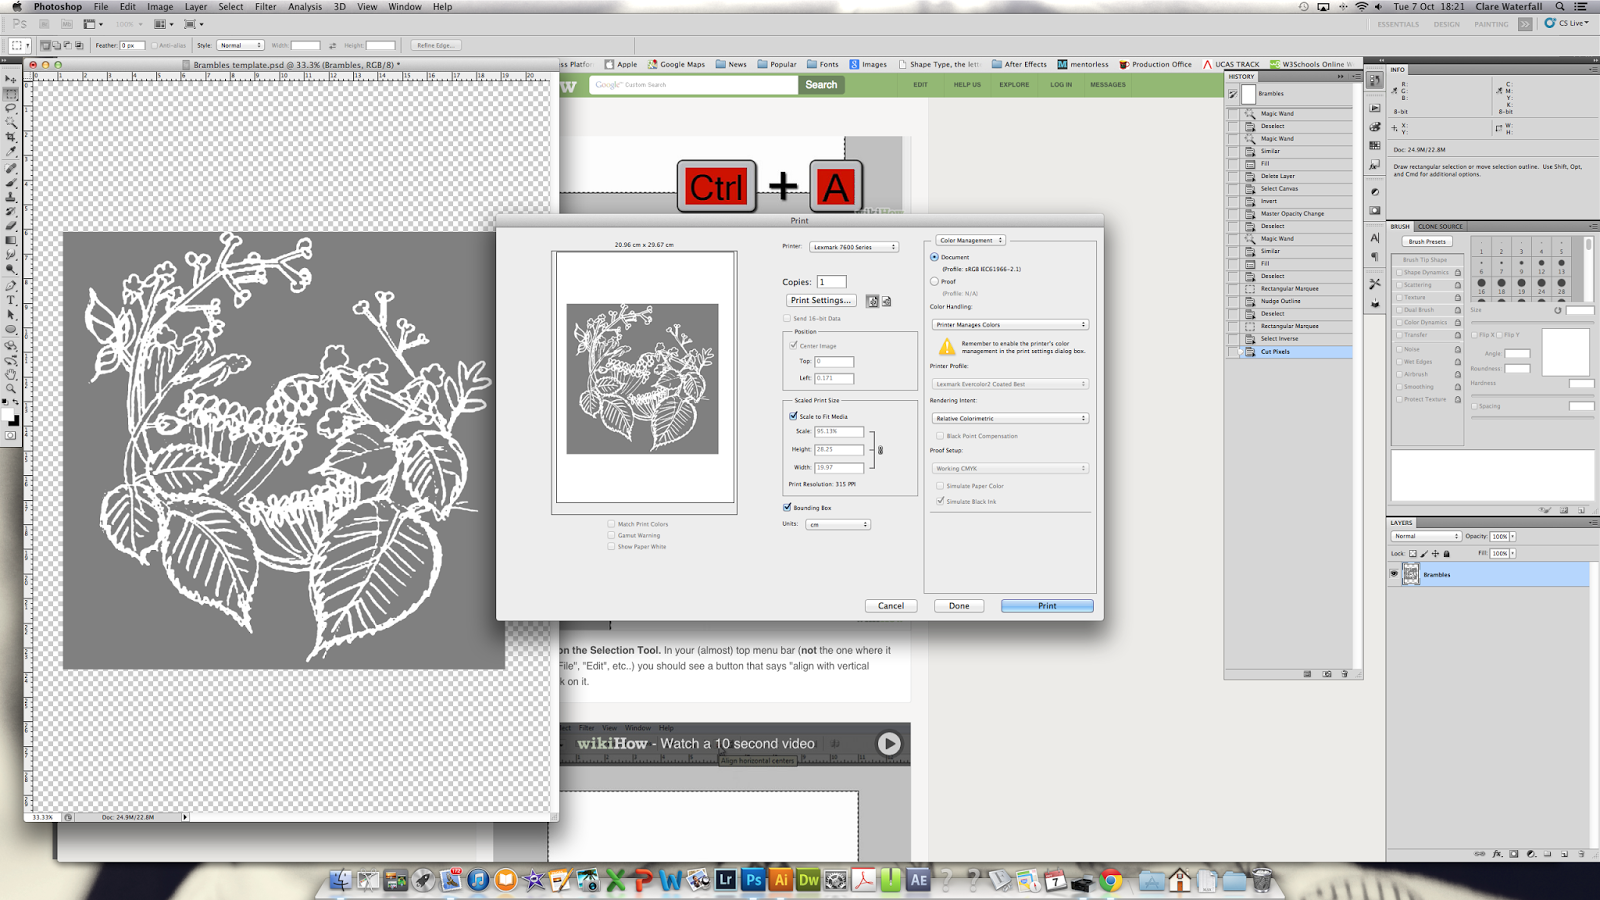 |
| You can print more than one copy on your piece of paper, if room allows, check your dimensions first though! |
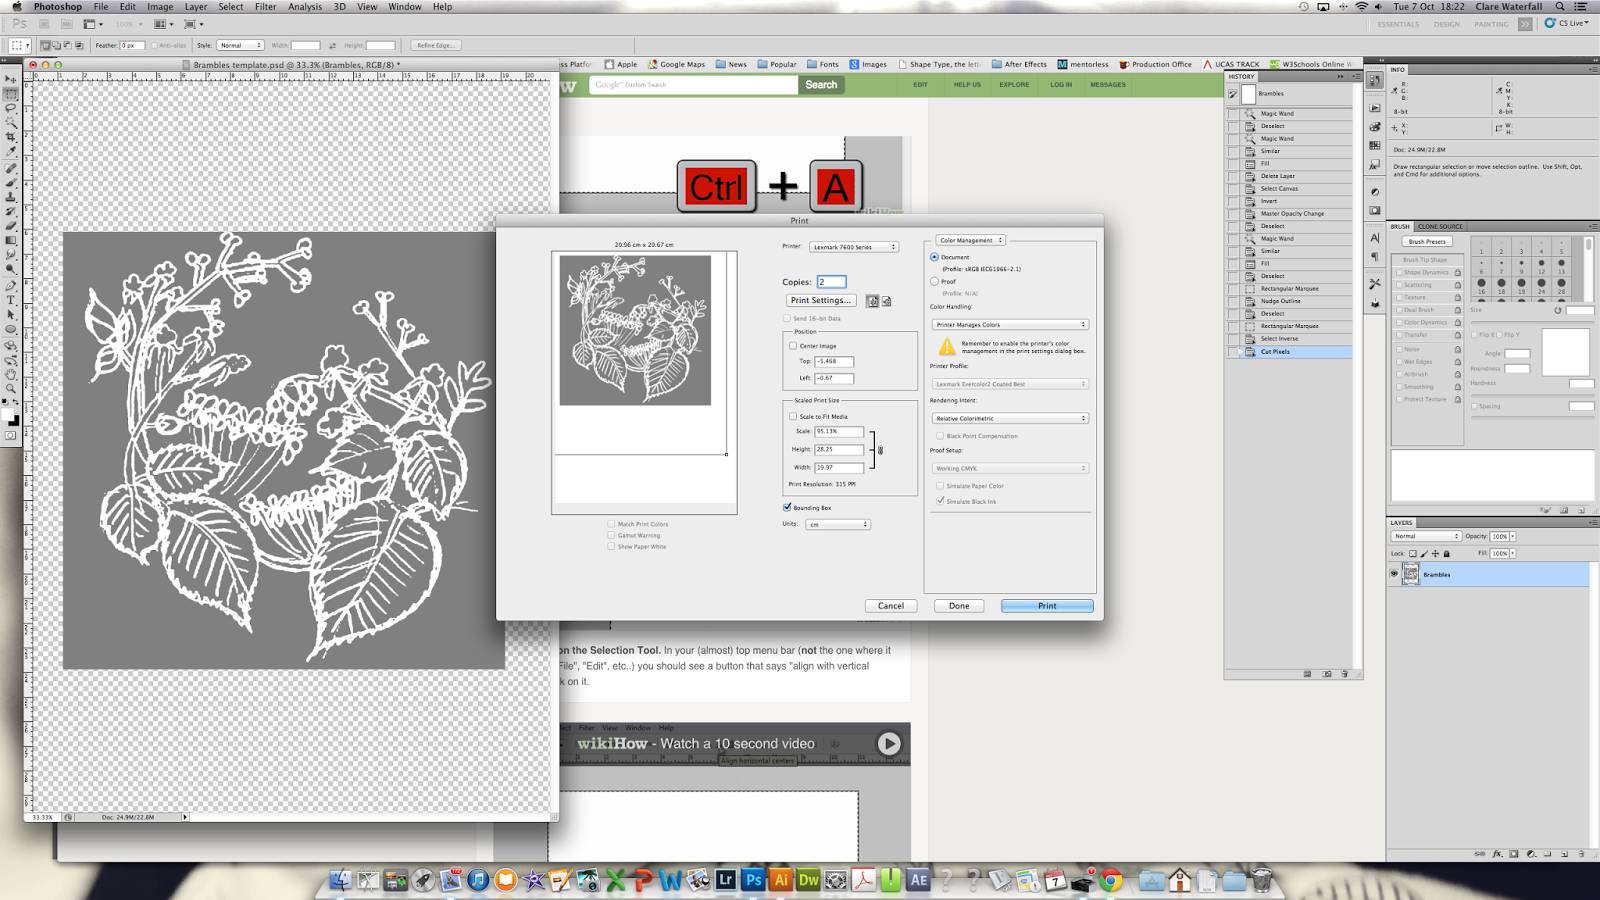 |
| If, as in this case, an A4 page cannot accommodate 2 of these designs, because you have them at a size for a specific frame, you can move the image by dragging it around in the preview area. This will mean there will be one larger trim area that can hopefully be used on smaller cuts or other craft projects. Be mindful here of print margins!! |
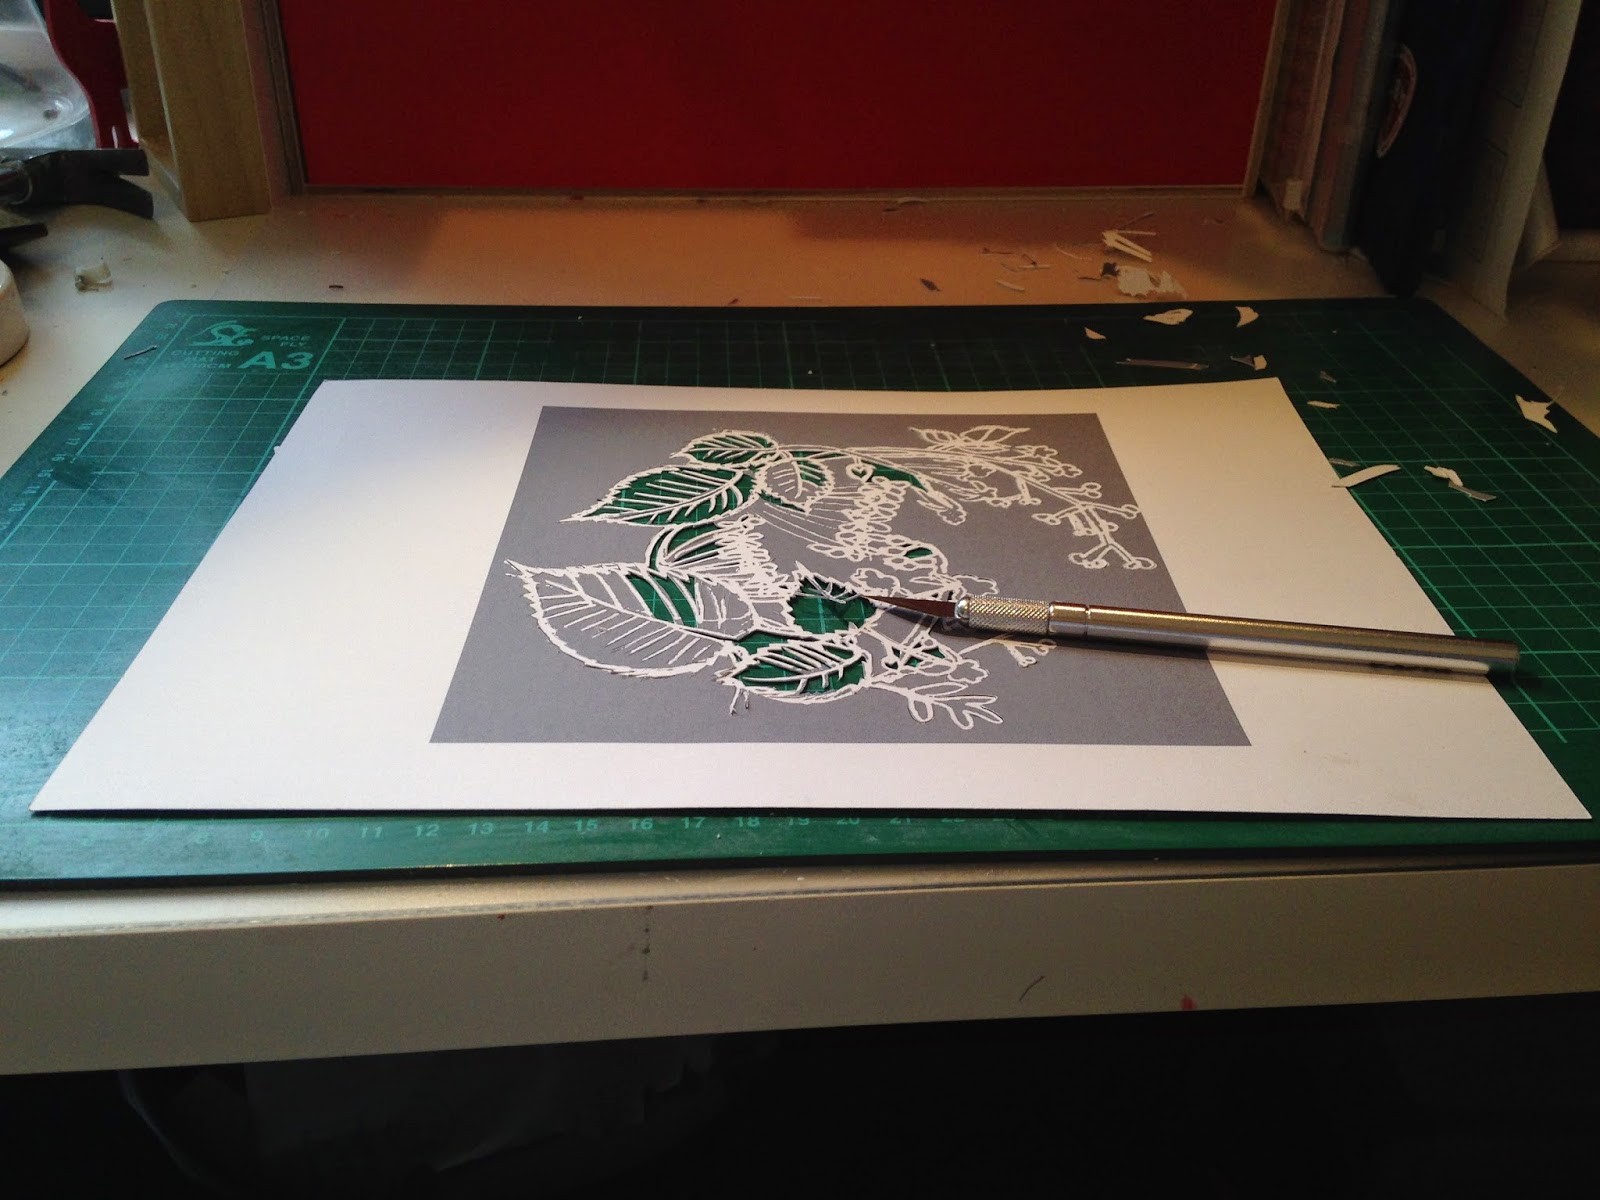 |
| Using your weapon of choice, I favour the X-Cut but have used a very nice Lacie and Swan Morton, cut away the grey areas. |
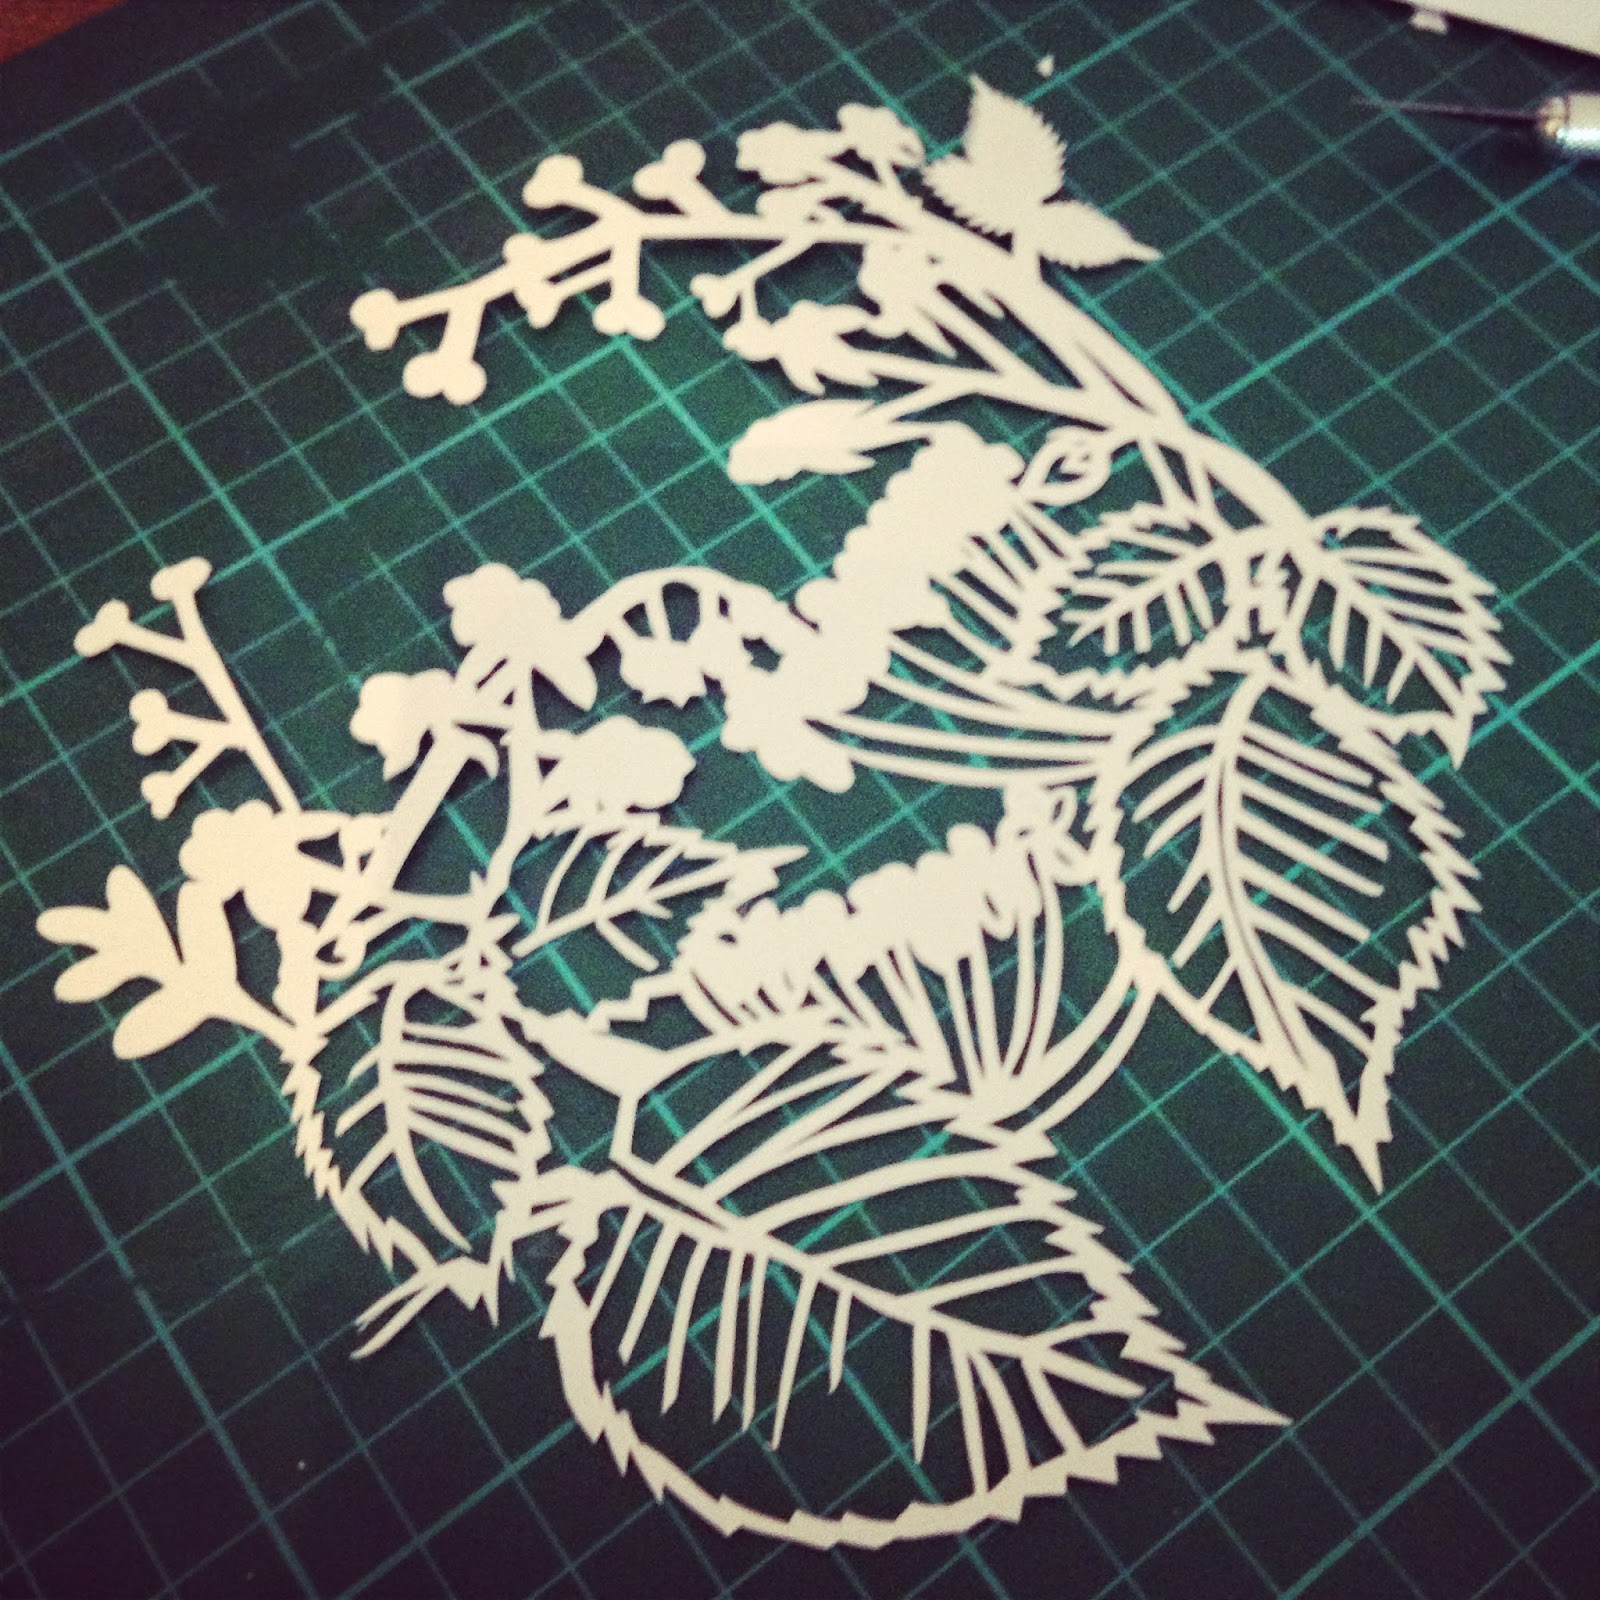 |
| So here is my cut. A true seconds entry. I want my sale version to have white leaves with the spines cut away, some details accented and it will be a mirror image of this. A new blog will demonstrate how to select some areas for cutting and others for keeping, but in the meantime please feel free to practice this method. |
After it goes live and I have a bit more time, I think I shall break it down, one post per method, save the confusion. I'll also resize the screen so there is less clutter for you. Any other suggestion that you can give on how I can improve my tutorials is GREATLY welcomed, be kind I am a Mummy on the edge :) but it will really help me to improve how I produce future tutorials.
Coming soon, video tutorials for those who prefer video.
Thank you for visiting. I am on Instagram, facebook, twitter, Etsy and soon Youtube. Links at the side if you would like to like, follow, say hello or give feed back there or in the comments below.
Thanks again xxxx


